Lexmark Pro5500 User's Guide - Page 19
Changing the Sleep timeout, Saving paper and energy, Accept, Paper Setup, Paper Type, Device Setup
 |
View all Lexmark Pro5500 manuals
Add to My Manuals
Save this manual to your list of manuals |
Page 19 highlights
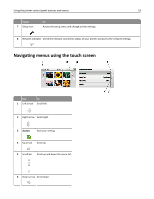
Using the printer control panel buttons and menus 19 Tips: • Use your fingers to navigate the screen. The touch screen does not work if you use other tools or devices to navigate. • Drag the scroll bar or touch the arrows until the menu or setting that you want appears on the display. • Flick the screen by dragging your finger up or down the screen, and then lifting your finger off the screen. To navigate to the next or previous screen, flick sideways. It will have the same effect as selecting the left or right arrow. • To confirm a setting or select a menu or item, touch it. • If necessary, touch OK or Accept after making a selection or changing a setting. Note: All the instructions in this guide start from the home screen. If you are not on the home screen, then touch . For example, to navigate to Paper Type and select the default paper type setting: 1 Touch > Paper Setup > Paper Type. Note: For select printer models with two paper trays installed, touch , select the paper tray, and then touch Paper Setup > Paper Type. 2 Scroll up or down (using the scroll bar or arrows, or by flicking the screen up or down) to view the list of paper types. 3 Select a paper type setting by touching it, and then touch Accept to save the setting. Changing the Sleep timeout The Sleep timeout is the time it takes for the printer to switch to Sleep mode when the printer is left idle. The Sleep feature optimizes energy efficiency by reducing the printer power consumption (as much as 28 percent on some printer models) compared to the default printer settings. To save the most energy, select the lowest Sleep timeout. 1 From the home screen, touch > Device Setup > Sleep. 2 Select a Sleep timeout, and then touch Accept. Saving paper and energy To significantly cut paper usage and reduce paper waste, activate 2‑Sided Printing: 1 From the home screen, navigate to: > Print Mode Setup > 2‑Sided Printing > On 2 Touch Accept. To optimize energy efficiency, reduce the Sleep timeout and Screen Brightness: 1 From the home screen, navigate to: > Device Setup 2 Touch Sleep or Screen Brightness, and then adjust the setting. 3 Touch Accept. Note: If you select 2‑Sided Printing, then the printer prints on both sides of the paper (duplex) for copy and fax jobs, and for printing in Windows and Macintosh, depending on your printer model.
-
 1
1 -
2
-
3
-
4
-
5
-
6
-
7
-
8
-
9
-
10
-
11
-
12
-
13
-
 14
14 -
 15
15 -
 16
16 -
 17
17 -
 18
18 -
 19
19 -
 20
20 -
 21
21 -
 22
22 -
 23
23 -
 24
24 -
25
-
26
-
27
-
28
-
29
-
30
-
31
-
32
-
33
-
34
-
35
-
36
-
37
-
38
-
39
-
40
-
41
-
42
-
43
-
44
-
45
-
46
-
47
-
48
-
49
-
50
-
51
-
52
-
53
-
54
-
55
-
56
-
57
-
58
-
59
-
60
-
61
-
62
-
63
-
64
-
65
-
66
-
67
-
68
-
69
-
70
-
71
-
72
-
73
-
74
-
75
-
76
-
77
-
78
-
79
-
80
-
81
-
82
-
83
-
84
-
85
-
86
-
87
-
88
-
89
-
90
-
91
-
92
-
93
-
94
-
95
-
96
-
97
-
98
-
99
-
100
-
101
-
102
-
103
-
104
-
105
-
106
-
107
-
108
-
109
-
110
-
111
-
112
-
113
-
114
-
115
-
116
-
117
-
118
-
119
-
120
-
121
-
122
-
123
-
124
-
125
-
126
-
127
-
128
-
129
-
130
-
131
-
132
-
133
-
134
-
135
-
136
-
137
-
138
-
139
-
140
-
141
-
142
-
143
-
144
-
145
-
146
-
147
-
148
-
149
-
150
-
151
-
152
-
153
-
154
-
155
-
156
-
157
-
158
-
159
-
160
-
161
-
162
-
163
-
164
-
165
-
166
-
167
-
168
-
169
-
170
-
171
-
172
-
173
-
174
-
175
-
176
-
177
-
178
-
179
-
180
-
181
-
182
-
183
-
184
-
185
-
186
-
187
-
188
-
189
 |
 |
