Lexmark T612 Setup Guide (1.4 MB) - Page 25
Step 6, Con Network Printer
 |
UPC - 000073504283
View all Lexmark T612 manuals
Add to My Manuals
Save this manual to your list of manuals |
Page 25 highlights
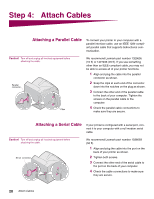
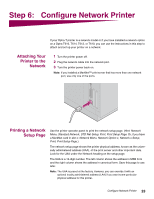
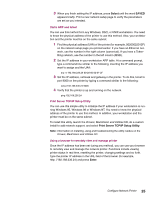
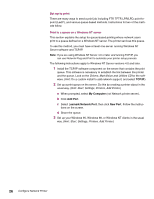
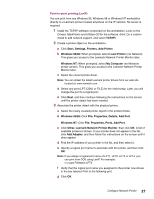
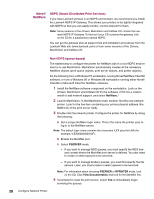
Step 6: Configure Network Printer If your Optra T printer is a network model or if you have installed a network option on a Optra T616, T614, T612, or T610, you can use the instructions in this step to attach and set up your printer on a network. Attaching Your Printer to the Network 1 Turn the printer power off. 2 Plug the network cable into the network port. 3 Turn the printer power back on. Note: If you installed a MarkNet™ print server that has more than one network port, use only one of the ports. Printing a Network Setup Page Use the printer operator panel to print the network setup page. (Hint: Network Menu, Standard Network, STD Net Setup, Print, Print Setup Page. Or, if you have a MarkNet card in slot x: Network Menu, Network Option x, Network x Setup, Print, Print Setup Page.) The network setup page shows the printer physical address, known as the universally administered address (UAA), of the print server and other important data. Look for the UAA under the Network heading on the setup page. The UAA is a 12-digit number. The left column shows the address in MSB form and the right column shows the address in canonical form. Save this page to use later. Note: The UAA is preset at the factory. However, you can override it with an optional locally administered address (LAA) if you want some particular physical address for this printer. Configure Network Printer 23
-
 1
1 -
2
-
3
-
4
-
5
-
6
-
7
-
8
-
9
-
10
-
11
-
12
-
13
-
14
-
15
-
16
-
17
-
18
-
19
-
 20
20 -
 21
21 -
 22
22 -
 23
23 -
 24
24 -
 25
25 -
 26
26 -
 27
27 -
 28
28 -
 29
29 -
 30
30 -
31
-
32
-
33
-
34
-
35
-
36
-
37
 |
 |