Lexmark W820 Setup Guide - Page 25
Attaching the locking clips, Pull the tray out fully.
 |
UPC - 734646210508
View all Lexmark W820 manuals
Add to My Manuals
Save this manual to your list of manuals |
Page 25 highlights
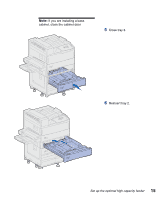
Attaching the locking clips The locking clips keep the printer and the high capacity feeder properly aligned, helping to prevent them from being separated accidently. 1 Remove tray 2. a Pull the tray out fully. b Tilt the front of the tray upward. c Gently pull the tray out. Set up the optional high capacity feeder 13
-
 1
1 -
2
-
3
-
4
-
5
-
6
-
7
-
8
-
9
-
10
-
11
-
12
-
13
-
14
-
15
-
16
-
17
-
18
-
19
-
 20
20 -
 21
21 -
 22
22 -
 23
23 -
 24
24 -
 25
25 -
 26
26 -
 27
27 -
 28
28 -
 29
29 -
 30
30 -
31
-
32
-
33
-
34
-
35
-
36
-
37
-
38
-
39
-
40
-
41
-
42
-
43
-
44
-
45
-
46
-
47
-
48
-
49
-
50
-
51
-
52
-
53
-
54
-
55
-
56
-
57
-
58
-
59
-
60
-
61
-
62
-
63
-
64
-
65
-
66
-
67
-
68
-
69
-
70
-
71
-
72
-
73
-
74
-
75
-
76
-
77
-
78
-
79
-
80
-
81
-
82
-
83
-
84
-
85
-
86
-
87
-
88
-
89
-
90
-
91
-
92
-
93
-
94
-
95
-
96
-
97
-
98
-
99
-
100
-
101
-
102
-
103
-
104
-
105
-
106
-
107
-
108
-
109
-
110
-
111
-
112
-
113
-
114
-
115
-
116
-
117
-
118
-
119
-
120
-
121
-
122
-
123
-
124
-
125
-
126
 |
 |

13
Set up the optional high capacity feeder
Attaching the locking clips
The locking clips keep the printer and
the high capacity feeder properly
aligned, helping to prevent them from
being separated accidently.
1
Remove tray 2.
a
Pull the tray out fully.
b
Tilt the front of the tray upward.
c
Gently pull the tray out.