Lexmark X340n User's Guide - Page 59
Understanding Scan options, Profiles, Quick Setup, Custom, Format Type, Compression, Default Content
 |
View all Lexmark X340n manuals
Add to My Manuals
Save this manual to your list of manuals |
Page 59 highlights
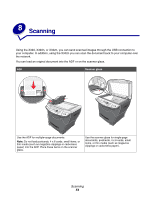
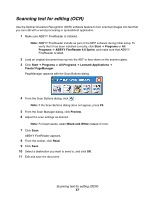
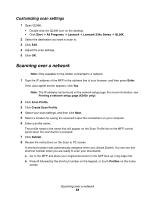
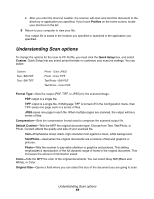
c After you enter the shortcut number, the scanner will scan and send the document to the directory or application you specified. If you touch Profiles on the home screen, locate your shortcut on the list. 9 Return to your computer to view your file. Your output file is saved in the location you specified or launched in the application you specified. Understanding Scan options To change the options for the scan to PC Profile, you must click the Quick Setup box, and select Custom. Quick Setup lets you select preset formats or customize your scan job settings. You can select: Custom Text - BW PDF Text - BW TIFF Photo - Color JPEG Photo - Color TIFF Text/Photo - BW PDF Text/Photo - Color PDF Format Type-Sets the output (PDF, TIFF, or JPEG) for the scanned image. PDF output is a single file. TIFF output is a single file. If Multi-page TIFF is turned off in the Configuration menu, then TIFF saves one page each in a series of files. JPEG saves one page in each file. When multiple pages are scanned, the output will be a series of files. Compression-Sets the compression format used to compress the scanned output file. Default Content-Tells the MFP the original document type. Choose from Text, Text/Photo, or Photo. Content affects the quality and size of your scanned file. Text-Emphasizes sharp, black, high-resolution text against a clean, white background. Text/Photo-Used when the original documents are a mixture of text and graphics or pictures. Photo-Tells the scanner to pay extra attention to graphics and pictures. This setting emphasizes a reproduction of the full dynamic range of tones in the original document. This increases the amount of information saved. Color-Tells the MFP the color of the original documents. You can select Gray, BW (Black and White), or Color. Original Size-Opens a field where you can select the size of the document you are going to scan. Understanding Scan options 59
-
 1
1 -
2
-
3
-
4
-
5
-
6
-
7
-
8
-
9
-
10
-
11
-
12
-
13
-
14
-
15
-
16
-
17
-
18
-
19
-
20
-
21
-
22
-
23
-
24
-
25
-
26
-
27
-
28
-
29
-
30
-
31
-
32
-
33
-
34
-
35
-
36
-
37
-
38
-
39
-
40
-
41
-
42
-
43
-
44
-
45
-
46
-
47
-
48
-
49
-
50
-
51
-
52
-
53
-
 54
54 -
 55
55 -
 56
56 -
 57
57 -
 58
58 -
 59
59 -
 60
60 -
 61
61 -
 62
62 -
 63
63 -
 64
64 -
65
-
66
-
67
-
68
-
69
-
70
-
71
-
72
-
73
-
74
-
75
-
76
-
77
-
78
-
79
-
80
-
81
-
82
-
83
-
84
-
85
-
86
-
87
-
88
-
89
-
90
-
91
-
92
-
93
-
94
-
95
-
96
-
97
-
98
-
99
-
100
-
101
-
102
-
103
-
104
-
105
 |
 |
