Lexmark X340n User's Guide - Page 86
AaBbCc, MACHINE SETUP, Toner Dark
 |
View all Lexmark X340n manuals
Add to My Manuals
Save this manual to your list of manuals |
Page 86 highlights
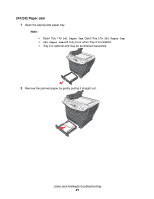
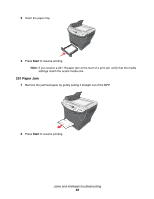
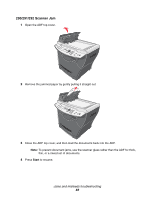
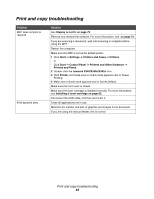
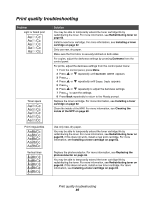
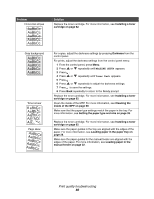
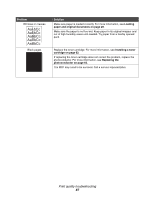
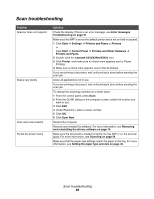
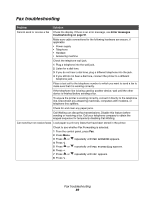
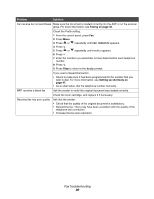
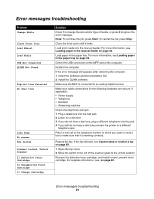
Problem Horizontal stripes AaBbCc AaBbCc AaBbCc AaBbCc AaBbCc Gray background AaBbCc AaBbCc AaBbCc AaBbCc AaBbCc Toner smear Page skew AAAAaAaaaBaBBBbBbbbCbCCCCccccc Solution Replace the toner cartridge. For more information, see Installing a toner cartridge on page 62. For copies, adjust the darkness settings by pressing Darkness from the control panel. For prints, adjust the darkness settings from the control panel menu: 1 From the control panel, press Menu. 2 Press or repeatedly until MACHINE SETUP appears. 3 Press . 4 Press or repeatedly until Toner Dark appears. 5 Press . 6 Press or repeatedly to adjust the darkness settings. 7 Press to save the settings. 8 Press Back repeatedly to return to the Ready prompt. Replace the toner cartridge. For more information, see Installing a toner cartridge on page 62. Clean the inside of the MFP. For more information, see Cleaning the inside of the MFP on page 68. Make sure that the paper type settings match the paper in the tray. For more information, see Setting the paper type and size on page 35. Replace the toner cartridge. For more information, see Installing a toner cartridge on page 62. Make sure the paper guides in the tray are aligned with the edges of the paper. For more information, see Loading paper in the paper tray on page 28. Make sure the paper guides for the manual feeder are aligned with the edges of the paper. For more information, see Loading paper in the manual feeder on page 32. Print quality troubleshooting 86
-
 1
1 -
2
-
3
-
4
-
5
-
6
-
7
-
8
-
9
-
10
-
11
-
12
-
13
-
14
-
15
-
16
-
17
-
18
-
19
-
20
-
21
-
22
-
23
-
24
-
25
-
26
-
27
-
28
-
29
-
30
-
31
-
32
-
33
-
34
-
35
-
36
-
37
-
38
-
39
-
40
-
41
-
42
-
43
-
44
-
45
-
46
-
47
-
48
-
49
-
50
-
51
-
52
-
53
-
54
-
55
-
56
-
57
-
58
-
59
-
60
-
61
-
62
-
63
-
64
-
65
-
66
-
67
-
68
-
69
-
70
-
71
-
72
-
73
-
74
-
75
-
76
-
77
-
78
-
79
-
80
-
 81
81 -
 82
82 -
 83
83 -
 84
84 -
 85
85 -
 86
86 -
 87
87 -
 88
88 -
 89
89 -
 90
90 -
 91
91 -
92
-
93
-
94
-
95
-
96
-
97
-
98
-
99
-
100
-
101
-
102
-
103
-
104
-
105
 |
 |
