Lexmark X3550 User's Guide - Page 50
Printing all photos, Printing photos by number, Start Color, Start Black, Warning
 |
UPC - 734646022767
View all Lexmark X3550 manuals
Add to My Manuals
Save this manual to your list of manuals |
Page 50 highlights
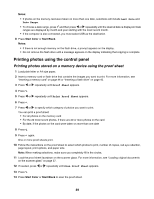
15 Load photo paper with the glossy or printable side facing you. (If you are not sure which side is the printable side, see the instructions that came with the paper.) For more information, see "Loading paper" on page 34. Note: Make sure the paper matches the size you selected on the proof sheet. 16 Press Start Color or Start Black to print your photos. Warning: Do not remove the memory card or flash drive, or turn off the printer, until the photos you selected in the photo proof sheet have been printed. The proof sheet becomes invalid when the memory card or flash drive is removed from the printer, or any time the printer is turned off. Printing all photos 1 Load photo paper with the glossy or printable side facing you. (If you are not sure which side is the printable side, see the instructions that came with the paper.) For more information, see "Loading paper" on page 34. 2 Insert a memory card or flash drive that contains the images you want to print. For more information, see "Inserting a memory card" on page 44 or "Inserting a flash drive" on page 45. 3 Press or repeatedly until Print Photos appears. 4 Press . 5 Press or repeatedly until Print All Photos appears. 6 Press Start Color or Start Black. The print settings used on the print job are displayed sequentially on the second line of the display. 7 Press Start Color or Start Black again. Printing photos by number You can print photos using the numbers assigned to them on a photo proof sheet. If you want to print photos by photo number, you must first print a proof sheet. For more information, see "Printing photos stored on a memory device using the proof sheet" on page 49. 1 Load photo paper with the glossy or printable side facing you. (If you are not sure which side is the printable side, see the instructions that came with the paper.) For more information, see "Loading paper" on page 34. 2 Insert a memory card or flash drive that contains the images you want to print. For more information, see "Inserting a memory card" on page 44 or "Inserting a flash drive" on page 45. 3 Press or repeatedly until Print Photos appears. 4 Press . 5 Press or repeatedly until Photo Number appears. 6 Press . 7 Press or repeatedly until the photo number you want appears. 8 Press to select a photo. Note: When you select a photo, an asterisk (*) appears to the left of the number on the second line of the display. 9 If you want to select additional photos, press or to reach the number, and then press 50
-
 1
1 -
2
-
3
-
4
-
5
-
6
-
7
-
8
-
9
-
10
-
11
-
12
-
13
-
14
-
15
-
16
-
17
-
18
-
19
-
20
-
21
-
22
-
23
-
24
-
25
-
26
-
27
-
28
-
29
-
30
-
31
-
32
-
33
-
34
-
35
-
36
-
37
-
38
-
39
-
40
-
41
-
42
-
43
-
44
-
 45
45 -
 46
46 -
 47
47 -
 48
48 -
 49
49 -
 50
50 -
 51
51 -
 52
52 -
 53
53 -
 54
54 -
 55
55 -
56
-
57
-
58
-
59
-
60
-
61
-
62
-
63
-
64
-
65
-
66
-
67
-
68
-
69
-
70
-
71
-
72
-
73
-
74
-
75
-
76
-
77
-
78
-
79
-
80
-
81
-
82
-
83
-
84
-
85
-
86
-
87
-
88
-
89
-
90
-
91
-
92
-
93
-
94
-
95
-
96
-
97
-
98
-
99
-
100
-
101
-
102
-
103
-
104
-
105
-
106
-
107
-
108
-
109
 |
 |