Lexmark X658 Quick Reference - Page 4
Copying
 |
View all Lexmark X658 manuals
Add to My Manuals
Save this manual to your list of manuals |
Page 4 highlights
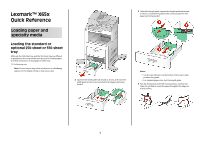
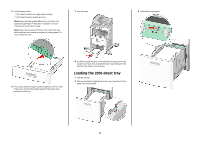
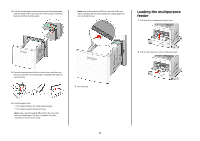
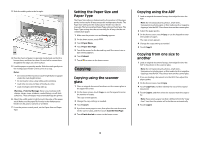
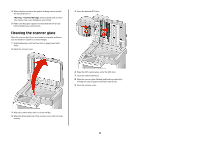
3 Slide the width guide to the far right. 4 Flex the sheets of paper or specialty media back and forth to loosen them, and then fan them. Do not fold or crease them. Straighten the edges on a level surface. 5 Load the paper or specialty media. Slide the stack gently into the multipurpose feeder until it comes to a stop. Notes: • Do not exceed the maximum stack height by forcing paper under the stack height limiter. • Do not load or close a tray while a job is printing. • Load only one size and type of media at a time. • Load envelopes with the flap side up. Warning-Potential Damage: Never use envelopes with stamps, clasps, snaps, windows, coated linings, or self-stick adhesives. These envelopes may severely damage the printer. 6 Adjust the width guide to lightly touch the edge of the paper stack. Make sure the paper fits loosely in the multipurpose feeder, lies flat, and is not bent or wrinkled. 7 From the printer control panel, set the Paper Size and Paper Type. Setting the Paper Size and Paper Type The Paper Size setting is determined by the position of the paper guides in the tray for all trays except the multipurpose feeder. The Paper Size setting for the multipurpose feeder must be set manually. The factory default Paper Type setting is Plain Paper. The Paper Type setting must be set manually for all trays that do not contain plain paper. 1 Make sure the printer is on and Ready appears. 2 On the home screen, touch . 3 Touch Paper Menu. 4 Touch Paper Size/Type. 5 Touch the arrows for the desired tray until the correct size or type setting appears. 6 Touch Submit. 7 Touch to return to the home screen. Copying Copying using the scanner glass 1 Place an original document facedown on the scanner glass in the upper left corner. 2 On the home screen, touch Copy, or use the keypad to enter the number of copies. The copy screen appears. 3 Change the copy settings as needed. 4 Touch Copy It. 5 If you have more pages to scan, then place the next document on the scanner glass, and then touch Scan the Next Page. 6 Touch Finish the Job to return to the home screen. Copying using the ADF 1 Load an original document faceup, short edge first into the ADF. Note: Do not load postcards, photos, small items, transparencies, photo paper, or thin media (such as magazine clippings) into the ADF. Place these items on the scanner glass. 2 Adjust the paper guides. 3 On the home screen, touch Copy, or use the keypad to enter the number of copies. The copy screen appears. 4 Change the copy settings as needed. 5 Touch Copy It. Copying from one size to another 1 Load an original document faceup, short edge first into the ADF or facedown on the scanner glass. Note: Do not load postcards, photos, small items, transparencies, photo paper, or thin media (such as magazine clippings) into the ADF. Place these items on the scanner glass. 2 If you are loading a document into the ADF, then adjust the paper guides. 3 On the home screen, touch Copy. 4 Touch Copy from, and then identify the size of the original document. 5 Touch Copy to, and then select the size you want the copy to be. Note: If you select a paper size that is different from the "Copy from" size, then the printer will scale the size automatically. 6 Touch Copy It. 4
-
 1
1 -
 2
2 -
 3
3 -
 4
4 -
 5
5 -
 6
6 -
 7
7 -
 8
8
 |
 |
