Lexmark X658 Quick Reference - Page 8
Cleaning the scanner glass - white paper
 |
View all Lexmark X658 manuals
Add to My Manuals
Save this manual to your list of manuals |
Page 8 highlights
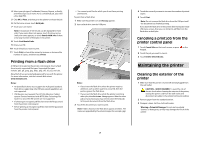
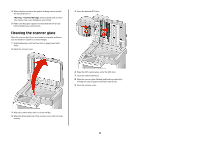
4 Wipe only the outside of the printer, making sure to include the standard exit bin. Warning-Potential Damage: Using a damp cloth to clean the interior may cause damage to your printer. 5 Make sure the paper support and standard exit bin are dry before beginning a new print job. Cleaning the scanner glass Clean the scanner glass if you encounter print quality problems, such as streaks on copied or scanned images. 1 Slightly dampen a soft, lint-free cloth or paper towel with water. 2 Open the scanner cover. 5 Open the bottom ADF door. 6 Wipe the ADF scanner glass under the ADF door. 7 Close the bottom ADF door. 8 Wipe the scanner glass (flatbed) and backing material by moving the cloth or paper towel from side to side. 9 Close the scanner cover. 3 Wipe the scanner glass until it is clean and dry. 4 Wipe the white underside of the scanner cover until it is clean and dry. 8
-
 1
1 -
2
-
 3
3 -
 4
4 -
 5
5 -
 6
6 -
 7
7 -
 8
8
 |
 |
