Lexmark X864 Maintenance Guide
Lexmark X864 Manual
 |
View all Lexmark X864 manuals
Add to My Manuals
Save this manual to your list of manuals |
Lexmark X864 manual content summary:
- Lexmark X864 | Maintenance Guide - Page 1
X860de, X862de, X864de Maintenance Guide August 2011 www.lexmark.com - Lexmark X864 | Maintenance Guide - Page 2
status of supplies from a network computer 5 Ordering supplies...6 Ordering toner cartridges ...6 Ordering a photoconductor kit ...6 Ordering a maintenance kit ...6 Ordering staple cartridges ...7 Ordering a cleaning kit...7 Replacing supplies...7 Replacing the toner cartridge ...7 Replacing the - Lexmark X864 | Maintenance Guide - Page 3
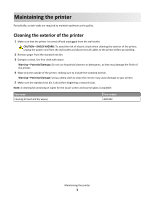
clean the interior may cause damage to your printer. 5 Make sure the standard exit bin is dry before beginning a new print job. Note: A cleaning kit consisting of wipes for the touch screen and scanner glass is available: Part name Cleaning kit (wet and dry wipes) Part number 40X0392 Maintaining - Lexmark X864 | Maintenance Guide - Page 4
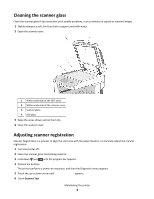
the scan area with the paper location. To manually adjust the scanner registration: 1 Turn the printer off. 2 Clean the scanner glass and backing material. 3 Hold down and until the progress bar appears. 4 Release the buttons. The printer performs a power‑on sequence, and then the Diagnostic menu - Lexmark X864 | Maintenance Guide - Page 5
printing the remaining copies. Checking the status of supplies A message appears on the display when a replacement supply item is needed or when maintenance is required. Checking the status of supplies from the printer control panel 1 Make sure the printer is on and Ready appears. 2 On the home - Lexmark X864 | Maintenance Guide - Page 6
Yield Toner Cartridge Part number X860H21G For printer(s) X860, X862, X864 Ordering a photoconductor kit When Replace Photoconductor message appears, order a new photoconductor kit. Part name Photoconductor Kit Part number X860H22G For printer(s) X860, X862, X864 Ordering a maintenance kit - Lexmark X864 | Maintenance Guide - Page 7
. Part name Staple Cartridges-3 pack Part number 25A0013 Ordering a cleaning kit Use the wet and dry wipes from the cleaning kit to clean the scanner glass and touch screen. Part name Cleaning kit (wet and dry wipes) Part number 40X0392 Replacing supplies Replacing the toner cartridge When 88 - Lexmark X864 | Maintenance Guide - Page 8
Damage: When replacing a toner cartridge, do not leave the new cartridge exposed to direct light for an extended period of time. Extended light exposure can cause print quality problems. 5 Firmly shake the cartridge side-to-side several times to redistribute the toner. Maintaining the printer 8 - Lexmark X864 | Maintenance Guide - Page 9
into the printer. Push the toner cartridge in as far as it will go. The cartridge clicks into place when correctly installed. 7 Close the front door. Replacing the photoconductor You can determine approximately how full the photoconductor is by printing the printer settings configuration sheet - Lexmark X864 | Maintenance Guide - Page 10
may continue to function properly after the photoconductor has reached its official end‑of‑life, print quality significantly decreases. To replace the photoconductor: 1 Turn the printer off. 2 Open the front door. Note: The photoconductor cannot be pulled out if Side Door A is closed. Maintaining - Lexmark X864 | Maintenance Guide - Page 11
3 Lower Side Door A. 4 Pull the photoconductor out of the printer. Place the photoconductor on a flat, clean surface. 5 Unpack the new photoconductor. Maintaining the printer 11 - Lexmark X864 | Maintenance Guide - Page 12
6 Align and insert the end of the photoconductor. 7 Remove the tape from the top of the photoconductor. Maintaining the printer 12 - Lexmark X864 | Maintenance Guide - Page 13
8 Push the photoconductor as far as it will go. The photoconductor clicks into place when correctly installed. 9 Close Side Door A. Maintaining the printer 13 - Lexmark X864 | Maintenance Guide - Page 14
performs a motor cycle and clears the Replace Photoconductor warnings. The printer returns to the Ready state. Moving the printer Before moving the printer CAUTION-POTENTIAL INJURY: The printer weight is greater than 55kg (121 lbs), and requires at least four persons or a properly rated mechanical - Lexmark X864 | Maintenance Guide - Page 15
handling system to lift the printer. • Turn the printer off using the power switch, and then unplug the power cord from the wall outlet. • Disconnect all cords and cables from the printer before moving it. • Remove all printer options before moving the printer. Warning-Potential Damage: Damage to - Lexmark X864 | Maintenance Guide - Page 16
3 Place the tray into the printer. 4 Remove the cable cover. Maintaining the printer 16 - Lexmark X864 | Maintenance Guide - Page 17
5 Disconnect the optional drawer connector. 6 Attach the cable cover. 7 Lift the printer off the trays. Maintaining the printer 17 - Lexmark X864 | Maintenance Guide - Page 18
Any cart used to move the options must have a surface able to support the dimensions of the options. • Keep the printer in an upright position. • Avoid severe jarring movements. Shipping the printer When shipping the printer, use the original packaging or call the place of purchase for a relocation
-
 1
1 -
 2
2 -
 3
3 -
 4
4 -
 5
5 -
 6
6 -
 7
7 -
8
-
9
-
10
-
11
-
12
-
13
-
14
-
15
-
16
-
17
-
18
 |
 |

X860de, X862de, X864de
Maintenance Guide
August 2011
www.lexmark.com