Lexmark XC4342 Quick Reference - Page 7
Maintain the printer
 |
View all Lexmark XC4342 manuals
Add to My Manuals
Save this manual to your list of manuals |
Page 7 highlights
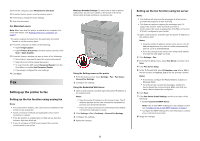
7 From the printer home screen, release the print job. • For confidential print jobs, touch Held jobs > select your user name > Confidential > enter the PIN > select the print job > configure the settings > Print. • For other print jobs, touch Held jobs > select your user name > select the print job > configure the settings > Print. For Macintosh users Using AirPrint 1 With a document open, choose File > Print. 2 Select a printer, and then from the drop-down menu following the Orientation menu, choose PIN Printing. 3 Enable Print with PIN, and then enter a four‑digit PIN. 4 Click Print. 5 From the printer home screen, release the print job. Touch Held jobs > select your computer name > Confidential > enter the PIN > select the print job > Print. Using the print driver 1 With a document open, choose File > Print. 2 Select a printer, and then from the drop-down menu following the Orientation menu, choose Print and Hold. 3 Choose Confidential Print, and then enter a four‑digit PIN. 4 Click Print. 5 From the printer home screen, release the print job. Touch Held jobs > select your computer name > Confidential > select the print job > enter the PIN > Print. Maintain the printer Attaching cables CAUTION-SHOCK HAZARD: To avoid the risk of electrical shock, do not set up this product or make any electrical or cabling connections, such as the power cord, fax feature, or telephone, during a lightning storm. CAUTION-POTENTIAL INJURY: To avoid the risk of fire or electrical shock, connect the power cord to an appropriately rated and properly grounded electrical outlet that is near the product and easily accessible. CAUTION-POTENTIAL INJURY: To avoid the risk of fire or electrical shock, use only the power cord provided with this product or the manufacturer's authorized replacement. CAUTION-POTENTIAL INJURY: To reduce the risk of fire, use only a 26 AWG or larger telecommunications (RJ-11) cord when connecting this product to the public switched telephone network. For users in Australia, the cord must be approved by the Australian Communications and Media Authority. Warning-Potential Damage: To avoid loss of data or printer malfunction, do not touch the USB cable, any wireless network adapter, or the printer in the areas shown while actively printing. Printer port Function 1 Power cord socket Connect the printer to a properly grounded electrical outlet. 2 LINE port Connect the printer to an active Note: Available only in some printer models. telephone line through a standard wall jack (RJ‑11), DSL filter, or VoIP adapter, or any other adapter that allows you to access the telephone line to send and receive faxes. 3 Ethernet port Connect the printer to a network. 4 USB printer port Connect the printer to a computer. 7 Printer port 5 USB port Function Attach a keyboard or any compatible option.
-
 1
1 -
 2
2 -
 3
3 -
 4
4 -
 5
5 -
 6
6 -
 7
7 -
 8
8 -
 9
9 -
 10
10 -
 11
11 -
 12
12 -
13
-
14
-
15
-
16
-
17
 |
 |
