Lexmark Z65n Setup Sheet (1.11 MB)
Lexmark Z65n Manual
 |
View all Lexmark Z65n manuals
Add to My Manuals
Save this manual to your list of manuals |
Lexmark Z65n manual content summary:
- Lexmark Z65n | Setup Sheet (1.11 MB) - Page 1
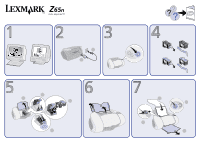
www.lexmark.com Make sure your computer is on. Refer to your User's Guide for safety information and help. Connect the power supply. Make sure the power light is on. Remove the sticker and tape. 2 1 Open the front cover and install the cartridges. 2 1 3 Open both paper trays. SNAP 4 Load - Lexmark Z65n | Setup Sheet (1.11 MB) - Page 2
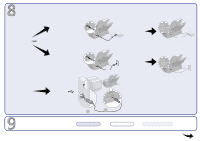
the network link light is on. RJ-45 (Category 5) Make sure the network link light is on. Follow the steps for your operating system. Printed on recycled paper. 12/01 P/N 13D0064 EC 3D0011 © Copyright 2001 Lexmark International, Inc. All rights reserved. 1 Windows 2 Mac OS 8.6 - 9.2 Mac OS X 10 - Lexmark Z65n | Setup Sheet (1.11 MB) - Page 3
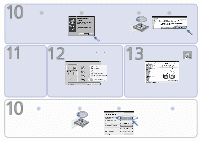
. From the desktop, double-click: Now, customize your printer settings and print. Mac OS 8.6 - 9.2 1 2 3 Network users, refer to your User's Guide for installation instructions. Now, learn more about your printer. 4 Follow the instructions on your screen. For help, refer to your User - Lexmark Z65n | Setup Sheet (1.11 MB) - Page 4
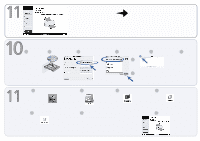
. From the desktop, double-click the Lexmark Z65 printer folder. Then, double-click the Lexmark Z65 Users Guide.pdf icon. Mac OS X 10.0.3 - 10.1 1 2 3 Network users, refer to your User's Guide for installation instructions. 1 From the Dock, click: 2 Double-click: 4 5 a 6 Follow the
-
 1
1 -
 2
2 -
 3
3 -
 4
4
 |
 |
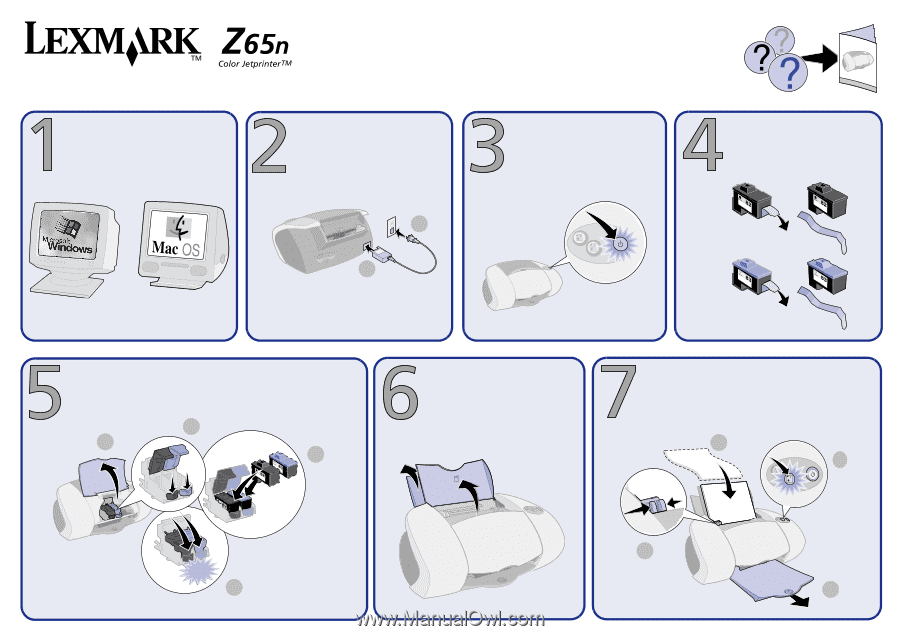
www.lexmark.com
Make sure your computer is
on
.
Connect the power supply.
1
2
Make sure the power light is
on
.
Remove the sticker and tape.
Open the front cover and install the cartridges.
Load plain inkjet paper in paper tray 1 (front).
1
2
3
Open
both
paper trays.
1
3
2
4
4
SNAP
Refer to your
User’s Guide
for safety information and help
.