LiftMaster HDSL24UL Installation Manual - English - Page 15
Requirements, Secure Side, Public Side
 |
View all LiftMaster HDSL24UL manuals
Add to My Manuals
Save this manual to your list of manuals |
Page 15 highlights
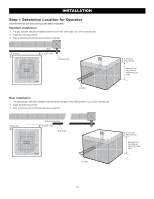
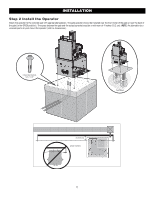
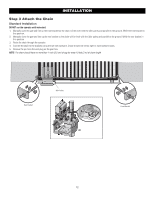
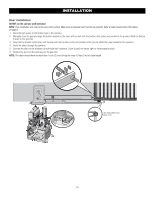
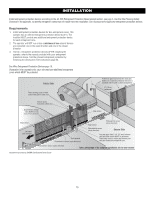
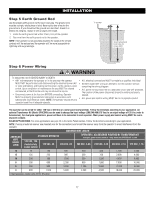
INSTALLATION Install entrapment protection devices according to the UL 325 Entrapment Protection Requirements section, see page 3. Use the Site Planning Safety Checklist in the appendix, to identify entrapment zones that will result from the installation. See Accessories for approved entrapment protection devices. Requirements 1. Install entrapment protection devices for ALL entrapment zones. This operator has an inherent entrapment protection device built-in. The installer MUST provide one additional entrapment protection device for each entrapment zone. 2. The operator will NOT run unless a minimum of two external devices are connected; one in the open direction and one in the closed direction. 3. Test ALL entrapment protection devices AFTER installing the operator, refer to the manual provided with your entrapment protection device. Test the inherent entrapment protection by following the Obstruction Test instructions page 25. See Wire Entrapment Protection Devices page 16. Illustration is for example only; your site may have additional entrapment zones which MUST be protected. Public Side Place warning signs on both sides of the gate in clear view Pedestrian gate located near the slide gate. Make sure a separate pedestrian entrance is available and the path is clearly designated. 6' (1.8 m) minimum Interior posts, non-pinch rollers (2x) Gap between vertical bars MUST be less than 2-1/4" (57 mm) Edge sensor Edge sensor Left hand gate opening Edge sensor Photoelectric sensor (close direction) Photoelectric sensor (close direction) Secure Side Earth ground Photoelectric sensor (open direction) Any gap larger than 2-1/4" (57 mm) between gate and fixed objects MUST be protected. Install edge sensors where gap between post and gate creates an entrapment zone. Photoelectric sensor (open direction) Take a photograph of the complete installation site for your records Illustrations provided by DASMA Gate Systems Safety Guide 15
-
 1
1 -
2
-
3
-
4
-
5
-
6
-
7
-
8
-
9
-
 10
10 -
 11
11 -
 12
12 -
 13
13 -
 14
14 -
 15
15 -
 16
16 -
 17
17 -
 18
18 -
 19
19 -
 20
20 -
21
-
22
-
23
-
24
-
25
-
26
-
27
-
28
-
29
-
30
-
31
-
32
-
33
-
34
-
35
-
36
-
37
-
38
-
39
-
40
-
41
-
42
-
43
-
44
-
45
-
46
-
47
-
48
-
49
-
50
-
51
-
52
-
53
-
54
-
55
-
56
-
57
-
58
-
59
-
60
 |
 |
