Linksys PPSX1 User Guide - Page 25
NDPSM P_MGR.TeSupp - user guide
 |
UPC - 745883548842
View all Linksys PPSX1 manuals
Add to My Manuals
Save this manual to your list of manuals |
Page 25 highlights
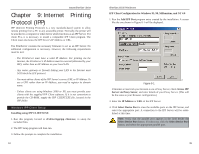
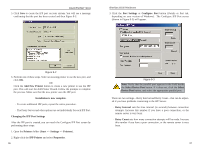
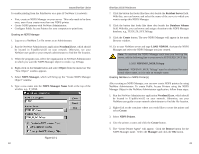
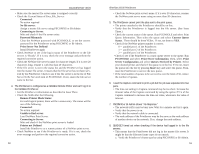
Instant EtherFast® Series To enable printing from the PrintServer on a pure IP NetWare 5.x network: • First, create an NDPS Manager on your server. This only needs to be done once, even if you create more than one NDPS printer. • Create NDPS printers with NetWare Administrator. • Configure Public Access Printers for your computers to print from. Creating an NDPS Manager 1. Log on to a NetWare 5.x file server as an Administrator. 2. Run the NetWare Administrator application Nwadmn32.exe, which should be located in F:\public\win32 on your network. Otherwise, see your NetWare user guide or your network administrator to find the file location. 3. When the program runs, select the organization on NetWare Administrator in which you want the NDPS Manager object to reside, e.g. TeSupp. 4. Right-click on the Create button and select Object from the menu bar. The "New Object" window appears. 5. Select NDPS Manager, which will bring up the "Create NDPS Manager Object" window. 6. Type a new name into the NDPS Manager Name field at the top of the window, e.g., P_MGR. Figure 10-1 42 EtherFast 10/100 PrintServers 7. Click the button that looks like three dots beside the Resident Server field. With this, you can browse and select the name of the server to which you want to assign this NDPS Manager. 8. Click the button that looks like three dots beside the Database Volume field. With this, you can browse and assign a location to the NDPS Manager database, e.g., TECH_50_SYS.TeSupp. 9. Click the Create button. The new NDPS Manager will appear in the main Browser window. 10. Go to your NetWare server and type LOAD NDPSM. Activate the NDPS Manager and select the NDPS Manager you just created. Note: To autoload the NDPS Manager each time you boot up the server, add the following line to your server's AUTOEXEC.NCF file: LOAD NDPSM P_MGR.TeSupp Attention! "NDPSM P_MGR. TeSupp" must be substituted for your actual object name, as it is only an example name. Creating NetWare 5.x NDPS Printer(s) After creating an NDPS Manager, you can now create NDPS printers by using NetWare Administrator. To create Public Access Printers using the NDPS Manager Object in the NetWare Administrator application, follow these steps: 1. Run the NetWare Administrator application Nwadmn32.exe, which should be located in F:\public\win32 on your network. Otherwise, see your NetWare user guide or your network administrator to find the file location. 2. Right-click on the container where you would like to create the printer and select Create. 3. Select NDPS Printer. 4. Give the printer a name and click the Create button. 5. The "Create Printer Agent" will appear. Click the Browse button for the NDPS Manager name. Select the Manager and click the OK button. 43
-
 1
1 -
2
-
3
-
4
-
5
-
6
-
7
-
8
-
9
-
10
-
11
-
12
-
13
-
14
-
15
-
16
-
17
-
18
-
19
-
 20
20 -
 21
21 -
 22
22 -
 23
23 -
 24
24 -
 25
25 -
 26
26 -
 27
27 -
 28
28 -
 29
29 -
 30
30 -
31
-
32
-
33
-
34
-
35
-
36
-
37
-
38
-
39
-
40
 |
 |
