Linksys WPG12 User Guide - Page 8
Installing The, Presentation Player's Setup Utility - wireless projector
 |
UPC - 745883552535
View all Linksys WPG12 manuals
Add to My Manuals
Save this manual to your list of manuals |
Page 8 highlights
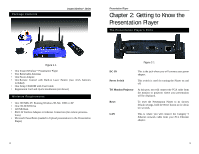
Instant WirelessTM Series 3. To have a wired connection, connect one end of the Category 5 Ethernet network cable to your PC's Ethernet adapter. Connect the other end to the Ethernet port on the back of the Presentation Player. Figure 3-3 4. Place the Player near the monitor or projector facing the presenters so the infra red in the remote control will have access to the Player. 5 For a wireless connection, fix the direction of the antennas. Try to place it in a position which can best cover your wireless network. Normally, the higher you place the antenna, the better the wireless performance will be. The antenna's position enhances the receiving sensitivity. Both antennas should be perpendicular to the ground and parallel to each other. Presentation Player Chapter 4: Installing The Presentation Player's Setup Utility Overview The Presentation Player can play from any PC in your wireless network. You will need to install this utility in each PC that will be used with the Presentation Player - once installed, it will not need to be done again. 1. Insert the Setup CD-ROM into your CD-ROM drive. The CD's InstallShield Wizard should start automatically. If it does not start automatically, click the Start button, select Run, and type d:\setup.exe (where "d" is the letter of your CD-ROM drive) in the Open field to start the autorun program. 2. The Welcome page for the Setup Utility will appear (as shown in Figure 4-1.). Click the Install tab to start the installation procedure and place the Setup Utility on your current PC. Click Uninstall to begin a simple procedure for removing the Setup Utility. Click the User Guide tab to use this User Guide. If you need to contact Linksys for technical support, click the Contact Us tab for that information. Click the Exit tab to close the Setup Utility. Figure 4-1 Note: If you click Cancel at any time, you will have to re-start the installation procedure. 8 9
-
 1
1 -
2
-
 3
3 -
 4
4 -
 5
5 -
 6
6 -
 7
7 -
 8
8 -
 9
9 -
 10
10 -
 11
11 -
 12
12 -
 13
13 -
14
-
15
-
16
-
17
-
18
-
19
-
20
-
21
-
22
-
23
-
24
-
25
 |
 |
