Linksys WVC54GCA-RM User Guide - Page 10
Install Camera Utility, Online Registration - can t connect wireless
 |
UPC - 745883582280
View all Linksys WVC54GCA-RM manuals
Add to My Manuals
Save this manual to your list of manuals |
Page 10 highlights
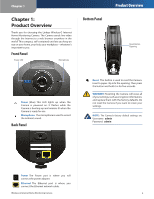
Chapter 3 14. Review the Camera's settings. To make changes to the settings, click Back to go back to the previous screen. If the settings are correct, click Save to continue. Setting Up and Mounting the Camera 18. Reconnect the power to the Camera. Click Next. Save the Camera Settings 15. When the Wizard informs you that the new Camera settings have been saved, click Continue. 16. Disconnect the power from the camera. Click Next. Reconnect the Power 19. The Setup Wizard displays Camera successfully connected to network. Click Continue, then click Next on the following screen. Camera Successfully Connected to Network Disconnect the Power 17. Disconnect the network cable from the Camera and from your switch or router. Click Next. Disconnect the Network Cable Wireless-G Internet Home Monitoring Camera Camera Connected to Wireless Network NOTE: The Camera can also be connected to a wired network. To do this, connect the network cable to the Camera before you power on the Camera. (To connect to a wireless network, power it on with no network cable attached.) 20. The Congratulations screen appears. Click the desired option. •• Install Camera Utility This installs the Camera's Utility. •• Online Registration This registers your Camera online. •• Exit Click this to exit the Setup Wizard and install the Camera's utility later. Go to Placement Options, page 10. 9
-
 1
1 -
2
-
3
-
4
-
 5
5 -
 6
6 -
 7
7 -
 8
8 -
 9
9 -
 10
10 -
 11
11 -
 12
12 -
 13
13 -
 14
14 -
 15
15 -
16
-
17
-
18
-
19
-
20
-
21
-
22
-
23
-
24
-
25
-
26
-
27
-
28
-
29
-
30
-
31
-
32
-
33
-
34
-
35
-
36
-
37
-
38
-
39
-
40
-
41
-
42
-
43
-
44
-
45
-
46
-
47
-
48
-
49
-
50
-
51
-
52
 |
 |
