Lowrance HDS-9 LIVE HDS Live Operator Manual - Page 54
Creating a new route on the chart panel, Edit a route from the chart panel, Delete a route
 |
View all Lowrance HDS-9 LIVE manuals
Add to My Manuals
Save this manual to your list of manuals |
Page 54 highlights
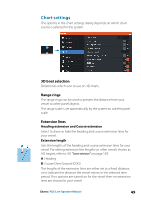
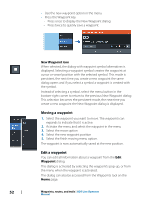
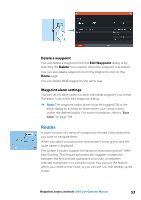
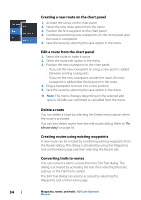
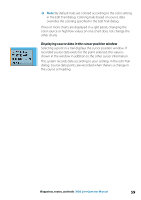
Creating a new route on the chart panel 1. Activate the cursor on the chart panel 2. Select the new route option from the menu 3. Position the first waypoint on the chart panel 4. Continue positioning new routepoints on the chart panel until the route is completed 5. Save the route by selecting the save option in the menu. Edit a route from the chart panel 1. Select the route to make it active 2. Select the route edit option in the menu 3. Position the new routepoint on the chart panel: - If you set the new routepoint on a leg, a new point is added between existing routepoints - If you set the new routepoint outside the route, the new routepoint is added after the last point in the route 4. Drag a routepoint to move it to a new position 5. Save the route by selecting the save option in the menu. Ú Note: The menu changes depending on the selected edit option. All edits are confirmed or cancelled from the menu. Delete a route You can delete a route by selecting the Delete menu option when the route is activated. You can also delete routes from the edit routes dialog. Refer to "The edit route dialog" on page 56. Creating routes using existing waypoints A new route can be created by combining existing waypoints from the Routes dialog. The dialog is activated by using the Waypoints tool on the Home page and then selecting the Routes tab. Converting trails to routes You can convert a trail to a route from the Edit Trail dialog. The dialog is activated by activating the trail, then selecting the trail's pop-up, or the Trail menu option. The Edit Trail dialog can also be accessed by selecting the Waypoints tool on the Home page. 54 Waypoints, routes, and trails | HDS Live Operator Manual
-
 1
1 -
2
-
3
-
4
-
5
-
6
-
7
-
8
-
9
-
10
-
11
-
12
-
13
-
14
-
15
-
16
-
17
-
18
-
19
-
20
-
21
-
22
-
23
-
24
-
25
-
26
-
27
-
28
-
29
-
30
-
31
-
32
-
33
-
34
-
35
-
36
-
37
-
38
-
39
-
40
-
41
-
42
-
43
-
44
-
45
-
46
-
47
-
48
-
 49
49 -
 50
50 -
 51
51 -
 52
52 -
 53
53 -
 54
54 -
 55
55 -
 56
56 -
 57
57 -
 58
58 -
 59
59 -
60
-
61
-
62
-
63
-
64
-
65
-
66
-
67
-
68
-
69
-
70
-
71
-
72
-
73
-
74
-
75
-
76
-
77
-
78
-
79
-
80
-
81
-
82
-
83
-
84
-
85
-
86
-
87
-
88
-
89
-
90
-
91
-
92
-
93
-
94
-
95
-
96
-
97
-
98
-
99
-
100
-
101
-
102
-
103
-
104
-
105
-
106
-
107
-
108
-
109
-
110
-
111
-
112
-
113
-
114
-
115
-
116
-
117
-
118
-
119
-
120
-
121
-
122
-
123
-
124
-
125
-
126
-
127
-
128
-
129
-
130
-
131
-
132
-
133
-
134
-
135
-
136
-
137
-
138
-
139
-
140
-
141
-
142
-
143
-
144
-
145
-
146
-
147
-
148
-
149
-
150
-
151
-
152
-
153
-
154
-
155
-
156
-
157
-
158
-
159
-
160
-
161
-
162
-
163
-
164
-
165
-
166
-
167
-
168
-
169
-
170
-
171
-
172
-
173
-
174
-
175
-
176
-
177
-
178
-
179
-
180
-
181
-
182
-
183
-
184
-
185
-
186
-
187
-
188
-
189
-
190
-
191
-
192
-
193
-
194
-
195
-
196
-
197
-
198
 |
 |
