Mackie 24.8Bus Meter Bridge - Page 2
Meter Bridge, E Meter Bridge, Meter Bridge, Meter Bridge
 |
View all Mackie 24.8Bus manuals
Add to My Manuals
Save this manual to your list of manuals |
Page 2 highlights
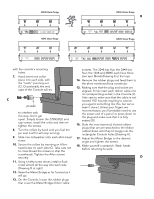
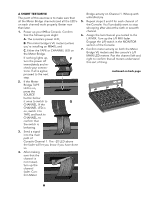
MB•16 Meter Bridge MB•E Meter Bridge MB•24 Meter Bridge E MB•32 Meter Bridge with the console's mounting holes. 7. Hand-insert one collar piece into each side, with the "teeth" pointing out (C). Occasionally, the end caps of the Console will try C pin down to interfere with this step. Don't get upset. Simply loosen the CONSOLE end cap screws, install the collar and then retighten the screws. 8. Turn the collars by hand until you feel the pin seat itself (it will stop turning). 9. Slide one lockwasher onto each allen-head screw. 10. Secure the collars by inserting an Allenhead screw on each side (C). Take care not to cross-thread the screws or strip the screwheads. Tighten the Allen screws securely. 11. Using a hefty screw driver, install a flush screw almost all the way into each side (Drawing D at right). 12. Raise the Meter Bridge as far forward as it will go. 13. On the Console, locate the rubber plugs that cover the Meter Bridge ribbon cable sockets. The 32•8 has five; the 24•8 has four; the 16•8 and MB•E each have three (see epic MondoDrawing E at the top). 14. Remove the rubber plugs and feed them to the afore-mentioned boa constrictor. 13. Making sure that the plug and socket are aligned, firmly insert each ribbon cable into its corresponding socket in the Console (F). Take care to make sure that the cable is not twisted 180˚ (sounds insulting to caution you against something like this, but we've seen it done.) Unless your fingers are microminiature, you'll probably need to use the eraser end of a pencil to press down on the plug and make sure that it is fully seated (G). 16. Slide the new improved, slotted rubber plugs (that are pre-attached to the ribbon cables) down until they fit snugly into the rectangular Console holes (Drawing H). 17. Adjust the Meter Bridge to the desired angle and tighten the screws. 18. Make yourself a sandwich. Wash hands before returning to work. D
-
 1
1 -
 2
2 -
 3
3 -
 4
4
 |
 |
