Mackie 32.8Bus Owner's Manual - Page 29
Let's Record!, Overdub, Anyone?, MIXING OVERVIEW, s Record - 8 bus 32 channel
 |
View all Mackie 32.8Bus manuals
Add to My Manuals
Save this manual to your list of manuals |
Page 29 highlights
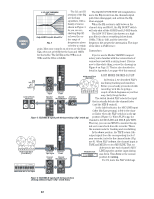
Getting reverb into the monitors is a little Overdub, Anyone? more involved, since there is no return assignment switch to MIX-B. You have three choices: • Assign MIX-B to L/R Mix in the MIX-B master section. Then, select L/R Mix as your only source in the monitor section. Finally, use Stereo AUX Returns 1-6 to bring the reverb into the L/R Mix buses. Make sure that none of the channel L/R switches are engaged. There is no disadvantage to this patch, unless you are already using the L/R Mix buses for some other function. See the OVERDUB drawings on page 30 and 31. Once you've got your basic tracks down, take a moment and log all your settings, right down to headphone sends and outboard compressor thresholds. You may be back next week doing it all over again, and you won't remember it all. It seems some engineers use a camera for this step, but our Polaroids never come out that well. One easy way to do this is to copy the 8•Bus panel layouts from the end of the manual and • Patch the returns into unused tape returns, using mark your settings on them in color. the Tape In jacks on the rear of the console. Then Now, normal all the channel inputs and EQs route them into MIX-B, just as if they were and sends-anything that does not affect your additional tape tracks. MIX-B monitor and cue submix. Do not change • Patch the returns into unused channel strips, the FLIP switch settings yet. using the Line In jacks. Then you can route Then, pick a convenient input channel or two the reverb anywhere your heart desires. and use them as your input for overdubs. As you Let's Record! record on different tracks, just reassign the bus outputs from the channels, no sweat. Remember, Here's one way to set the board up (another with the triple busing feature, explained in Sec- option is shown in the hook-up drawings...either tion 2 ("Submaster/Tape Outputs"), you won't works just fine): have to repatch anything to feed up to a 24-track recorder. And your monitor mix and Kick Drum to Channel 1 ......... Direct Out to Track 1 Snare Drum .......... to Channel 2 Direct Out to Track 2 Cymbals Left ......... to Channel 3 Bus 3 to Track 3 Cymbals Right ....... to Channel 4 Bus 4 to Track 4 Tom 1 to Channel 6 panned between Buses 3 & 4 to Tracks 3 & 4 Tom 2 to Channel 7 panned between Buses 3 & 4 to Tracks 3 & 4 Tom 3 to Channel 8 panned between Buses 3 & 4 to Tracks 3 & 4 Bass Amp to Channel 9 Bus 5 to Track 5 Bass Direct to Channel 10 ......... Bus 5 to Track 5 Scratch Vocal ......... to Channel 11 ......... Direct Out to Track 11 Guitar near to Channel 12 ......... Bus 6 to Track 6 Guitar far to Channel 13 ......... Bus 6 to Track 6 Piano L to Channel 14 ......... Bus 7 to Track 7 Piano R to Channel 15 ......... Bus 8 to Track 8 Trombone I to Channel 16 ......... panned between Buses 1 & 2 to tracks 9 & 10 Trombone II to Channel 17 ......... panned between Buses 1 & 2 to tracks 9 & 10 Flugelhorn to Channel 18 ......... panned between Buses 1 & 2 to tracks 9 & 10 Trumpet to Channel 19 ......... panned between Buses 1 & 2 to tracks 9 & 10 cue mix haven't changed. At the end of the night, you can run the monitor mix into a cassette or DAT and take a rough mix home. If you're going to do your final mix right away, you have another option during overdubbing. First, pick an input channel for your overdub mics beyond the number of tape tracks you have. If you have a 16-Track, choose channels 17 and 18. These will be your inputs, which you will then assign to open tape Your monitoring and cue signals come from the MIX-B inputs corresponding to the tape tracks: tracks for the overdubs. Now, push the FLIP buttons on channels 1-16. This will bring the Tape Inputs into the main channel faders, and you can begin working on your mix while you Kick Track 1 Tape Return 1 MIX-B Snare Track 2 Tape Return 2 MIX-B Drums L Track 3 Tape Return 3 MIX-B Drums R .......... Track 4 Tape Return 4 MIX-B Bass Track 5 Tape Return 5 MIX-B Guitar Track 6 Tape Return 6 MIX-B Piano L Track 7 Tape Return 7 MIX-B Piano R Track 8 Tape Return 8 MIX-B Horns L Track 9 Tape Return 9 MIX-B Horns R Track 10 Tape Return 10 .......... MIX-B Scratch Vocal ... Track 11 Tape Return 11 .......... MIX-B At this point, your recording should pretty well take care of itself. Keep on top of the players: be sure they're in tune, keep them tight. You'll have great tracks before midnight. monitor on the L/R Bus. Headphones can still be fed via the AUX Send of your choice, or by assigning monitor to the phones. When you're done overdubbing, your mix is ready. MIXING OVERVIEW See the MIXDOWN drawings on pages 31 and 32. Recording and overdubbing require care from the recording engineer, but the focus really has to be on the performances. It's important to get a good sound, but it's more important to keep the musicians really in it, keep the pace up, be ready to snag that killer track when it happens. Good mixing, however, focuses solely on the engineer and requires an emphasis on precision 27 RECORDING
-
 1
1 -
2
-
3
-
4
-
5
-
6
-
7
-
8
-
9
-
10
-
11
-
12
-
13
-
14
-
15
-
16
-
17
-
18
-
19
-
20
-
21
-
22
-
23
-
 24
24 -
 25
25 -
 26
26 -
 27
27 -
 28
28 -
 29
29 -
 30
30 -
 31
31 -
 32
32 -
 33
33 -
 34
34 -
35
-
36
-
37
-
38
-
39
-
40
-
41
-
42
-
43
-
44
-
45
-
46
-
47
-
48
-
49
-
50
-
51
-
52
-
53
-
54
-
55
-
56
-
57
-
58
-
59
-
60
-
61
-
62
-
63
-
64
 |
 |
