Mackie Opt24 Installation Guide - Page 3
gently wiggle from side to side to release them from their sockets.
 |
View all Mackie Opt24 manuals
Add to My Manuals
Save this manual to your list of manuals |
Page 3 highlights
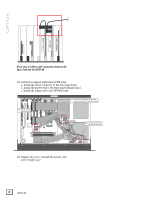
Installation Guide 4) Remove the blank cover plate for the ACC1 slot (next to the SYNC card) by removing 1 Phillipshead screw. Save the screw for installing the OPT•24. 4) Remove Screw and ACC1 Slot Cover Plate RREEAARR PPAANNEELL ® MACKIE DESIGNS. ™ © 2000 ® MACKIE DESIGNS. ™ © 2000 FRONT PANEL 5) Unplug the 2 ribbon cables from the Sync card. Squeeze the tabs on the sides of the connectors and gently wiggle from side to side to release them from their sockets. 5A) Unplug Ribbon Cables from Sync Card 5B) Pull Ribbon Cables back and out of the way RREEAARR PPAANNEELL FRONT PANEL Installation Guide 3
-
 1
1 -
 2
2 -
 3
3 -
 4
4 -
 5
5 -
 6
6 -
 7
7 -
 8
8
 |
 |

3
Installation Guide
Installation Guide
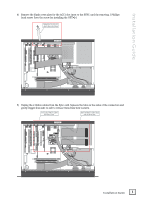
4)
Remove the blank cover plate for the ACC1 slot (next to the SYNC card) by removing 1 Phillips-
head screw. Save the screw for installing the OPT•24.
REAR PANEL
®
MACKIE DESIGNS. ™
© 2000
4) Remove Screw and
ACC1 Slot Cover Plate
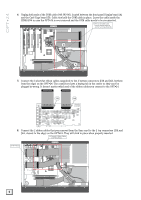
5)
Unplug the 2 ribbon cables from the Sync card. Squeeze the tabs on the sides of the connectors and
gently wiggle from side to side to release them from their sockets.
REAR PANEL
®
MACKIE DESIGNS. ™
© 2000
5B) Pull Ribbon Cables back
and out of the way
5A) Unplug Ribbon Cables
from Sync Card