Magellan eXplorist 500 Manual - English - Page 84
Working with Files on the Personal Computer, File Transfer, Transfer, Internal Memory, SD Card - cable
 |
UPC - 763357109405
View all Magellan eXplorist 500 manuals
Add to My Manuals
Save this manual to your list of manuals |
Page 84 highlights
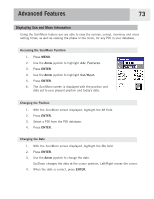
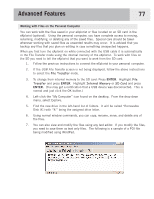
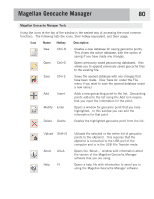
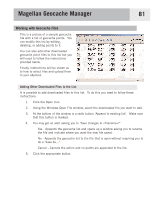
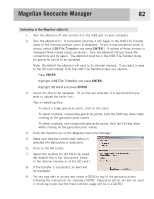
Advanced Features 77 Working with Files on the Personal Computer You can work with the files saved in your eXplorist or files located on an SD card in the eXplorist (optional). Using the personal computer, you have complete access to moving, renaming, modifying, or deleting any of the saved files. Special care should be taken whenever working with saved files as unwanted results may occur. It is advised that you backup any files that you plan on editing in case something unexpected happens. When you first turn the eXplorist on while connected with the USB cable it is automatically in the File Transfer mode using the internal memory of the eXplorist. To work with files on the SD you need to tell the eXplorist that you want to work from the SD card. 1. Follow the previous instructions to connect the eXplorist to your personal computer. 2. If the USB File Transfer screen is not being displayed, follow the above instructions to select the File Transfer mode. 3. To change from internal memory to the SD card: Press ENTER. Highlight File Transfer and press ENTER. Highlight Internal Memory or SD Card and press ENTER. (You may get a notification that a USB device was disconnected. This is normal and just click the OK button.) 4. Left-click the "My Computer" icon found on the desktop. From the drop-down menu, select Explore. 5. Find the new drive in the left-hand list of folders. It will be called "Removable Disk (X:) with "X:" being the assigned drive letter. 6. Using normal window commands, you can copy, rename, move, and delete any of the files. 7. You can also view and modify the files using any text editor. If you modify the files, you need to save them as text only files. The following is a sample of a POI file being modified using WordPad.
-
 1
1 -
2
-
3
-
4
-
5
-
6
-
7
-
8
-
9
-
10
-
11
-
12
-
13
-
14
-
15
-
16
-
17
-
18
-
19
-
20
-
21
-
22
-
23
-
24
-
25
-
26
-
27
-
28
-
29
-
30
-
31
-
32
-
33
-
34
-
35
-
36
-
37
-
38
-
39
-
40
-
41
-
42
-
43
-
44
-
45
-
46
-
47
-
48
-
49
-
50
-
51
-
52
-
53
-
54
-
55
-
56
-
57
-
58
-
59
-
60
-
61
-
62
-
63
-
64
-
65
-
66
-
67
-
68
-
69
-
70
-
71
-
72
-
73
-
74
-
75
-
76
-
77
-
78
-
 79
79 -
 80
80 -
 81
81 -
 82
82 -
 83
83 -
 84
84 -
 85
85 -
 86
86 -
 87
87 -
 88
88 -
 89
89 -
90
-
91
-
92
-
93
-
94
-
95
-
96
-
97
-
98
-
99
-
100
-
101
-
102
-
103
-
104
-
105
-
106
-
107
-
108
-
109
-
110
-
111
-
112
-
113
-
114
-
115
-
116
-
117
-
118
-
119
 |
 |