Magnavox DV225MG9 User manual, English (US)
Magnavox DV225MG9 - DVD Player And 4 Head Hi-Fi Stereo VCR Manual
 |
UPC - 053818570715
View all Magnavox DV225MG9 manuals
Add to My Manuals
Save this manual to your list of manuals |
Magnavox DV225MG9 manual content summary:
- Magnavox DV225MG9 | User manual, English (US) - Page 1
Overview 9 Front Panel Indicator Lights 9 Selecting DVD or VCR Operation 9 Front & Rear Terminals 9 Remote Control...10 Installing the Batteries for the Remote Control 10 VCR FUNCTIONS Playback 11 When You Playback a Cassette Tape Recorded in Hi-Fi Stereo 11 Other Operations 11 Index Search - Magnavox DV225MG9 | User manual, English (US) - Page 2
BACK). NO USER SERVICEABLE PARTS INSIDE. REFER SERVICING TO QUALIFIED SERVICE PERSONNEL. The important note is located on the rear or bottom of different from that to which the receiver is connected. 4) Consult the dealer or an experienced radio/TV technician for help. This Class B digital apparatus - Magnavox DV225MG9 | User manual, English (US) - Page 3
the picture. In case of picture problems with 525(480) progressive scan output, it is recommended that the user switch the connection to the 'standard definition' output. If there are questions regarding your TV set compatibility with this 525p(480p) DVD player, please contact our customer service - Magnavox DV225MG9 | User manual, English (US) - Page 4
a good quality VHS video head cleaner. 2. If a Video head cleaner does not solve the problem, please call our toll free customer support line found on the cover of this manual to locate an authorized service center. Note: • Remember to read the instructions along with the video head cleaner before - Magnavox DV225MG9 | User manual, English (US) - Page 5
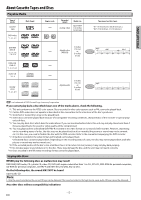
Playable Media Type of media cassette tape Mark (logo) Region code DVD-video or *1, 2, 3, 5, 9 Recorded signals analog video Media size tape width 1/2 inches (12.65 mm) DVD-RW DVD-R *1, 3, 4, 5, 6, 7, 8, 9, 10 DVD+RW DVD+R *1, 3, 4, 5, 8, 9 audio CD *3, 5, 9 CD-RW CD-R *3, 4, 5, 8, 9 digital - Magnavox DV225MG9 | User manual, English (US) - Page 6
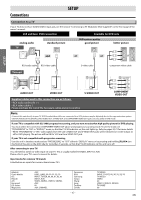
)" on the front page of the owner's manual. VCR and Basic DVD Connection Available for DVD only analog audio TV AUDIO IN L R AUDIO IN L R VIDEO IN standard picture VIDEO IN and DVD's picture quality good picture S-VIDEO IN or or better picture COMPONENT VIDEO IN Y COMPONENT VIDEO IN - Magnavox DV225MG9 | User manual, English (US) - Page 7
generate noise distortion and may also damage the speakers. Connection to an External Tuner rear of TV rear of the unit external tuner (cable/satellite box) DIGITAL AUDIO OUT DVD AUDIO OUT S-VIDEO OUT COMPONENT VIDEO OUT Y DVD/VCR AUDIO OUT L VCR AUDIO IN L L AUDIO IN COAXIAL R CB/ PB - Magnavox DV225MG9 | User manual, English (US) - Page 8
Preparation for Use Turning on Unit for the First Time VCR Please note: most instructions in this man- ual refer to remote control use. 1 Be sure your TV's input is set to VIDEO. (Name may vary with TV manufacturer. See your TV manual for details.) 2 Select your on-screen language. Then press - Magnavox DV225MG9 | User manual, English (US) - Page 9
input jack of your digital audio receiver. * For enhanced DVD viewing. DVD/VCR video and audio connections required to view cassette tapes. Note: • Audio and video cables are included for both VCR and DVD viewing. You can enhance your DVD picture and sound quality with an S-video cable, a component - Magnavox DV225MG9 | User manual, English (US) - Page 10
TRACKING TRACKING • To call up the top menu on a disc. TIMER SET VCR ZOOM • To magnify part of a picture. (2x/4x) • To adjust the tracking manually during playback. • To put the VCR into standby mode for a timer recording. • To select the VCR output mode. • To activate VCR mode. - 10 - EN - Magnavox DV225MG9 | User manual, English (US) - Page 11
HIFI • During playing back non Hi-Fi tapes, [AUDIO ] on the remote control is not available. Type of recorded tape L-channel R-channel Other Operations Hi-Fi tapes recorded in Hi-Fi stereo L R MONO L+R To cue or review picture during playback (picture search) Use [g] or [h] ([ F.FWD g] or - Magnavox DV225MG9 | User manual, English (US) - Page 12
. Refer to "Satellite Link" on page 14. TV this unit external tuner Recording & One-touch Timer Recording (OTR) VCR 1 Insert a recordable cassette tape. 2 Press [INPUT] until "L1" or "L2" is displayed on the TV screen. Select "L1" to activate rear input jacks. Select "L2" to activate front - Magnavox DV225MG9 | User manual, English (US) - Page 13
you want to use the DVD player during a timer recording or while TIMER REC indicator on this unit is on or blinking. • Press [STANDBY-ON] to turn on the unit. Press [DVD ] on the remote control to choose DVD mode, then continue with the other DVD features as described in this manual. Note for timer - Magnavox DV225MG9 | User manual, English (US) - Page 14
To stop recording, press [STOP/EJECT C A] on this unit, then stop playback of the external device. output jacks of external device AUDIO OUT L or R VIDEO OUT L1 RCA audio/video cables DVD/VCR VCR AUDIO OUT AUDIO IN L L R R VIDEO OUT VIDEO IN rear of the unit You can use a video disc player - Magnavox DV225MG9 | User manual, English (US) - Page 15
AUDIO - R h D C REC TIMER REC IR B I REW F.FWD STOP/EJECT PLAY RECORD Lights up when power is on. B OPEN/CLOSE TRACKING VCR DVD P-SCAN PLAY SOURCE H C B PREV STOP PLAY N 1 2 43 Note: • " " may appear at the top-right on the TV screen when the operation is prohibited by the disc - Magnavox DV225MG9 | User manual, English (US) - Page 16
remote control. DVD DVD DISPLAY 1 11/16 0:00:00 - 0:03:30 DISPLAY 2 1/3 0:00:00 - 1:23:45 DISPLAY 3 T L1 DISPLAY appears only in a case multiangle is available on the DVD a disc in program or random mode, PROGRAM (or RANDOM) will be displayed instead of 2 . 4 DVD FUNCTIONS - 16 - EN - Magnavox DV225MG9 | User manual, English (US) - Page 17
10 minutes. • Press [CLEAR] to erase the incorrect input at step 2. • For audio CD, time search is not available for programmed and random playback. Marker Setting DVD This function allows you to assign a specific point on a disc to be called back later. To set a marker 1 Press [SEARCH] repeatedly - Magnavox DV225MG9 | User manual, English (US) - Page 18
is available only during playback. 1 Press [A-B] at your desired starting point (A). A-B A- PLAY 2 Press [A-B] at your desired ending point (B). A-B A-B Random Playback DVD This function shuffles the playing order of tracks instead of playback in sequence. 1 Press [MODE] twice. STOP MODE - Magnavox DV225MG9 | User manual, English (US) - Page 19
OFF or Black Level Setting DVD Adjust the black level to make the dark areas of the TV picture brighter. 1 Press [MODE] during playback. MODE ON PLAY 2 Press [OK] to adjust OK OFF the black level. ON: makes the dark areas brighter. OFF: shows the original picture as recorded. 3 Press - Magnavox DV225MG9 | User manual, English (US) - Page 20
DVD FUNCTIONS LANGUAGE menu SETUP LANGUAGE AUDIO SUBTITLE DISC MENU PLAYER MENU ORIGINAL OFF ENGLISH ENGLISH DISPLAY menu SETUP DISPLAY TV digit number to enter the code for the desired language. Refer to the "Language Code List" on page 24. • Only the languages supported by the disc can be - Magnavox DV225MG9 | User manual, English (US) - Page 21
screen. • Select "4:3 PAN & SCAN" for a full height picture with both sides adjusted. • Select "16:9 WIDE" if a widescreen TV is connected to this unit. STILL MODE: • Select "AUTO" usually. • If you select "AUTO", it automatically selects the best resolution setting ("FRAME" or "FIELD") based on the - Magnavox DV225MG9 | User manual, English (US) - Page 22
10 SETUP PARENTAL PASSWORD Please enter a 4-digit password. OK Note: • Record the password in case you forget it. • If you forget the ) Set to "ON" to display when multiple camera angles are available during DVD playback. OTHERS menu SETUP OTHERS ANGLE ICON ON AUTO POWER OFF ON ANGLE - Magnavox DV225MG9 | User manual, English (US) - Page 23
twice. Note: • When you do not wish to initialize, select "NO" at step 3. Troubleshooting Guide INFORMATION If this unit does not perform properly when operated as instructed in this manual. Refer to the following: Problem Corrective action DVD / VCR No power. • Make sure the power plug is - Magnavox DV225MG9 | User manual, English (US) - Page 24
, flood, lightning or other acts of God. THIS WARRANTY DOES NOT COVER PACKING MATERIALS, ANY ACCESSORIES (EXCEPT REMOTE CONTROL), ANY COSMETIC PARTS, COMPLETE ASSEMBLY PARTS, DEMO OR FLOOR MODELS. FUNAI CORP. AND ITS REPRESENTATIVES OR AGENTS SHALL IN NO EVENT BE LIABLE FOR ANY GENERAL, INDIRECT OR - Magnavox DV225MG9 | User manual, English (US) - Page 25
ón "Connection to a TV" en la página 6 en el manual de manejo. En caso contrario, vea la sección "Connecting to RF Modulator (Not Supplied)" en la página del frente en el manual de manejo. 2 Instalación de las pilas del control remoto 1 2 3 3 Conmutación VCR/DVD OPEN/CLOSE TRACKING VCR DVD - Magnavox DV225MG9 | User manual, English (US) - Page 26
SET 12 45 78 CLEAR 0 DISPLAY VCR 3 TRACKING 6 9 INPUT +10 DVD MODE PLAY STOP RECORD PREV NEXT PAUSE TITLE SEARCH AUDIO DISC un disco. • Para llamar el menú superior en un disco. • Para ampliar parte de la imagen. (2x/4x) • Para ajustar manualmente elseguimiento durante la reproducción. - Magnavox DV225MG9 | User manual, English (US) - Page 27
the section "Connection to a TV" on page 6 of the owner's manual. If not, see the section "Connecting to RF Modulator (Not Supplied)" on the front page of the owner's manual. 2 Installing the Batteries for the Remote Control 1 2 3 3 VCR/DVD Switching OPEN/CLOSE TRACKING VCR DVD P-SCAN PLAY - Magnavox DV225MG9 | User manual, English (US) - Page 28
Quick Use Guide 6 VCR Playback Before: Turn on the TV. VCR 1 2 Insert a cassette To start playback tape into this unit. PLAY 3 4 To stop playback To eject the cassette tape STOP OPEN/CLOSE 7 DVD/CD Playback Before: Turn on the TV, amplifier and any other components which are connected to
-
 1
1 -
 2
2 -
 3
3 -
 4
4 -
 5
5 -
 6
6 -
 7
7 -
8
-
9
-
10
-
11
-
12
-
13
-
14
-
15
-
16
-
17
-
18
-
19
-
20
-
21
-
22
-
23
-
24
-
25
-
26
-
27
-
28
 |
 |
PRECAUTIONS
SETUP
VCR FUNCTIONS
DVD FUNCTIONS
Español
INFORMATION
INSTRUCCIONES EN
ESPAÑOL INCLUIDAS.
DVD/VCR
AUDIO OUT
VIDEO OUT
L
R
rear of TV
rear of your RF
modulator
AUDIO IN
TO TV
ANT. IN
L
R
CHANNEL
4
3
VIDEO IN
ANT. IN
Set channel 3 or 4
rear of this unit
RF coaxial cable
RF coaxial
cable
VHF / UHF
antenna
cable TV
company
or
RCA video cable
RCA audio cable
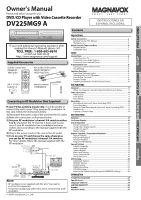
DVD / CD Player with Video Cassette Recorder
DV225MG9 A
Owner’s Manual
Please read before using this unit.
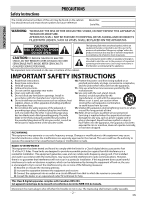
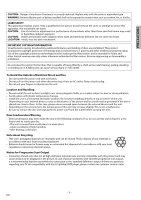
PRECAUTIONS
Safety Instructions
...................................................................................
2
Symbols Used in This Manual
..............................................................................
4
Maintenance
..............................................................................................................
4
About Cassette Tapes and Discs
.............................................................
5
Playable Media
..........................................................................................................
5
Unplayable Discs
......................................................................................................
5
SETUP
Connections
.............................................................................................
6
Connection to a TV
..................................................................................................
6
Connection to an Audio System
.........................................................................
7
Connection to an External Tuner
.......................................................................
7
Preparation for Use
.................................................................................
8
Turning on Unit for the First Time
.....................................................................
8
Clock Setting
..............................................................................................................
8
Function Overview
..................................................................................
9
Front Panel Indicator Lights
.................................................................................
9
Selecting DVD or VCR Operation
........................................................................
9
Front & Rear Terminals
...........................................................................................
9
Remote Control
........................................................................................................
10
Installing the Batteries for the Remote Control
...........................................
10
VCR FUNCTIONS
Playback
.................................................................................................
11
When You Playback a Cassette Tape Recorded in Hi-Fi Stereo
.............
11
Other Operations
....................................................................................
11
Index Search
..............................................................................................................
11
Time Search
...............................................................................................................
11
Auto Repeat
...............................................................................................................
12
Recording
................................................................................................
12
Recording & One-touch Timer Recording (OTR)
..........................................
12
Timer Recording
......................................................................................................
12
Notes for Timer Recording & One-touch Timer Recording (OTR)
.........
13
Satellite Link
..............................................................................................................
14
Copying a Cassette Tape
......................................................................................
14
DVD FUNCTIONS
Playback
.................................................................................................
15
On-Screen Display
..................................................................................
16
Search Functions
....................................................................................
17
Using Track Search
..................................................................................................
17
Using Title / Chapter Search
................................................................................
17
Using Time Search
..................................................................................................
17
Marker Setting
..........................................................................................................
17
Repeat / Random / Programmed Playback
...........................................
18
Repeat Playback
.......................................................................................................
18
Repeat A-B Playback
..............................................................................................
18
Random Playback
....................................................................................................
18
Programmed Playback
..........................................................................................
18
Special Settings
......................................................................................
19
Subtitle Language
...................................................................................................
19
Audio Language
......................................................................................................
19
Camera Angles
.........................................................................................................
19
Black Level Setting
..................................................................................................
19
Stereo Sound Mode
................................................................................................
19
Virtual Surround
.......................................................................................................
19
DVD Setting
............................................................................................
20
LANGUAGE Setting
.................................................................................................
20
DISPLAY Setting
.......................................................................................................
21
AUDIO Setting
..........................................................................................................
21
PARENTAL Setting
...................................................................................................
22
OTHERS Setting
........................................................................................................
22
Reset to the Default Setting (Except for PARENTAL Setting)
..................
23
INFORMATION
Troubleshooting Guide
..........................................................................
23
Specifications
.........................................................................................
24
Language Code List
................................................................................
24
LIMITED WARRANTY
...............................................................................
24
Español
...................................................................................................
25
Quick Use Guide
......................................................................................
27
Supplied Accessories
remote control unit
±NB622UD /
NB672UD²
RCA audio / video cables
±WPZ0102TM018 /
WPZ0102LTE01²
AA ±1.5 V DC²
battery x 2
owner’s manual
±1VMN28435²
Owner’s Manual
© 2009 Funai Electric Co., Ltd.
If you need additional operating assistance after
reading this Owner’s Manual, please call
TOLL FREE : 1-800-605-8610
or visit our web site at
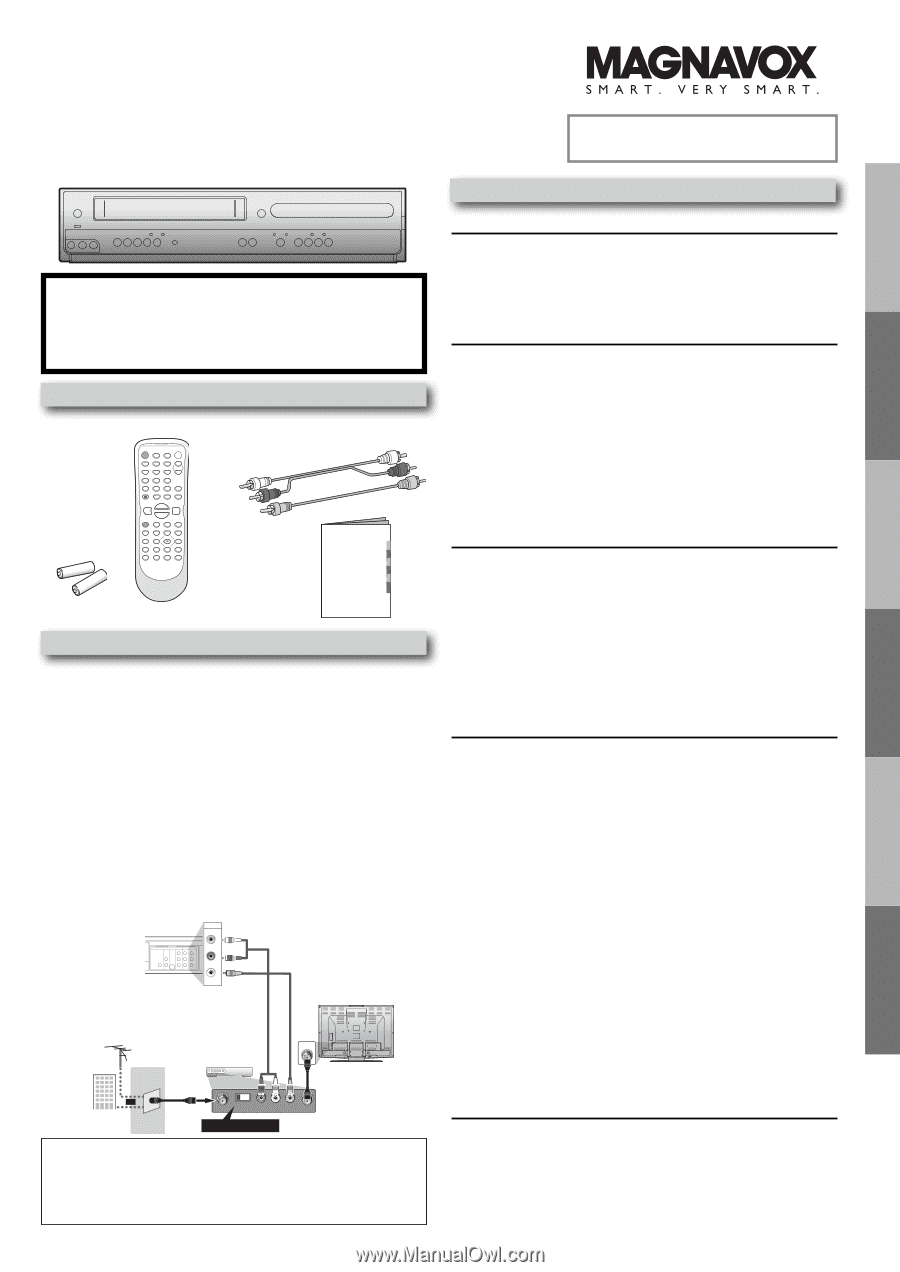
If your TV has antenna in jack only
, it is still possible to
connect this unit to your TV by using an RF modulator. In
this case, follow the instructions below.
1)
Disconnect the power cords of the unit from the AC outlet.
2)
Make the connection as illustrated below.
3)
Set your RF modulator’s channel 3/4 switch to either
3 or 4
, whichever the TV channel is least used in your
area. If your RF modulator has a modulator/antenna
switch, set it according to the manual supplied with the
RF modulator.
4)
Plug in the power cords of the unit to the AC outlet.
5)
Turn on your TV and choose the same channel as
you set the RF modulator’s channel 3/4 switch to.
For more details, follow the manual supplied with the
RF modulator.
Note:
• RF modulator is not supplied with this unit. You need to
purchase this separately.
• The picture quality may suffer if this unit is connected to an RF
modulator.
Connecting to RF Modulator (Not Supplied±
Contents