Magnavox MDV455 User manual, English (US) - Page 13
Connecting to a TV Only, TV has Component Video In Jacks red, green, and blue - progressive
 |
View all Magnavox MDV455 manuals
Add to My Manuals
Save this manual to your list of manuals |
Page 13 highlights
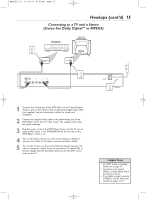
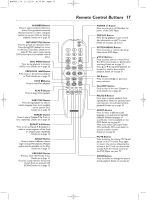
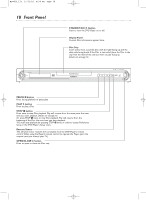
MDV455_17x 11/11/03 4:34 PM Page 13 Hookups (cont'd) 13 Connecting to a TV Only TV has Component Video In Jacks (red, green, and blue) 1 Back of TV (example only) Y LEFT AUDIO IN Pb/Cb RIGHT AUDIO IN Pr/Cr Pr/Cr LEFT AUDIO IN Pb/Cb RIGHT AUDIO IN Y 2 3 1 Connect the DVD Player's Y Pb/Cb Pr/Cr jacks to the corresponding Component Video In jacks on your TV. On your TV, you may have Component Video In jacks that are label Progressive Scan. If you use instead, set TV Mode to P-scan YPbPr. Otherwise, set TV Mode to YPbPr for standard component. Details are on page 35. Use component video cables (not supplied). 2 Connect the DVD Player's white and red Audio L/R (left and right) jacks to the left/right AUDIO IN jacks on the TV. Use the supplied audio cables. Match the cable colors to the jack colors. 3 Plug the power cords of the DVD Player and the TV into an active power outlet. Press STANDBY-ON y on the front of the DVD Player to turn it on. 4 Turn on the TV. Set it to the correct Component Video In channel. See your TV owner's manual for details. Or, go to your lowest TV channel (01 or 02) and change channels downward until you see the DVD screen saver on the TV. 5 Go to page 35 to set TV Mode correctly (as detailed in step 1). If TV Mode is incorrect, you will not have a DVD picture at your TV. Helpful Hints • On the TV, the component video in jacks may be labeled YUV or Y Pr/Cr Pb/Cb and may be green, blue, and red. • If your TV has a single Audio In jack instead of separate left/right Audio In jacks, you will need a different audio cable.You need a "splitter" audio cable to go from the Audio L/R jacks of the DVD Player to the single Audio In jack on your TV. See your electronics retailer for details.
-
 1
1 -
2
-
3
-
4
-
5
-
6
-
7
-
 8
8 -
 9
9 -
 10
10 -
 11
11 -
 12
12 -
 13
13 -
 14
14 -
 15
15 -
 16
16 -
 17
17 -
 18
18 -
19
-
20
-
21
-
22
-
23
-
24
-
25
-
26
-
27
-
28
-
29
-
30
-
31
-
32
-
33
-
34
-
35
-
36
-
37
-
38
-
39
-
40
-
41
-
42
-
43
-
44
-
45
-
46
-
47
-
48
 |
 |
