Makita JR3070CT Owners Manual - Page 5
Assembly - blade clamp
 |
View all Makita JR3070CT manuals
Add to My Manuals
Save this manual to your list of manuals |
Page 5 highlights
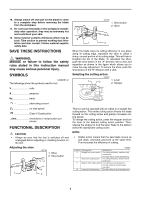
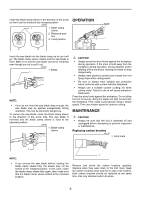
Switch action 1 006185 2 1. Switch trigger 2. Lock button Number on adjusting dial 6 5 4 3 2 1 C00251 Strokes per minute 2,800 2,500 1,850 1,400 1,000 950 CAUTION: • Before plugging in the tool, always check to see that the switch trigger actuates properly and returns to the "OFF" position when released. • Switch can be locked in "ON" position for ease of operator comfort during extended use. Apply caution when locking tool in "ON" position and maintain firm grasp on tool. To start the tool, simply pull the switch trigger. Tool speed is increased by increasing pressure on the switch trigger. Release the switch trigger to stop. For continuous operation, pull the switch trigger and then push in the lock button. To stop the tool from the locked position, pull the switch trigger fully, then release it. Speed adjusting dial (For JR3070CT) 006025 1. Adjusting dial 1 The strokes per minute can be adjusted just by turning the adjusting dial. This can be done even while the tool is running. The dial is marked 1 (lowest speed) to 6 (full speed). Turn the adjusting dial without positive stops between 1 and 6 according to your work. Refer to the table to select the proper speed for the workpiece to be cut. However, the appropriate speed may differ with the type or thickness of the workpiece. In general, higher speeds will allow you to cut workpieces faster but the service life of the blade will be reduced. Workpiece to be cut C00267 Number on adjusting dial Wood 6 Autoclaved lightweight concrete 5 - 6 Mild steel 3 - 4 Aluminum 3 - 5 Plastics 1 - 4 Stainless steel 1 - 2 NOTE: • If the tool is operated continuously at low speeds for a long period of time, the operation life of the motor will be reduced. • The speed adjusting dial can be turned only as far as 6 and back to 1. Do not force it past 6 or 1, or the speed adjusting function may no longer work. The tools equipped with electronic function are easy to operate because of the following features. Constant speed control Electronic speed control for obtaining constant speed. Possible to get fine finish, because the rotating speed is kept constant even under load condition. Soft start feature Safety and soft start because of suppressed starting shock. ASSEMBLY CAUTION: • Always be sure that the tool is switched off and unplugged before carrying out any work on the tool. Installing or removing the saw blade CAUTION: • Always clean out all chips or foreign matter adhering to the blade, blade clamp and/or slider. Failure to do so may cause insufficient tightening of the blade, resulting in a serious injury. To install the saw blade, always make sure that the blade clamp sleeve is in released position before inserting the saw blade. If the blade clamp sleeve is in fixed position, 5
-
 1
1 -
 2
2 -
 3
3 -
 4
4 -
 5
5 -
 6
6 -
 7
7 -
 8
8 -
 9
9 -
 10
10 -
 11
11 -
12
-
13
-
14
-
15
-
16
-
17
-
18
-
19
-
20
-
21
-
22
-
23
-
24
 |
 |
