Maytag MFX2876DRE Use & Care Guide - Page 19
Water and Ice Dispensers
 |
View all Maytag MFX2876DRE manuals
Add to My Manuals
Save this manual to your list of manuals |
Page 19 highlights
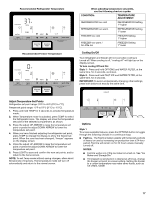
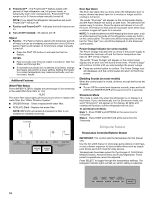
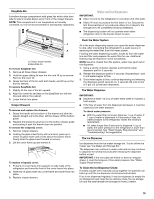
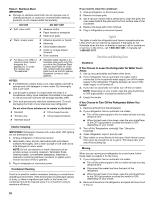
EasySlide Bin A shallow storage compartment with glass lids which slide from side to side is located below and in front of the crisper drawers. NOTE: This compartment is not temperature or humidity controlled, so it is not recommended for storing leafy vegetables. A B A. Crisper drawer handles B. EasySlide bin To remove EasySlide bin: 1. Remove all three crisper drawers. 2. Hold the upper sliding lid near the trim and lift up to remove. Remove the lower lid. 3. Grasp the front of the bin with both hands, and lift up on the front to remove. To replace EasySlide bin: 1. Slightly tilt the rear of the bin upward. 2. Align the center rib and tabs on the EasySlide bin with the ribs and slots in the cabinet. 3. Lower the bin into place. Crisper Drawers To remove and replace the drawers: 1. Grasp the handle at the bottom of the drawer and slide the drawer straight out to the stop. Lift the drawer off the bottom guide. 2. Replace the drawer by placing it on the bottom drawer guide and pushing it past the drawer stop into position. To remove the crisper(s) cover: 1. Remove crisper drawers. 2. Holding the glass insert firmly with one hand, press up in center of glass insert until it rises above the plastic frame. Gently slide the glass insert forward to remove. 3. Lift the cover frame up and remove it. To replace crisper(s) cover: 1. Fit back of cover frame into supports on side walls of the refrigerator and lower the front of the cover frame into place. 2. Slide rear of glass insert into cover frame and lower front into place. 3. Replace crisper drawers. Water and Ice Dispensers IMPORTANT: ■ Allow 3 hours for the refrigerator to cool down and chill water. ■ Allow 24 hours to produce the first batch of ice. Discard the first three batches of ice produced. Allow 2 to 3 days for the storage bin to fill completely following installation. ■ The dispensing system will not operate when either refrigerator door or the freezer drawer is open. Flush the Water System Air in the water dispensing system can cause the water dispenser to drip. After connecting the refrigerator to a water source or replacing the water filter, flush the water system. Flushing the water dispensing system, forces air from the water line and filter and prepares the water filter for use. Additional flushing may be required in some households. NOTE: As air is cleared from the system, water may spurt out of the dispenser. 1. Using a sturdy container, depress and hold the water dispenser pad for 5 seconds. 2. Release the dispenser pad for 5 seconds. Repeat steps 1 and 2 until water begins to flow. 3. Once water begins to flow, continue depressing and releasing the dispenser pad (5 seconds on, 5 seconds off) until a total of 3 gal. (12 L) has been dispensed. The Water Dispenser IMPORTANT: ■ Dispense at least 1 qt (1 L) of water every week to maintain a fresh supply. ■ If the flow of water from the dispenser decreases, it could be caused by low water pressure. To check water pressure: ■ With the water filter removed, dispense 1 cup of water. If 1 cup of water is dispensed in 8 seconds or less, the water pressure to the refrigerator meets the minimum requirement. ■ If it takes longer than 8 seconds to dispense 1 cup of water, the water pressure to the refrigerator is lower than recommended. See "Water Supply Requirements" and "Troubleshooting" for suggestions. The Ice Dispenser Ice dispenses from the ice maker storage bin. To turn off the ice maker, see "Ice Maker and Storage Bin." The dispenser may continue to make noise and ice may continue to dispense for several seconds after releasing the dispenser button or pad. IMPORTANT: If the ice cubes are hollow or have an irregular shape, it could be because of low water pressure. See "Water Supply Requirements." To Clean the Ice Dispenser Chute: Humidity causes ice to naturally clump together. Ice particles can build up until the ice dispenser chute becomes blocked. If ice is not dispensed regularly, it may be necessary to empty the ice storage bin and clean the ice delivery chute, the ice storage bin and the area beneath the storage bin every 2 weeks. 19
-
 1
1 -
2
-
3
-
4
-
5
-
6
-
7
-
8
-
9
-
10
-
11
-
12
-
13
-
 14
14 -
 15
15 -
 16
16 -
 17
17 -
 18
18 -
 19
19 -
 20
20 -
 21
21 -
 22
22 -
 23
23 -
 24
24 -
25
-
26
-
27
-
28
-
29
-
30
-
31
-
32
-
33
-
34
-
35
-
36
-
37
-
38
-
39
-
40
-
41
-
42
-
43
-
44
-
45
-
46
-
47
-
48
-
49
-
50
-
51
-
52
-
53
-
54
-
55
-
56
-
57
-
58
-
59
-
60
-
61
-
62
-
63
-
64
-
65
-
66
-
67
-
68
-
69
-
70
-
71
-
72
-
73
-
74
-
75
-
76
-
77
-
78
-
79
-
80
-
81
-
82
-
83
-
84
-
85
-
86
-
87
-
88
-
89
-
90
-
91
-
92
-
93
-
94
-
95
-
96
-
97
-
98
-
99
-
100
 |
 |
