Maytag MRT311FFFZ Use & Care Guide - Page 11
Refrigerator Use - model
 |
View all Maytag MRT311FFFZ manuals
Add to My Manuals
Save this manual to your list of manuals |
Page 11 highlights
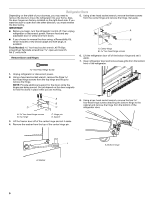
Install Air Filter On some models, your refrigerator's accessory packet includes an air filter, which must be installed prior to use. On some models, the air filter is already installed at the factory. Replacing the Air Filter The disposable air filter should be replaced every 6 months. To order a replacement air filter, contact us using the assistance/service information following the warranty. 1. Remove the old air filter by squeezing in on the side tabs. 2. Remove the old status indicator. 3. Install the new air filter and reset the status indicator using the instructions in the previous sections. REFRIGERATOR USE The air filter reduces the buildup of odors. This helps to maintain a cleaner environment inside the refrigerator. Installing the Air Filter The filter should be installed behind the vented door which is located (depending on your model) along either the rear or left interior wall near the top of the refrigerator compartment. 1. Remove the air filter from its packaging. 2. Lift open the vented door. 3. Snap the filter into place. Air Filter Status Indicator The filter comes with a status indicator which should be activated and installed at the same time the air filter is installed. REPLACE MONTHS Using the Controls Your refrigerator has two controls that affect the temperature. The Temperature control is located at the top front of the refrigerator compartment, and the Airflow control is located on the back wall of the freezer compartment. IMPORTANT: ■ The recommended setting should be correct for normal household refrigerator use. The controls are set correctly when milk or juice is as cold as you like and when ice cream is firm. ■ Wait 24 hours for your refrigerator to cool completely before adding food. If you add food before the refrigerator has cooled completely, your food may spoil. NOTE: Adjusting the refrigerator and freezer temperature controls to a colder-than-recommended setting will not cool the compartments any faster. ■ If the temperature is too warm or too cold in the refrigerator or freezer, first check the air vents to be sure they are not blocked before adjusting the controls. Temperature Control For your convenience, the temperature control is preset at the factory. When you first install your refrigerator, make sure the control is still preset as shown. Recommended Setting 1. Place the indicator face-down on a firm, flat surface. 2. Apply pressure to the bubble on the back of the indicator, until the bubble pops to activate the indicator. 3. Lift open the vented air filter door. On some models, there are notches behind the door. On models with notches: ■ Slide the indicator down into the notches, facing outward. NOTE: The indicator will not easily slide into the notches if the rear bubble has not been popped. ■ Close the air filter door and check that the indicator is visible through the rectangular hole in the door. On models without notches: ■ Store the indicator in a visible place you will easily remember - either inside the refrigerator or elsewhere in your kitchen or home. Cooling Off/On ■ To turn cooling off, press and hold TEMP SETTING for 4 seconds until all lights turn on for 1 second. To turn cooling back on, press and hold TEMP SETTING again for 4 seconds. NOTE: Neither compartment will cool when the control is set to OFF. 11
-
 1
1 -
2
-
3
-
4
-
5
-
 6
6 -
 7
7 -
 8
8 -
 9
9 -
 10
10 -
 11
11 -
 12
12 -
 13
13 -
 14
14 -
 15
15 -
 16
16 -
17
-
18
-
19
-
20
-
21
-
22
-
23
-
24
-
25
-
26
-
27
-
28
-
29
-
30
-
31
-
32
-
33
-
34
-
35
-
36
-
37
-
38
-
39
-
40
 |
 |
