Maytag MSD2650KEU Use and Care Manual - Page 12
Fresh Food Features - manual
 |
View all Maytag MSD2650KEU manuals
Add to My Manuals
Save this manual to your list of manuals |
Page 12 highlights
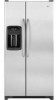
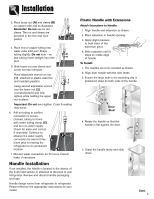
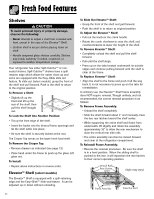
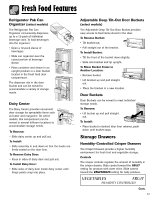
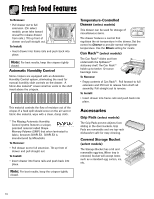
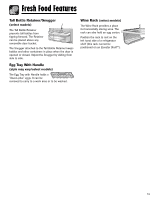
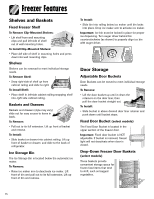
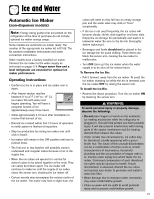
Fresh Food Features Shelves CAUTION To avoid personal injury or property damage, observe the following: • Never attempt to adjust a shelf that is loaded with food, except in the case of the ElevatorTM Shelf. • Confirm shelf is secure before placing items on shelf. • Handle tempered glass shelves carefully. Shelves may break suddenly if nicked, scratched, or exposed to sudden temperature change. Your refrigerator has either Spill-Catcher™ or nonsealed shelves. Spill-Catcher™ shelves have a spill retainer edge which allows for easier clean up and some are equipped with the Easy-Glide slide out feature. To slide out (select models), grasp the front of the shelf and pull forward. Push in the shelf to return to the original position. To Remove a Shelf: • Slightly tilt up the front and lift up the rear of the shelf, then pull the shelf straight out. To Lock the Shelf Into Another Position: • Tilt up the front edge of the shelf. • Insert the hooks into the desired frame openings and let the shelf settle into place. • Be sure the shelf is securely locked at the rear. The Crisper Top serves as the lower fresh food shelf. To Remove the Crisper Top: • Remove drawers as indicated (see page 13). • Place hand under the frame to push up the glass. Lift glass out. To Install: • Repeat above instructions in reverse order. Elevator™ Shelf (select models) The Elevator™ Shelf is equipped with a spill-retaining edge and the Easy-Glide™ slide-out feature. It can be adjusted up or down without unloading. To Slide Out Elevator™ Shelf: • Grasp the front of the shelf and pull forward. • Push the shelf in to return to original position. To Adjust the Elevator™ Shelf: • Pull out the knob on the crank handle. • Rotate the crank clockwise to raise the shelf, and counterclockwise to lower the height of the shelf. To Remove Elevator™ Shelf: • Completely unload the shelf and pull the shelf forward. • Pull until the shelf stops. • Press up on the tabs located underneath its outside edges and continue pulling forward until the shelf is clear of the frame. To Replace Elevator™ Shelf: • Align the shelf to the frame and push it all the way back. It is not necessary to press up on the tabs for reinstallation. In ordinary use, the Elevator™ Shelf frame assembly does NOT require removal. Though unlikely, and not recommended, the correct removal procedure is as follows: To Remove Frame Assembly: • Unload the shelf completely. • Slide the shelf forward about 2" and manually move the two rear latches toward the shelf center. • While supporting the entire shelf and frame from underneath, lift slightly and rotate the assembly approximately 30° to allow the rear mechanism to clear the vertical rear side rails. • The entire assembly can then be moved forward and clear of the refrigerator compartment. To Reinstall Frame Assembly: • Reverse the removal procedure. Be sure the shelf is in a level position. When the sliding shelf is pushed to the rear, it will reposition the rear latches to their correct operating position. (style may vary) 11
-
 1
1 -
2
-
3
-
4
-
5
-
6
-
 7
7 -
 8
8 -
 9
9 -
 10
10 -
 11
11 -
 12
12 -
 13
13 -
 14
14 -
 15
15 -
 16
16 -
 17
17 -
18
-
19
-
20
-
21
-
22
-
23
-
24
-
25
-
26
-
27
-
28
-
29
-
30
-
31
-
32
-
33
-
34
-
35
-
36
-
37
-
38
-
39
-
40
-
41
-
42
-
43
-
44
-
45
-
46
-
47
-
48
-
49
-
50
-
51
-
52
-
53
-
54
-
55
-
56
-
57
-
58
-
59
-
60
-
61
-
62
-
63
-
64
-
65
-
66
-
67
-
68
-
69
-
70
-
71
-
72
-
73
-
74
-
75
-
76
-
77
-
78
-
79
-
80
-
81
-
82
-
83
-
84
-
85
-
86
-
87
-
88
-
89
-
90
-
91
-
92
-
93
-
94
-
95
-
96
-
97
-
98
-
99
-
100
-
101
-
102
-
103
-
104
-
105
-
106
-
107
-
108
-
109
-
110
-
111
-
112
 |
 |