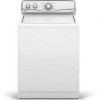
Maytag MTW5600TQ Use and Care Guide
Maytag MTW5600TQ - Centennial Washer Manual
 |
View all Maytag MTW5600TQ manuals
Add to My Manuals
Save this manual to your list of manuals |
Maytag MTW5600TQ manual content summary:
- Maytag MTW5600TQ | Use and Care Guide - Page 1
AUTOMATIC WASHER USE & CARE GUIDE LAVEUSE AUTOMATIQU E GUIDE D'UTILISATION ET D'ENTRETIEN FOR QUESTIONS ABOUT FEATURES, OPERAEION/PERFORMANCE, PARTS, ACCESSORIES OR SERVICE CAI L: 1.800.688.9900 IN CANADA, CALL: 1.800.807.6777 VISEF OUR WEBSITE AT WWW.MAYTAG.COM IN CANADA, WWW.MAYTAG.CA W10150597A - Maytag MTW5600TQ | Use and Care Guide - Page 2
Robinets d'arriv#e d'eau ... 34 Moving and Storage ...TROUBLESHOOTING ... 15 Preparation avant un entreposage ou un d_m#nagement 34 16 DI_PANNAGE ... 35 Washer and Components Washer Operation ...Washer Results ...ASSISTANCE OR SERVICE ...In the U.S.A ...In Canada ...Accessories ...WARRANTY - Maytag MTW5600TQ | Use and Care Guide - Page 3
WASHER SAFETY Your safety and the safety of others are very important. We have provided many important safety messages in this manual injured if you don't immediately follow instructions. You can be killed or seriously injured if you don't follow instructions. S_ All safety messages will tell - Maytag MTW5600TQ | Use and Care Guide - Page 4
will be exposed to the weather. [] Do not tamper with controls. [] Do not repair or replace any part of the washer or attempt any servicing unless specifically recommended in this manual or in published user-repair instructions that you understand and have the skills to carry out. [] See "Electrical - Maytag MTW5600TQ | Use and Care Guide - Page 5
20-] 00 psi (138-690 kPa) for best performance. • A level floor with a maximum slope of 1" (2.5 cm) under entire washer. Installing the washer on carpeting is not recommended. • A sturdy floor to support the washer weight (washer, water and load) of 315 Ibs (143 kgs). Do not store or operate your - Maytag MTW5600TQ | Use and Care Guide - Page 6
should be considered for ease of installation and servicing. • Additional clearances may be required for the top of the wash tub. Secure drain hose with beaded tie strap. The washer can standpipe adapter kit is available. See "lbols and Parts." The top of the standpipe must be at least 39" (99 - Maytag MTW5600TQ | Use and Care Guide - Page 7
is properly grounded. • Do not have a fuse in the neutral or ground circuit. GROUNDING INSTRUCTIONS For a grounded, cord-connected washer: This washer must be grounded• In the event of a malfunction or breakdown, grounding will reduce the risk of electrical shock by providing a path of least - Maytag MTW5600TQ | Use and Care Guide - Page 8
washer to within approximately 3 ft (90 cm) of its final location. 2. [he washer must be in the upright position material. and not tilted before removing the shipping 3. Locate the yellow shipping materials on the rear of the machine, near the bottom. Follow the steps for your particular model - Maytag MTW5600TQ | Use and Care Guide - Page 9
damage due to water leakage. Read and follow these instructions. The drain hose is connected to your washer and is stored inside the washer cabinet. Remove drain hose from washer cabinet Gently pull the corrugated drain hose out of the washer from the top of the hose. Continue to pull the hose - Maytag MTW5600TQ | Use and Care Guide - Page 10
Parts." • Check the temperature of the water to make sure that the hot water hose is connected to the hot water faucet and that the cold water hose is connected to the cold water faucet. The washer on coupling by hand until it is seated on the washer. NOTE: Do not overtighten or use tape or - Maytag MTW5600TQ | Use and Care Guide - Page 11
excessive noise and vibration. Install the Front Leveling Feet 1. Prop up the front of the washer about 4" (10.2 cm) with a wood block or similar object [he block needs to support the weight of the washer. 9eciure he D "a H }se 1. Remove the shipping material from the power cord. Drape the power - Maytag MTW5600TQ | Use and Care Guide - Page 12
washer by placing a level on the top edges of the washer, first side to side, then front to back. (2.5 cm) f 3. Screw the feet into the threaded holes at the front corner of the washer until the nuts touch the washer Check that all parts are now installed. If there is an extra part, go back through - Maytag MTW5600TQ | Use and Care Guide - Page 13
the washer basket or detergent dispenser /on some models). Close the lid. Select any cycle, and then pull the Cycle Control knob out to start the washer. . Failure to fellow these instructions can result in death, fire, or electrical shock. 2. Drop a sorted load of clothes loosely into your washer. - Maytag MTW5600TQ | Use and Care Guide - Page 14
load. Pour measured liquid chlorine bleach into the liquid chlorine bleach dispenser. Bleach is immediately fed into the washer and is diluted automatically during the wash part of the cycle. • Dispensers on Timed Bleach models instructions. The Automatic Temperature Control (ATC) (on some models) - Maytag MTW5600TQ | Use and Care Guide - Page 15
Temperature Guide Wash Temp Hot Warm Cool Cold Suggested Fabrics Whites and pastels hard water deposits using only cleaners labeled as washer safe. Cleaning the liquid fabric softener dispenser (on some models): 1. Remove dispenser by grasping top with both hands and squeezing, while pushing upward - Maytag MTW5600TQ | Use and Care Guide - Page 16
Plug in washer or reconnect power. TROUBLESHOOTING First try the solutions suggested here or visit our website and reference FAQs (Frequently to possibly avoid the cost of a service call In U.S.A. www.maytag.com/help In Canada www.maytag.ca Asked Questions) Noisy • Is the load balanced and the - Maytag MTW5600TQ | Use and Care Guide - Page 17
The top of the agitator is much higher than the highest water level. This is normal and necessary for clothes to move freely. • Has a household fuse blown, or has a circuit breaker tripped? Replace the fuse or reset the circuit breaker. If the problem continues, call an electrician. • Is the washer - Maytag MTW5600TQ | Use and Care Guide - Page 18
bleach properly? Do not pour chlorine bleach directly onto load. Wipe up bleach spills. Undiluted bleach will damage fabrics. Do not place load items on top of the bleach dispenser when loading and unloading the washer/on some models). • Did you follow the manufacturer's care label instructions? 18 - Maytag MTW5600TQ | Use and Care Guide - Page 19
!__}i__!!_i!!g ASSISTANCE OR SERVICE Before calling for assistance or service, please check "Troubleshooting." It may save you the cost of a service call. If you still need help, follow the instructions below. When calling, please know the purchase date and the complete model and serial number of - Maytag MTW5600TQ | Use and Care Guide - Page 20
according to instructions attached to or furnished with the product, Maytag Corporation or Maytag Limited (hereafter "Maytag") will pay for Factory Specified Parts and repair labor to correct defects in materials or workmanship. Service must be provided by a Maytag designated service company. This - Maytag MTW5600TQ | Use and Care Guide - Page 21
signifient : Risque possible de deces ou de blessure grave si vous ne suivez pae immediatement lee instructions. Risque possible de deces ou de blessure grave si vous ne suivez pas lee instructions. Tous les messages de securite vous diront quel est le danger potentiel et vous disent comment reduire - Maytag MTW5600TQ | Use and Care Guide - Page 22
Ne pas reparer ou remplacer un composant quelconque de la laveuse, ni entreprendre une operation de service, si ce n'est specifiquement recommande dans ce manuel ou darts un manuel d'instructions de reparations destine a I'utilisateur; il est alors essentiel que la personne concernee comprenne ces - Maytag MTW5600TQ | Use and Care Guide - Page 23
des informations sur la commande, veuillez consulter les num_ros de t_l_phone sans frais d'interurbain figurant sur la page de couverture du Guide d'utilisation et d'entretien. Evier de buanderie ou canalisation d'dvacuation rigide plus haut que 96" (2,4 m) Tuyau rigide de 1" (2,5 cm) de diam6tre - Maytag MTW5600TQ | Use and Care Guide - Page 24
laveusaevecunechargteotale(laveuseea,uet linged)e315Ib(143kg). Nepasrangenrifairefoncfionn[ear[aveus_edestemp&aturiensf&ieure_s32°F(O°CU).n r_siddu'eaudansla laveusreisqudeecausedresdommag_ebsasste mp&atuVreo.ir "Entretiednelalaveuse". Installation dans un encastrement - Maytag MTW5600TQ | Use and Care Guide - Page 25
_ la terre de la laveuse, v6rifier aupr_s d'un _lectricien qualifi_. • Ne pas utiliser un fusible dans le circuit neutre ou de liaison _ la terre. INSTRUCTIONS DE LIAISON h, LATERRE Pour une laveLise reliee a la terre et connectee par LIB cordon : Cette laveuse doit _tre reliee A la terre. En cas - Maytag MTW5600TQ | Use and Care Guide - Page 26
Risque du poids excessif Utiliser deux ou plus de personnes pour deplacer et installer la laveuse. Le non-respect de cette instruction peut causer une blessure au dos ou d'autre blessure. REMARQUE : Placer la laveuse sur du carton pour prot_ger le plancher, avant de la d6placer. Le - Maytag MTW5600TQ | Use and Care Guide - Page 27
tement d#gag_es de la laveuse. Veiller _ raccorder correctement le tuyau de vidange pour qu'aucune fuite d'eau ne puisse d_t_riorer le plancher. I.ire les instructions ci-dessous et les suivre _ la lettre. I.e tuyau de vidange est connect# _ la laveuse et est remis_ _ I'int#rieur de la caisse de la - Maytag MTW5600TQ | Use and Care Guide - Page 28
Vidange dans I'_vier de buanderie ou dans le tuyau de rejet _ I'_gout Connexion de la bride de retenue sur le tuyau de vidange ondul_ Raccordement des tuyaux d'arriv_e d'eau aux robinets Vdrifier que le panier de la laveuse est vide. 1. Connecter le tuyau comportant la mention "chaud" au robinet d' - Maytag MTW5600TQ | Use and Care Guide - Page 29
Raccorder les tuyaux d'arriv_e d'eau _ la laveuse Inspection--recherche des fuites Ouvrir les robinets d'eau; inspecter pour rechercher les fuites. Une petite quantit(! d'eau peut p_n(!trer dans la laveuse. II suffira de la vidanger plus tard. REMARQUE : Remplacer les tuyaux d'arriv_e d'eau - Maytag MTW5600TQ | Use and Care Guide - Page 30
n'est pas d'aplomb. 1. Soulever I'avant de la laveuse d'environ 4" (10,2 cm) avec un bloc de bois ou un objet semblable. I.e bloc dolt pouvoir supporter le poids de la laveuse. / j 4. Incliner la laveuse vers I'arri6re et enlever le bloc de bois. Abaisser doucement jusqu'au plancher. la laveuse - Maytag MTW5600TQ | Use and Care Guide - Page 31
Ne pas utiiiser un adaptateur. Ne pas utiiiser un c_bie de raiionge. Le non-respect de ces instructions peut causer un deces, un incendie ou un choc eiectrique. 1. Consultleerssp(!cificatio(!nlesctriqueVs(.!rifieqruelatensio_nlectriqudeisponibelest correcetetquelaprisedecouranetstconvenablemrelni6t - Maytag MTW5600TQ | Use and Care Guide - Page 32
. Ne pas faire secher des articles qui ont ere sails par tout genre d'huile (y cornpris les huiles de cuisson). Le non-respect de ces instructions peut causer un deces, une explosion ou un incendie. AVERI ISSEMEN I : Pour r6duire le risque d'incendie, de choc 61ectrique ou de blessures corporelles - Maytag MTW5600TQ | Use and Care Guide - Page 33
essorage avec le couvercle ouvert. 6. [burner le s_lecteur lOAD SIZE (volume de la charge) ou WA[ER [.EVE sans danger pour le tissu. Suivre les instructions sur 1'Gtiquette des v&tements. ka Commande minimum d'environ 70°F (21°C). Guide de temperature Temperature de lavage Tissus sugg_r_s - Maytag MTW5600TQ | Use and Care Guide - Page 34
pas enlever la broche de liaison a la terre. Ne pas utiliser un adaptateur. Ne pas utiliser un c_ble de rallonge. Le non-respect de ces instructions peut causer un d_ces, un incendie ou un choc _lectrique. 2. Brancher la laveuse ou reconnecter la source de courant _lectrique. 3. Faire faire un - Maytag MTW5600TQ | Use and Care Guide - Page 35
ici ou visiter notre site Intemet et la FAQ (foire aux questions) pour _viter possiblement le co_t d'un appel de service. Aux I_.-U., www.maytag.com/help Au Canada, www.maytag.ca Bruit La charge est-elle _quilibr_e et la laveuse d_aplomb? I.a charge de lavage devrait _tre _quilibr(_e et pas - Maytag MTW5600TQ | Use and Care Guide - Page 36
la broche de liaison a la terre. Ne pas utiliser un adaptateuro hie pas utiliser un c_ble de rallonge. Le non-respect de ces instructions peut causer un deces, un incendie ou un choc electrique. • I e cordon d'allmentatlon est-il branch_ dans line prise _ 3 alv_oles reli_e _ la terre? Brancher - Maytag MTW5600TQ | Use and Care Guide - Page 37
la charge sur le dessus du distributeur d'eau de ]avel Iorsque vous chargez et d6chargez la laveuse (sur certains mod&les). • Avez-vous suivi les instructions d_entretien du fabricant indiquges sur I'gtiquette? - Maytag MTW5600TQ | Use and Care Guide - Page 38
service. Si vous avez encore besoin d'aide, suivez les instructions Maytag Services, IJ.C ou appeler le centre de service d6sign_ par Maytag le plus proche. T(!l_phoner sans frais au Centre d'assistance _ la client61e de Maytage Services , convient a tousles modeles Produit de nettoyage polyvalent - Maytag MTW5600TQ | Use and Care Guide - Page 39
ou n'est pas installe conformement aux instructions d'installation fournies. 11. Le coot Maytag autorise pour determiner si une autre garantie s'applique. Si vous avez besoin de service, voir d'abord la section "Depannage" du Guide service en cas de besoin. Vous devrez connaftre le numero de modele - Maytag MTW5600TQ | Use and Care Guide - Page 40
W10150597A SP PN W10150598A © 2007 All rights reserved. _us @oits I_serv_s. MAYTAG and the "M" Symbol are registered trademarks of Maytag Limited in Canada. MAYTAG et [e symbole "M" sont des marques dd _os6es de Mayta_ Limited au Canada. A[] other marks are trademarks of Mavtag Cor _oration or its
-
 1
1 -
 2
2 -
 3
3 -
 4
4 -
 5
5 -
 6
6 -
 7
7 -
8
-
9
-
10
-
11
-
12
-
13
-
14
-
15
-
16
-
17
-
18
-
19
-
20
-
21
-
22
-
23
-
24
-
25
-
26
-
27
-
28
-
29
-
30
-
31
-
32
-
33
-
34
-
35
-
36
-
37
-
38
-
39
-
40
 |
 |

NIAYI-'AG
®
AUTOMATIC
WASHER
USE & CARE GUIDE
LAVEUSE AUTOMATIQU
E
GUIDE
D'UTILISATION
ET D'ENTRETIEN
FOR
QUESTIONS
ABOUT
FEATURES,
OPERAEION/PERFORMANCE,
PARTS, ACCESSORIES
OR
SERVICE
CAI L: 1.800.688.9900
IN CANADA,
CALL:
1.800.807.6777
VISEF OUR
WEBSITE
AT WWW.MAYTAG.COM
IN CANADA,
WWW.MAYTAG.CA
AU
CANADA,
POUR
ASSISTANCE,
INS FAI LAEION
OU
SERVICE,
COMPOSER
I E : 1.800.807.6777
OU
VISFfER
NOfRE
SFFE INTERNET
,_
WWW.MAYTAG
.CA
W10150597A