McAfee AVM85M User Guide - Page 30
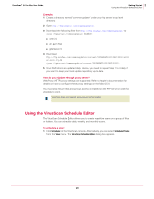
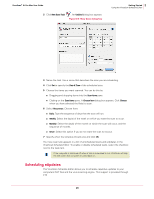
Scheduled, Tasks, VirusScan, Schedule Editor, New eUpdate Task, Untitled, Date & Time, Recurrence
 |
UPC - 731944564609
View all McAfee AVM85M manuals
Add to My Manuals
Save this manual to your list of manuals |
Page 30 highlights
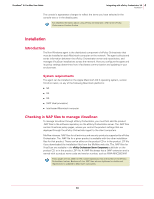
VirusScan® 8.6 for Mac User Guide 3 Getting Started Using the VirusScan Schedule Editor eUpdate is programmed to check for new updates on its own. However, you can schedule additional eUpdates or modify the existing schedule. To schedule an eUpdate: 1 From the View menu, select Scheduled Tasks. The VirusScan Schedule Editor dialog box appears. 2 Click New eUpdate Task. An Untitled window appears. Figure 3-6 New eUpdate dialog box 3 Type a name for the task. We recommend using a name that describes the task you are scheduling. 4 Click Set to specify a Date & Time for the update to occur. 5 Select Recurrence. Choose from: „ Daily: Type the sequence of days you want the eUpdate to connect. „ Weekly: Select the day(s) of the week on which you want the eUpdate to occur. „ Monthly: Select the day(s) of the month you want the automatic update, and the sequence of months. „ Never: Select this option if you do not want the automatic update to reoccur. 6 Select an end date and click OK. Your new eUpdate task appears in a list of all scheduled scans and eUpdates in the VirusScan Schedule Editor. To enable or disable eUpdate tasks, select the check box next to the appropriate task item. eUpdate will automatically start when an update is available. To initiate an unscheduled eUpdate: 1 Open the VirusScan console. 2 Click the eUpdate tab to switch to the eUpdate pane. 3 Click Start to check if new virus definitions are available for download. 30
-
 1
1 -
2
-
3
-
4
-
5
-
6
-
7
-
8
-
9
-
10
-
11
-
12
-
13
-
14
-
15
-
16
-
17
-
18
-
19
-
20
-
21
-
22
-
23
-
24
-
 25
25 -
 26
26 -
 27
27 -
 28
28 -
 29
29 -
 30
30 -
 31
31 -
 32
32 -
 33
33 -
 34
34 -
 35
35 -
36
-
37
-
38
-
39
-
40
-
41
-
42
-
43
-
44
-
45
-
46
-
47
-
48
-
49
-
50
-
51
-
52
-
53
-
54
-
55
-
56
-
57
-
58
-
59
-
60
-
61
-
62
-
63
-
64
-
65
-
66
-
67
-
68
 |
 |
