McAfee AVM85M User Guide - Page 34
Adding Macintosh Non-Windows Agent NAP file (NWA-MAC300.NAP)
 |
UPC - 731944564609
View all McAfee AVM85M manuals
Add to My Manuals
Save this manual to your list of manuals |
Page 34 highlights
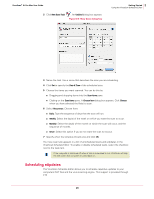
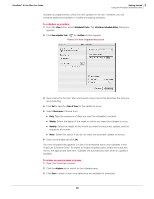
VirusScan® 8.6 for Mac User Guide 4 Integrating with ePolicy Orchestrator 3.6 Installation Adding Macintosh Non-Windows Agent NAP file (NWA-MAC300.NAP) To check in a Macintosh Non-Windows Agent .NAP file to the ePolicy Orchestrator server: 1 Locate the NWA-MAC300.NAP file, either on the product CD or in the installation .ZIP file that you downloaded from the McAfee web site, and save it to a temporary folder accessible from the ePolicy Orchestrator server. 2 Log on to the ePolicy Orchestrator server with administrative rights. 3 In the ePolicy Orchestrator console tree, right-click Repository and select Configure Repository. The Configure Software Repository wizard appears. Alternatively, you can open the wizard by double-clicking Repository in the ePolicy Orchestrator console tree, then clicking Check in NAP in the details pane. Tip 4 Select Add new software to be managed and click Next. 5 In the Select a Software Package dialog box, browse to and select the NWA-MAC300.NAP file you saved to a temporary folder in Step 1 on page 34. 6 Click Open to enable ePolicy Orchestrator to load the selected .NAP file. Adding VirusScan for Mac NAP file (Virex.nap) To add Virex.nap file to the ePolicy Orchestrator server: 1 Locate the Virex.nap file, either on the product CD or in the installation .ZIP file downloaded from the McAfee web site, and save it to a temporary folder accessible from the ePolicy Orchestrator server. 2 Log on to the ePolicy Orchestrator server with administrative rights. 3 In the ePolicy Orchestrator console tree, right-click Repository and select Configure Repository. The Configure Software Repository wizard appears. 4 Select Add new software to be managed and click Next. 5 In the Select a Software Package dialog box, browse to and select the Virex.nap file you saved to a temporary folder in Step 1 on page 34. 6 Click Open to enable ePolicy Orchestrator to load the selected .NAP file. Adding VirusScan for Mac Report NAP file (virexExt.nap) To add virexExt.nap file to the ePolicy Orchestrator server: 1 Locate the virexExt.nap file, either on the product CD or in the installation .ZIP file downloaded from the McAfee website, and save it to a temporary folder accessible from the ePolicy Orchestrator server. 2 Log on to the ePolicy Orchestrator server with administrative rights. 3 In the ePolicy Orchestrator console tree, right-click Repository and select Configure Repository. The Configure Software Repository wizard appears. 4 Select Add new reports and click Next. 34
-
 1
1 -
2
-
3
-
4
-
5
-
6
-
7
-
8
-
9
-
10
-
11
-
12
-
13
-
14
-
15
-
16
-
17
-
18
-
19
-
20
-
21
-
22
-
23
-
24
-
25
-
26
-
27
-
28
-
 29
29 -
 30
30 -
 31
31 -
 32
32 -
 33
33 -
 34
34 -
 35
35 -
 36
36 -
 37
37 -
 38
38 -
 39
39 -
40
-
41
-
42
-
43
-
44
-
45
-
46
-
47
-
48
-
49
-
50
-
51
-
52
-
53
-
54
-
55
-
56
-
57
-
58
-
59
-
60
-
61
-
62
-
63
-
64
-
65
-
66
-
67
-
68
 |
 |