McAfee PSMCDE-AB-AA User Guide - Page 30
Creating New Set of Options in Anti-virus Scanner, Tasks
 |
View all McAfee PSMCDE-AB-AA manuals
Add to My Manuals
Save this manual to your list of manuals |
Page 30 highlights
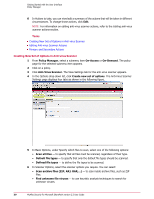
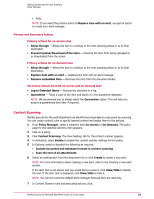
Getting Started with the User Interface Policy Manager 6 In Actions to take, you can view/edit a summary of the actions that will be taken in different circumstances. To change those actions, click Edit. NOTE: For information on editing anti-virus scanner actions, refer to the Editing anti-virus scanner actions section. Tasks Creating New Set of Options in Anti-virus Scanner Editing Anti-virus Scanner Actions Primary and Secondary Actions Creating New Set of Options in Anti-virus Scanner 1 From Policy Manager, select a submenu item On-Access or On-Demand. The policy page for the selected submenu item appears. 2 Click on a policy. 3 Click Anti-Virus Scanner. The View Settings tab for the anti-virus scanner appears. 4 In the Options drop-down list, click Create new set of options. The Anti-Virus Scanner Settings page displays four tabs as shown in the following figure. 5 In Basic Options, under Specify which files to scan, select one of the following options: • Scan all files - to specify that all files must be scanned, regardless of their type. • Default file types - to specify that only the default file types should be scanned. • Defined file types - to define the file types to be scanned. 6 In Scanner Options, select the scanner options you require. You can select: • Scan archive files (ZIP, ARJ, RAR,...) - to scan inside archive files, such as ZIP files. • Find unknown file viruses - to use heuristic analysis techniques to search for unknown viruses. 30 McAfee Security for Microsoft SharePoint version 2.5 User Guide
-
 1
1 -
2
-
3
-
4
-
5
-
6
-
7
-
8
-
9
-
10
-
11
-
12
-
13
-
14
-
15
-
16
-
17
-
18
-
19
-
20
-
21
-
22
-
23
-
24
-
 25
25 -
 26
26 -
 27
27 -
 28
28 -
 29
29 -
 30
30 -
 31
31 -
 32
32 -
 33
33 -
 34
34 -
 35
35 -
36
-
37
-
38
-
39
-
40
-
41
-
42
-
43
-
44
-
45
-
46
-
47
-
48
-
49
-
50
-
51
-
52
-
53
-
54
-
55
-
56
-
57
-
58
-
59
-
60
-
61
-
62
-
63
-
64
-
65
-
66
-
67
-
68
-
69
-
70
-
71
-
72
-
73
-
74
 |
 |
