Memorex Mi1112 User Guide - Page 6
Power Source - specs
 |
View all Memorex Mi1112 manuals
Add to My Manuals
Save this manual to your list of manuals |
Page 6 highlights
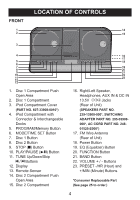
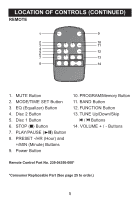
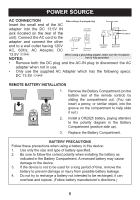
POWER SOURCE AC CONNECTION When using a 3-pronged plug Grounding Lead Insert the small end of the AC adapter into the DC 13.5V IN jack (located on the rear of the 3-pronged Receptacle Screw Receptacle unit). Connect the AC cord to the adapter and connect the other end to a wall outlet having 120V AC, 60Hz. AC Adapter, DC 3-pronged plug Receptacle Box Cover Grounding Adapter Receptacle Box Cover 13.5V Z When using a grounding adapter, make sure the receptacle NOTES: box is fully grounded. • Remove both the DC plug and the AC-IN plug to disconnect the AC adapter when not in use. • Only use the supplied AC Adapter which has the following specs: DC 13.5V Z REMOTE BATTERY INSTALLATION 1. Remove the Battery Compartment (on the bottom rear of the remote control) by sliding the compartment out. (You can insert a penny, or similar object, into the groove on the compartment to help slide it out.) 2. Install a CR2025 battery, paying attention to the polarity diagram in the Battery Compartment (positive side up). 3. Replace the Battery Compartment. BATTERY PRECAUTIONS Follow these precautions when using a battery in this device: 1. Use only the size and type of battery specified. 2. Be sure to follow the correct polarity when installing the battery as indicated in the Battery Compartment. A reversed battery may cause damage to the device. 3. If the device is not to be used for a long period of time, remove the battery to prevent damage or injury from possible battery leakage. 4. Do not try to recharge a battery not intended to be recharged; it can overheat and rupture. (Follow battery manufacturer's directions.) 6
-
 1
1 -
 2
2 -
 3
3 -
 4
4 -
 5
5 -
 6
6 -
 7
7 -
 8
8 -
 9
9 -
 10
10 -
 11
11 -
 12
12 -
13
-
14
-
15
-
16
-
17
-
18
-
19
-
20
-
21
-
22
-
23
-
24
-
25
-
26
-
27
-
28
-
29
-
30
-
31
-
32
-
33
-
34
-
35
-
36
-
37
-
38
-
39
-
40
-
41
-
42
-
43
-
44
-
45
-
46
-
47
-
48
-
49
-
50
-
51
-
52
 |
 |
