Motorola 549478-001-00 User Guide - Page 33
WallPlate Installation
 |
UPC - 766796451012
View all Motorola 549478-001-00 manuals
Add to My Manuals
Save this manual to your list of manuals |
Page 33 highlights
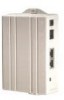
RADIUS network authenticated login WallPlate Installation Basic Configuration The following commands will enable a basic network configuration. The T3 system will ignore the text following the "#" comment character. NOTE: Telnet is recommended due to the TCP flow control. Ranged commands can take several seconds to execute. If the console is used to paste a long string of commands, set a Line Delay of 500ms on your serial program so that the serial buffer does not overflow. If this happens, some commands may be lost or not executed. Login using the serial console or telnet to the default IP address. #BASIC IP AND SYSTEM CONFIGURATION dhcp server enable ip config ip mask gateway ip private enable vlan enable vlan mode local port remote tag system reboot #ENABLE AND CONFIGURE ONE WLAN wifi wlan profile add wifi wlan config wlan(1-25)-1 profile wifi wlan enable wlan(1-25)-1 #ENABLE AND CONFIGURE DSL PORTS AND REMOTE ETHERNET PORTS interface dsl config port(1-25) max-down 10 max-up 10 interface remote enable port(1-25)-(1-2) #ENABLE THE LINE POWER AND RADIO interface wireless enable radio(1-25) interface dsl po en port(1-25) #REBOOT ######## system reboot Tools Required: Number 2 Philips head screwdriver Note: if using a power drill, set the torque clutch to 5 in-lbs. Components provided with the MC-802 WallPlate: 1 - MC-802 WallPlate 1 - RJ11 wall jack mounting adapter 1 - 100mm (4") RJ11 pigtail cable 2 - 6-32 thread forming Philips head screws, 0.375" Motorola, Inc. 570510-001-00 rev A Page 33 of 50
-
 1
1 -
2
-
3
-
4
-
5
-
6
-
7
-
8
-
9
-
10
-
11
-
12
-
13
-
14
-
15
-
16
-
17
-
18
-
19
-
20
-
21
-
22
-
23
-
24
-
25
-
26
-
27
-
 28
28 -
 29
29 -
 30
30 -
 31
31 -
 32
32 -
 33
33 -
 34
34 -
 35
35 -
 36
36 -
 37
37 -
 38
38 -
39
-
40
-
41
-
42
-
43
-
44
-
45
-
46
-
47
-
48
-
49
-
50
 |
 |
