Motorola CLS1110 User Guide
Motorola CLS1110 - CLS 1110 UHF Manual
 |
UPC - 723755565128
View all Motorola CLS1110 manuals
Add to My Manuals
Save this manual to your list of manuals |
Motorola CLS1110 manual content summary:
- Motorola CLS1110 | User Guide - Page 1
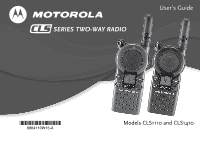
SERIES TWO-WAY RADIO User's Guide @6864110W15@ 1 6864110W15-A Models CLS1110 and CLS1410 - Motorola CLS1110 | User Guide - Page 2
2 - Motorola CLS1110 | User Guide - Page 3
28 Cloning Radio Settings 32 Advanced Features 33 Troubleshooting 35 Use and Care 38 Frequencies and Bandwidths.....39 Spirit GT Series Programming ... 45 Warranty 46 Reading the Display 20 Talking and Receiving 21 Basic Radio Operation 21 Signal Strength and Channel Busy Indicators - Motorola CLS1110 | User Guide - Page 4
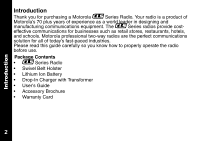
. Motorola professional two-way radios are the perfect communications solution for all of today's fast-paced industries. Please read this guide carefully so you know how to properly operate the radio before use. Package Contents • _Series Radio • Swivel Belt Holster • Lithium Ion Battery • Drop - Motorola CLS1110 | User Guide - Page 5
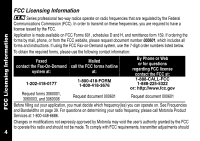
888-390-6456 TTY (Text Telephone) On the Web: www.motorola.com/radios/professional ATTENTION Before using this product, read the RF energy awareness information and operating instructions in the Safety and General Information section of this guide to ensure compliance with RF energy exposure limits - Motorola CLS1110 | User Guide - Page 6
on page 39. For questions on determining your radio frequency, please call Motorola Product Services at 1-800-448-6686. Changes or modifications not expressly approved by Motorola may void the user's authority granted by the FCC to operate this radio and should not be made. To comply with - Motorola CLS1110 | User Guide - Page 7
maintenance and repairs in the private land mobile and fixed services as certified by an organization representative of the user of those services. Replacement of any transmitter component (crystal, semiconductor, etc.) not authorized by the FCC equipment authorization for this radio could violate - Motorola CLS1110 | User Guide - Page 8
Operation. Read This Information Before Using Your Radio. The information provided in this document supersedes the general safety information contained in user guides published prior to December 1, 2002. Transmit and Receive Procedure Your two-way radio contains a transmitter and a receiver. To - Motorola CLS1110 | User Guide - Page 9
replacement antenna. Unauthorized antennas, modifications, or attachments could damage the radio and may violate FCC regulations. DO NOT hold the antenna when the radio is "IN USE." Holding the antenna affects the effective range. Two-Way Radio Operation When using your radio as a traditional two - Motorola CLS1110 | User Guide - Page 10
using any data feature of the radio with or without an accessory cable, position the radio and its antenna at least 1 inch (2.5 cm) from the body. Approved Accessories For a list of approved Motorola accessories visit our website at www.motorola.com. Electromagnetic Interference/Compatibility Note - Motorola CLS1110 | User Guide - Page 11
Safety and General Information Aircraft When instructed to do so, turn off your radio when on board an aircraft. Any use of a radio must be in accordance with applicable regulations per airline crew instructions. Medical Devices - Pacemakers The Advanced Medical Technology Association recommends - Motorola CLS1110 | User Guide - Page 12
use of radios in the area where you drive. Always obey them. When using your radio while driving, please: • Give full attention to driving and to the road. • Use hands-free a radio type especially qualified for use in such areas as "Intrinsically Safe." Do not remove, install, or charge batteries in - Motorola CLS1110 | User Guide - Page 13
in areas posted: "Turn off two-way radio." Obey all signs and instructions. Operational Cautions Antennas Do not use any portable radio that has a damaged antenna. If a damaged antenna comes into contact with your skin, a minor burn can result. Batteries All batteries can cause property damage and - Motorola CLS1110 | User Guide - Page 14
used unless absolutely necessary. Use of an improper extension cord could result in a risk of fire and/or electric shock. If an extension cord must be used The supply cord of this charger cannot be replaced. If the cord is damaged, call Motorola Product Services at 1-800-448-6686 in the USA or - Motorola CLS1110 | User Guide - Page 15
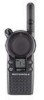
/off Adjust radio volume Use B to: Transmit call tone Use Push to Talk to: Talk Exit a menu Use T to: Monitor the frequency Scan channels (CLS1410 only) Use S to: Lock the keypad Scroll through menus Accessory Jack Use [ and ] to: Change channels (CLS1410 only) Change menu settings Speaker 020976o - Motorola CLS1110 | User Guide - Page 16
of the radio into the holster until it snaps into place. 2. To remove, push the tab on the holster and pull the radio away from the holster. Note: In case of loss, please contact your point-of-sale or call 1-800-448-6686 to request replacement part number HCLN4013. 56532 Swivel Belt Holster 0310 - Motorola CLS1110 | User Guide - Page 17
Getting Started Installing the Batteries Your radio uses a rechargeable Lithium Ion (Li Ion) battery or 3 AAA alkaline batteries with the 56564 AAA Battery Tray (not included with all models). Li Ion Battery 1. If the battery door is already in place, push down on the recess on the door and slide - Motorola CLS1110 | User Guide - Page 18
the Battery Use only the charger supplied with the radio, or other _Series power accessories. For optimum battery life, do not charge the battery for prolonged periods after it is fully charged. Charging the battery over the weekend is acceptable. Using the Drop-in Charger 1. Place the charger on - Motorola CLS1110 | User Guide - Page 19
Getting Started Using the 56531 Multi-Unit Charger The Multi-Unit Charger (MUC) allows drop-in charging of up to 6 radios or batteries. Batteries can be charged inside the radios or removed and placed in the MUC separately. Each of the 6 charging pockets can hold a radio or battery, but not both. - Motorola CLS1110 | User Guide - Page 20
Getting Started Charging Status LEDs On the drop-in charger, the radio and battery charging pockets have their own LEDs. On the MUC, each of the 6 charging pockets has an LED. The LEDs are grouped into pairs to show - Motorola CLS1110 | User Guide - Page 21
and the display briefly shows all features and display segments. The radio then displays the current channel (larger number in the center) and the frequency assigned to that channel (on the right indicated by l). The Interference Eliminator Code displays briefly (indicated by y), then the current - Motorola CLS1110 | User Guide - Page 22
hold the radio too close to your ear when adjusting the volume. Getting Started Reading the Display Signal Strength and Channel Busy Indicator Battery Meter Channel Interference Eliminator Code Indicator Programming Mode Scan (CLS1410 Only) 20 VibraCall® Alert Indicator Frequency and Interference - Motorola CLS1110 | User Guide - Page 23
Signal Strength and Channel Busy Indicators When there is activity on a frequency, the radio displays w and the transmit light flashes at a faster rate of once per second. When there is activity on the same frequency and code as your radio (your radio is receiving), the radio displays w and a signal - Motorola CLS1110 | User Guide - Page 24
Outdoor Flat ground with no obstructions Up to 5 miles Talking and Receiving Handsfree Use (VOX) (CLS1410 only) The CLS1410 model radio can operate handsfree when used with compatible voice activation (VOX) accessories. A short delay occurs between the time when you start talking and when the - Motorola CLS1110 | User Guide - Page 25
VOX (with audio accessory). 2. Press [ or ] to select the sensitivity level: 0 = Off 1 = Low 2 = Medium 3 = High Locking the Keypad External VOX 020995o You can lock the keypad to avoid accidentally changing your radio settings. 1. Press and hold S for 3 seconds. 2. To unlock, press and hold - Motorola CLS1110 | User Guide - Page 26
Scanning (CLS1410 Only) You can scan up to 4 channels and frequencies. When the radio detects activity, it stops scanning and locks in on the active channel. This allows you to talk and listen to the person transmitting without changing channels. 1. To start scanning, briefly press T. The scan icon - Motorola CLS1110 | User Guide - Page 27
has two temporary features to make it easier to use. • Scan advance If the radio stops scanning on a channel you do not want to listen to, press ] to resume scanning for the next active channel. • Nuisance delete Press and hold [ to temporarily remove a channel from the scan list. The channel return - Motorola CLS1110 | User Guide - Page 28
Mode Programming Mode Programming mode allows you to change the following settings on your radio: • Channel • Frequency • Interference eliminator code • Call tones • Microphone gain • Scan list (CLS1410 only) • Available channels (CLS1410 only) Notes: • To talk with someone on your two-way radio - Motorola CLS1110 | User Guide - Page 29
Factory Default Settings Your radio is programmed at the factory to the following settings: Programming Mode Frequency Channel 1 CLS1110 2 CLS1410 2 2 8 3 Not available 5 4 6 Code 1 Call Tone/ VibraCall® Off (0) VOX Not available Off (0) Microphone Gain 2 (medium sensitivity) To - Motorola CLS1110 | User Guide - Page 30
button when programming CSL1410 models, you will return to the front of the Programming Mode. Selecting a Channel (CLS1410 Only) 1. In programming mode, press S until the channel number flashes and the frequency and code display alternately (this is the first setting after you enter programming mode - Motorola CLS1110 | User Guide - Page 31
channels. 1. In programming mode, press S until = displays and the channel number flashes. 2. Press [ or ] to select the number of channels you want available. 3. Press and hold Push to Talk to exit programming mode, or press S to continue programming. Note: The radio retains settings for channels - Motorola CLS1110 | User Guide - Page 32
Tones and VibraCall® (CLS1410 only) Your radio can transmit call tones to other radios in your group so you can alert them that you are about to talk. Your radio is programmed at the factory with call tones turned off (set to 0), but you can change this setting to choose a distinctive call tone. The - Motorola CLS1110 | User Guide - Page 33
avoid hearing unwanted transmissions, you can edit the scan list to skip channels. 1. In programming mode, press S until h displays and the channel number and Y or n flash. 2. Press [ or ] to select the channel you want to remove from the scan list. 3. Press T to display either Y to include the - Motorola CLS1110 | User Guide - Page 34
Cloning Radio Settings You can copy _ Series radio settings from one radio (the source) to a second radio using the 56531 Multi-Unit Charger (MUC) optional accessory. See the MUC User's Guide for more information. You can clone only one radio at a time. A multi-channel radio can clone to a - Motorola CLS1110 | User Guide - Page 35
on. To Do This Press This Button While Turning the Radio On Default Setting Turn Keypad Tones On/Off [ On Turns keypad beeps off for silent keypad operation. Turn End-of-Transmission Tone On/Off If enabled, your two-way radio transmits a tone when you finish transmitting (like saying Roger - Motorola CLS1110 | User Guide - Page 36
Turning the Radio On Default Setting Turn Battery Save Mode On/Off Decreases attack time, which is the brief period of time between when the radio receives a transmission on its frequency and broadcasts audio. Push to Talk T [ On Turning battery save mode off decreases battery life by - Motorola CLS1110 | User Guide - Page 37
pressed while transmitting. Recharge, replace, and/or reposition batteries. Verify the transmit light is illuminated while speaking. Verify Channel, Frequency, and Code settings are correct. Hearing other noises or Frequency may be in use. Change on all radios if possible (see conversation on - Motorola CLS1110 | User Guide - Page 38
to body such as in a pocket or on a belt decreases range. Change location of radio. Confirm radios have the same channel, frequency, and interference eliminator code settings (see page 26). Recharge, replace, and/or reposition batteries. Move to another location. Obstructions and operating indoors - Motorola CLS1110 | User Guide - Page 39
drop-in charger. AAA cells installed in radio. Remove and replace with Li Ion battery. Low battery meter reading although new batteries are installed Verify radio is set to the correct battery type (see page 15). Verify high-capacity alkaline batteries are used for optimal battery life. Cannot - Motorola CLS1110 | User Guide - Page 40
Use and Care XXX Use and Care Use a soft damp cloth to clean the exterior. Do not immerse in water. If the radio is submerged in water... Do not use alcohol or cleaning solutions. Turn radio off and remove batteries. 38 Dry with soft cloth. Do not use radio until completely dry. - Motorola CLS1110 | User Guide - Page 41
charts provide frequency information and are useful when using Motorola _ Series radios with other business radios. Frequency Display Number is identical to Spirit M, GT, and S-Series frequency position (where applicable), but bandwidth may be different. UHF Frequencies Frequencies and Bandwidths - Motorola CLS1110 | User Guide - Page 42
UHF Frequencies (Continued) Display Frequency Number (MHz) Bandwidth Display Frequency Number (MHz) Bandwidth Frequencies and Bandwidths 15 461.1875 12.5 16 461.2125 12.5 17 461.2375 12.5 18 461.2625 12.5 19 461.2875 12.5 20 461.3125 - Motorola CLS1110 | User Guide - Page 43
.5 41 466.2125 12.5 42 466.2375 12.5 43 466.2625 12.5 44 466.2875 12.5 45 466.3125 12.5 46 466.3375 12.5 Display Frequency Number (MHz) Bandwidth 47 466.3625 12.5 48 467.7875 12.5 49 467.8375 12.5 50 467.8625 12.5 51 467.8875 12.5 52 467 - Motorola CLS1110 | User Guide - Page 44
Interference Eliminator Codes Frequencies and Bandwidths Display Number 1 2 3 4 5 6 7 8 9 10 11 12 13 Code (Hz) 67.0 71.9 74.4 77.0 79.7 82.5 85.4 88.5 91.5 94.8 97.4 100.0 103.5 Display Number 14 15 16 17 18 19 20 21 22 23 24 25 26 Code (Hz) 107.2 110.9 114.8 118.8 123.0 127.3 131.8 136.5 141 - Motorola CLS1110 | User Guide - Page 45
41 42 43 44 45 46 47 48 49 50 51 52 53 Digital Code 023 025 026 031 032 043 047 051 054 065 071 072 073 074 61 62 63 64 65 66 67 68 Digital Code 115 116 125 131 132 134 143 152 155 156 162 165 172 174 205 Display Number Digital Code Frequencies and Bandwidths 69 223 70 226 71 243 72 - Motorola CLS1110 | User Guide - Page 46
Frequencies and Bandwidths Display Number 84 85 86 87 88 89 90 91 92 93 94 95 96 Digital Interference Eliminator Codes (Continued) Digital Code 346 351 364 365 371 Number 97 98 99 100 101 102 103 104 105 106 107 108 109 Digital Code 465 466 503 506 516 532 546 565 606 612 624 627 631 Display - Motorola CLS1110 | User Guide - Page 47
replace the Spirit GT Series radio. The first eight frequencies and 38 interference eliminator codes of _ Series are compatible with Spirit GT Series. To program your _Series radio to talk with a Spirit GT Series, verify or change your Spirit GT settings as follows. To verify the frequency and code - Motorola CLS1110 | User Guide - Page 48
by the first end-user: • Products. The warranty is for one year. Exception: The warranty for Spirit GT Series and Talkabout Series two-way radio accessories (including the Spirit GT Series batteries) is for 90 days. • Software. The warranty is for 90 days. • Repairs/Replacements. The warranty is for - Motorola CLS1110 | User Guide - Page 49
the Products' purchase price. We may use functionally equivalent reconditioned/refurbished/pre-owned or new Products or parts. No software updates are provided. V. How to Obtain Warranty Service or Other Information USA Phones 1-800-331-6456 Pagers 1-800-548-9954 Two-Way Radios 1-800-448-6686 - Motorola CLS1110 | User Guide - Page 50
; (e) your address and telephone number. If requested, you must also return all detachable parts such as antennas, batteries and chargers. RETAIN YOUR ORIGINAL PROOF OF PURCHASE. We will ship repaired or replacement Products at our expense for the freight and insurance, but at your expense for any - Motorola CLS1110 | User Guide - Page 51
the Motorola-approved battery charger specified for charging such batteries; (b) have any broken seals or show evidence of tampering; (c) are used other externally exposed parts. • Failure of Products that is due primarily to any communication service or signal you may subscribe to or use with the - Motorola CLS1110 | User Guide - Page 52
covered by this warranty, please call the telephone number previously listed. We will provide information on repair availability, rates, methods of payment, where to send the Products, etc. VII. Some Other Limitations This is Motorola's complete warranty for the Products, and states your exclusive - Motorola CLS1110 | User Guide - Page 53
(c) should the Products become, or in Motorola's opinion be likely to become, the subject of a claim of infringement of a United States patent, you permit us, at our option and expense, either to: procure for you the right to continue using the Products; replace or modify them so that they become - Motorola CLS1110 | User Guide - Page 54
and other countries preserve for Motorola and other third party software providers certain exclusive rights for copyrighted software, such as the exclusive rights to reproduce in copies and distribute copies of such software. The software may be copied into, used in and redistributed with only - Motorola CLS1110 | User Guide - Page 55
Notes - Motorola CLS1110 | User Guide - Page 56
Notes - Motorola CLS1110 | User Guide - Page 57
enter programming mode, press and hold Push to Talk and Qfor 3 seconds while turning the radio on. The radio beeps and displays k, the channel number flashes, and the frequency (indicated by l) and code (indicated by y) display alternately. Set the Channel* Press [ or ]. Set the Frequency Set the - Motorola CLS1110 | User Guide - Page 58
_Series Programming Quick Reference Set a Call Tone Set the Microphone Gain Edit the Scan List* Press S until E display.s Press [ or ] to select1 High sensitivity Press S until h displays and the channel number and Y or n flash. Press [ or ] to select the channel, then press T to select Y (include - Motorola CLS1110 | User Guide - Page 59
- Motorola CLS1110 | User Guide - Page 60
motorola.com
-
 1
1 -
 2
2 -
 3
3 -
 4
4 -
 5
5 -
 6
6 -
 7
7 -
8
-
9
-
10
-
11
-
12
-
13
-
14
-
15
-
16
-
17
-
18
-
19
-
20
-
21
-
22
-
23
-
24
-
25
-
26
-
27
-
28
-
29
-
30
-
31
-
32
-
33
-
34
-
35
-
36
-
37
-
38
-
39
-
40
-
41
-
42
-
43
-
44
-
45
-
46
-
47
-
48
-
49
-
50
-
51
-
52
-
53
-
54
-
55
-
56
-
57
-
58
-
59
-
60
 |
 |
@6864110W15@
6864110W15-A
Models CLS1110 and CLS1410
SERIES
TWO-WAY RADIO
User's Guide