Motorola T605 Installation Manual - Page 7
Installing the Microphone, Installing the External Speaker
 |
UPC - 723755987999
View all Motorola T605 manuals
Add to My Manuals
Save this manual to your list of manuals |
Page 7 highlights
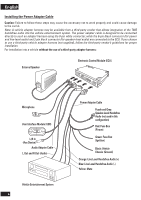
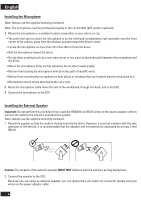
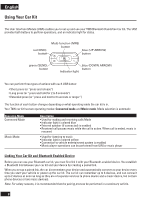
English Installing the Microphone Note: Always use the supplied mounting hardware. Note: The microphone must be positioned properly or the car kit WILL NOT perform optimally. 1 Mount the microphone in a suitable location using either screw, velcro, or clip. • The preferred spot to mount the microphone is on the overhead console/dome light assembly near the front center of the vehicle, away from the window, pointed toward the driver's head. • Locate the microphone no more than 16 inches (40 cm) from the driver. • Aim the microphone toward the driver. • Do not allow anything (such as a rear-view mirror or sun visor) to block the path between the microphone and the driver. • Mount the microphone firmly so that vibrations do not affect audio quality. • Refrain from locating the microphone directly in the path of heat/AC vents. • Refrain from mounting the microphone on door pillars or windows that can transmit exterior wind noise to it. • Microphone should not be attached to the car's visor. 2 Route the microphone cable down the side of the windshield, through the dash, and to the ECU. 3 Connect the microphone to the ECU. Installing the External Speaker Important: Do not perform this procedure if you used the ORANGE and BLUE wires on the power adapter cable to connect the audio to the vehicle's entertainment system. Note: Always use the supplied mounting hardware. 1 Mount the speaker so that the audio is clearly heard by the driver. However, it must not interfere with the safe operation of the vehicle. It is recommended that the speaker and microphone be separated by at least 3 feet (90cm). Caution: The location of the external speaker MUST NOT interfere with the vehicle's air bag deployment. 2 Connect the speaker to the ECU. Because you are using an external speaker, you can ignore the 2-pin audio out connector (purple and gray wires) on the power adapter cable. 6
-
 1
1 -
 2
2 -
 3
3 -
 4
4 -
 5
5 -
 6
6 -
 7
7 -
 8
8 -
 9
9 -
 10
10 -
 11
11 -
 12
12 -
13
-
14
-
15
-
16
-
17
-
18
 |
 |
