Motorola T605 Installation Manual - Page 8
Installing the Music Audio Adapter Cable, Installing the User Interface Module UIM
 |
UPC - 723755987999
View all Motorola T605 manuals
Add to My Manuals
Save this manual to your list of manuals |
Page 8 highlights
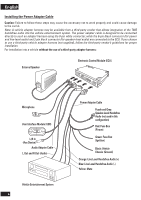
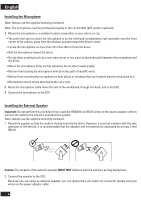
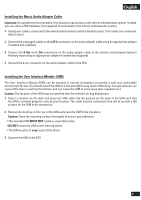
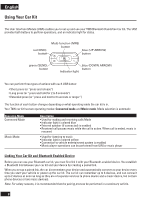
English Installing the Music Audio Adapter Cable Important: Do not perform this procedure if no Auxiliary input exists on the vehicle entertainment system. Instead, you can utilize a FM modulator (not supplied) to send audio to the vehicle entertainment system. 1 Unplug any cables connected to the vehicle entertainment system's Auxiliary input. If no cables are connected, skip to step 3. 2 Connect the unplugged cables to the L/R In connector on the audio adapter cable using an appropriate adapter if needed (not supplied). 3 Connect the R Out and L Out connectors on the audio adapter cable to the vehicle entertainment system's Auxiliary input using an appropriate adapter if needed (not supplied). 4 Connect the 8-pin connector on the audio adapter cable to the ECU. Installing the User Interface Module (UIM) The User Interface Module (UIM) can be mounted in several orientations to provide a safe and comfortable environment for use. You should mount the UIM on a flat spot within easy reach of the driver (curved surfaces can cause difficulties in pushing the buttons, and can cause the UIM to come loose after repeated use). Caution: The location of the UIM must not interfere with the vehicle's air bag deployment. 1 Select a location on the dash and press the UIM cable into the grooves on the back of the UIM such that the UIM is oriented properly in the desired location. The cable must be contained in the slot to provide a flat surface for the UIM to be mounted on. 2 Remove the backing on the rear of the UIM and press the UIM firmly into place. Caution: Clean the mounting surface thoroughly to ensure good adhesion. • The mounted UIM MUST NOT create a visual distraction. • DO NOT mount the UIM on the steering wheel. • The UIM must be in easy reach of the driver. 3 Connect the UIM to the ECU. 7
-
 1
1 -
2
-
 3
3 -
 4
4 -
 5
5 -
 6
6 -
 7
7 -
 8
8 -
 9
9 -
 10
10 -
 11
11 -
 12
12 -
 13
13 -
14
-
15
-
16
-
17
-
18
 |
 |
