NEC 4T-B80CT1U 4T-B70CT1U 4T-B80CT1U Setup Guide - Page 9
Mounting Precautions, For SHARP dealers and service engineers
 |
View all NEC 4T-B80CT1U manuals
Add to My Manuals
Save this manual to your list of manuals |
Page 9 highlights
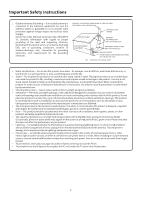
Mounting Precautions (For SHARP dealers and service engineers) • When installing, removing or moving the monitor, ensure that this is carried out by at least 4 people. • Be sure to use a wall-mount bracket designed or designated for mounting the monitor. • This monitor is designed to be installed on a concrete wall or pillar. Reinforced work might be necessary for some materials such as plaster / thin plastic board / wood before starting installation. • This monitor and bracket must be installed on a wall which can endure at least 4 times or more the weight of the monitor. Install by the most suitable method for the material and the structure. • To attach a VESA-compliant mounting bracket, use M6 screws that are 25/64 inch (10 mm) to 1/2 inch (12 mm) longer than the thickness of the mounting bracket. 25/64 inch (10 mm) Screws (M6) Mounting bracket Monitor mounting • Do not use an impact driver. • When moving the monitor, be sure to hold the handles or the parts marked by Do not grasp the screen. This may cause product damage, failure, or injury. [4T-B80CT1U, 4T-B70CT1U] below. • If you need to temporarily place the monitor on a table or other surface during installation, spread a thick so cloth on the table to prevent damage to the screen and table. • A er mounting, please carefully ensure the monitor is secure, and not able to come loose from the wall or mount. • Do not use any screw holes other than those for mounting brackets, located on the rear of the monitor, for installation. 8
-
 1
1 -
2
-
3
-
 4
4 -
 5
5 -
 6
6 -
 7
7 -
 8
8 -
 9
9 -
 10
10 -
 11
11 -
 12
12 -
 13
13 -
 14
14 -
15
-
16
-
17
-
18
-
19
-
20
-
21
 |
 |
