NEC NP-PX800X User Manual - Page 123
NEC NP-PX800X Manual
 |
View all NEC NP-PX800X manuals
Add to My Manuals
Save this manual to your list of manuals |
Page 123 highlights
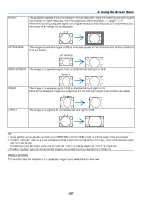
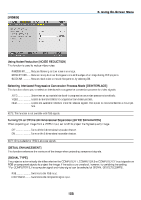
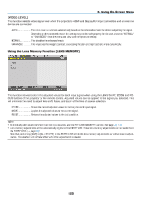
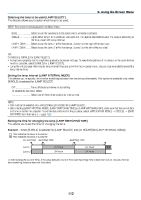
5. Using On-Screen Menu [VIDEO LEVEL] This function selects video signal level when the projector's HDMI and DisplayPort input connectors and an external device are connected. AUTO The video level is switched automatically based on the information from the device outputting the signal. Depending on the connected device, this setting may not be made properly. In this case, switch to "NORMAL" or "ENHANCED" from the menu and view with the optimum setting. NORMAL This disables the enhanced mode. ENHANCED This improves the image's contrast, expressing the dark and light sections more dynamically. Using the Lens Memory Function [LENS MEMORY] This function serves to store the adjusted values for each input signal when using the LENS SHIFT, ZOOM and FOCUS buttons of the projector or the remote control. Adjusted values can be applied to the signal you selected. This will eliminate the need to adjust lens shift, focus, and zoom at the time of source selection. STORE Stores the current adjusted values in memory for each input signal. MOVE Applies the adjusted values to the current signal. RESET Returns the adjusted values to the last condition. NOTE: • To store adjusted values common to all the input sources, use the REF. LENS MEMORY function. See page 45, 118. • Lens memory adjustments will be automatically registered the ENTRY LIST. These lens memory adjustments can be loaded from the ENTRY LIST. (→ page 99) Note that performing [CUT] or [ALL DELETE] in the ENTRY LIST will delete lens memory adjustments as well as source adjustments. This deletion will not take effect until other adjustments is loaded. 109
-
 1
1 -
2
-
3
-
4
-
5
-
6
-
7
-
8
-
9
-
10
-
11
-
12
-
13
-
14
-
15
-
16
-
17
-
18
-
19
-
20
-
21
-
22
-
23
-
24
-
25
-
26
-
27
-
28
-
29
-
30
-
31
-
32
-
33
-
34
-
35
-
36
-
37
-
38
-
39
-
40
-
41
-
42
-
43
-
44
-
45
-
46
-
47
-
48
-
49
-
50
-
51
-
52
-
53
-
54
-
55
-
56
-
57
-
58
-
59
-
60
-
61
-
62
-
63
-
64
-
65
-
66
-
67
-
68
-
69
-
70
-
71
-
72
-
73
-
74
-
75
-
76
-
77
-
78
-
79
-
80
-
81
-
82
-
83
-
84
-
85
-
86
-
87
-
88
-
89
-
90
-
91
-
92
-
93
-
94
-
95
-
96
-
97
-
98
-
99
-
100
-
101
-
102
-
103
-
104
-
105
-
106
-
107
-
108
-
109
-
110
-
111
-
112
-
113
-
114
-
115
-
116
-
117
-
 118
118 -
 119
119 -
 120
120 -
 121
121 -
 122
122 -
 123
123 -
 124
124 -
 125
125 -
 126
126 -
 127
127 -
 128
128 -
129
-
130
-
131
-
132
-
133
-
134
-
135
-
136
-
137
-
138
-
139
-
140
-
141
-
142
-
143
-
144
-
145
-
146
-
147
-
148
-
149
-
150
-
151
-
152
-
153
-
154
-
155
-
156
-
157
-
158
-
159
-
160
-
161
-
162
-
163
-
164
-
165
-
166
-
167
-
168
-
169
-
170
-
171
-
172
-
173
-
174
-
175
-
176
-
177
-
178
-
179
-
180
-
181
-
182
-
183
-
184
-
185
-
186
-
187
-
188
-
189
-
190
-
191
-
192
-
193
-
194
-
195
-
196
-
197
-
198
-
199
-
200
-
201
-
202
-
203
-
204
-
205
-
206
-
207
-
208
-
209
-
210
-
211
-
212
-
213
-
214
-
215
-
216
-
217
-
218
-
219
-
220
-
221
-
222
-
223
-
224
-
225
-
226
-
227
-
228
-
229
-
230
-
231
-
232
-
233
-
234
-
235
-
236
-
237
-
238
-
239
-
240
-
241
-
242
-
243
-
244
 |
 |
