Netgear AC1750-WiFi User Manual
Netgear AC1750-WiFi Manual
 |
View all Netgear AC1750-WiFi manuals
Add to My Manuals
Save this manual to your list of manuals |
Netgear AC1750-WiFi manual content summary:
- Netgear AC1750-WiFi | User Manual - Page 1
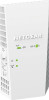
User Manual AC1750 WiFi Mesh Extender Model EX6250 January 2019 202-11920-01 NETGEAR, Inc. 350 E. Plumeria Drive San Jose, CA 95134, USA - Netgear AC1750-WiFi | User Manual - Page 2
AC1750 WiFi Mesh Extender Support Thank you for purchasing this NETGEAR product. You can visit www.netgear.com/support to register your product, get help, access the latest downloads and user manuals, and join our community. We recommend that you use only official NETGEAR support resources. - Netgear AC1750-WiFi | User Manual - Page 3
the extender to its factory default settings 29 Use the Reset button 29 Log in and reset the extender to factory settings 29 Update the extender firmware 31 Check for new firmware and update the extender 31 Manually upload firmware to the extender 32 Restart the extender from the extender web - Netgear AC1750-WiFi | User Manual - Page 4
54 Chapter 5 FAQs and troubleshooting FAQs...57 Find the extender's IP address 58 Cannot connect to the extender 59 Cannot join a WiFi network and receive an error message..........59 Cannot access mywifiext.net 60 Chapter 6 Supplemental information Factory default settings 63 Technical and - Netgear AC1750-WiFi | User Manual - Page 5
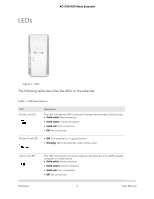
network range and speed, delivering tri-band WiFi. This chapter covers the following topics: • LEDs • Side and bottom panels • When to use your extender • How the extender works Note: For more information about the topics covered in this manual, visit the support website at support.netgear.com. 5 - Netgear AC1750-WiFi | User Manual - Page 6
Move the extender closer to the router. Client Link LED This LED indicates the connection between the extender and a WiFi-enabled computer or mobile device. • Solid white. Best connection. • Solid amber. Good connection. • Solid red. Poor connection. • Off. No connection. Overview 6 User Manual - Netgear AC1750-WiFi | User Manual - Page 7
Solid green. The extender is powered on. • Solid amber. The extender is booting. • Off. The extender is powered off. WPS LED • Solid green. WiFi security is enabled (WPA or WPA2). • Blinking green. A WPS connection is being established. • Off. WiFi security isn't enabled. Overview 7 User Manual - Netgear AC1750-WiFi | User Manual - Page 8
AC1750 WiFi Mesh Extender Side and bottom panels A switch and buttons are located on the side panel. An Ethernet port is located on the bottom panel. Figure 2. Side and bottom panel The side panel contains the following components: • Factory Reset button. Pressing this button resets the extender. - Netgear AC1750-WiFi | User Manual - Page 9
broadcasts its own WiFi network that WiFi devices can join. In its role as an access point, the extender performs tasks that WiFi routers do, such as broadcasting its network name (SSID). The extender must do each of these jobs so that both ends of the bridge are in place. Overview 9 User Manual - Netgear AC1750-WiFi | User Manual - Page 10
2 Get started This chapter covers the following topics: • Install your extender in extender mode • Install your extender in access point mode • Connect a device to the extender network • Log in to the extender after installation • Run the Smart Setup installation 10 - Netgear AC1750-WiFi | User Manual - Page 11
. Note: WPS does not support WEP network security or a hidden SSID network. If your router WiFi network uses WEP security or its SSID is hidden, follow the instructions in Connect with the NETGEAR installation assistant on page 13. • Connect with web browser setup. For more information, see Connect - Netgear AC1750-WiFi | User Manual - Page 12
Note: WPS does not support WEP network security or a hidden SSID network. If your existing WiFi network uses WEP security or its SSID is hidden, follow the instructions in Connect with the NETGEAR installation assistant on page 13. To use WPS to connect the extender to your WiFi router: 1. Press the - Netgear AC1750-WiFi | User Manual - Page 13
cable to connect the Ethernet port on your extender to an Ethernet port on your computer. 3. Launch web browser. 4. Enter http://www.mywifiext.net. The NETGEAR installation assistant displays. 5. Follow the prompts to connect your extender to your existing WiFi network. Get started 13 User Manual - Netgear AC1750-WiFi | User Manual - Page 14
your computer or mobile device to the new extender WiFi network. Install your extender in access point mode You can use the extender as a WiFi access point, which creates a new WiFi hotspot by using a wired Ethernet connection. The following instructions assume that this is the first time you - Netgear AC1750-WiFi | User Manual - Page 15
web browser and visit www.mywifiext.net. The NETGEAR installation assistant displays. c. Follow the prompts to set up your extender in access point mode. At the end of the installation, the NETGEAR installation assistant displays the extender's WiFi network credentials. Get started 15 User Manual - Netgear AC1750-WiFi | User Manual - Page 16
extender's WiFi credentials to connect your WiFi-enabled devices to the extender network. Connect a device to the extender network After you complete the setup process, you can connect all your devices to the new extender network using a WiFi, wired, or WPS connection. Get started 16 User Manual - Netgear AC1750-WiFi | User Manual - Page 17
AC1750 WiFi Mesh Extender Connect a device to the extender network using WiFi If you enabled the One WiFi Name feature, your extender uses the same WiFi network name and password as your router. The following is an example of what your WiFi network names might look like if One WiFi Name is enabled: - Netgear AC1750-WiFi | User Manual - Page 18
Press the WPS button on the extender. The WPS LED blinks white. 2. Within two minutes, press the WPS button on your WPS-enabled device. If your WPS enabled device successfully connects to extender, the WiFi connection manager on your device will show connection status. Get started 18 User Manual - Netgear AC1750-WiFi | User Manual - Page 19
IP address, see Find the extender's IP address on page 58. Run the Smart Setup installation You can use the Smart Setup to change the extender settings. This is an easy way to connect the extender to a different router or to change the extender WiFi network name (SSID) or WiFi password. To run the - Netgear AC1750-WiFi | User Manual - Page 20
AC1750 WiFi Mesh Extender For more information about how to find your extender's IP address, see Find the extender's IP address on page 58. A login page displays. 3. Enter your admin user name and password and click the LOG IN button. The Status page displays. 4. Click the SMART SETUP button. 5. - Netgear AC1750-WiFi | User Manual - Page 21
a forgotten user name or password • Automatically adjust for daylight saving time • Manually set the extender clock • Back up and manage the extender configuration • Return the extender to its factory default settings • Update the extender firmware • Restart the extender from the extender web - Netgear AC1750-WiFi | User Manual - Page 22
AC1750 WiFi Mesh Extender Change the extender login user name and password You can change the admin user name and password that you use to log in to the extender. To change the extender's login user name and password: 1. Launch a web browser from a computer or mobile device that is connected to - Netgear AC1750-WiFi | User Manual - Page 23
AC1750 WiFi Mesh Extender 9. Click the SAVE extender menu displays. 5. Select Settings > Password. The Password Settings page displays. 6. Select the Password Off or Password On radio button. 7. Click the SAVE button. Your settings are saved. Maintain and monitor the 23 extender User Manual - Netgear AC1750-WiFi | User Manual - Page 24
AC1750 WiFi Mesh Extender Recover a forgotten user name or password If you changed the password that you use to access the extender and you set up password recovery, you can recover your password if you lose it. To recover your password that you use to access the extender: 1. Launch a web browser - Netgear AC1750-WiFi | User Manual - Page 25
time check box. 7. Click the SAVE button. Your settings are saved. Manually set the extender clock If you turned on the access schedule, you can set the extender clock. The extender clock makes sure that the WiFi access schedules are accurate. Maintain and monitor the 25 extender User Manual - Netgear AC1750-WiFi | User Manual - Page 26
AC1750 WiFi Mesh Extender To manually set the extender clock: 1. Launch a web browser from a computer or mobile device that is connected to your extender network. 2. Log in to your extender: • If you did not enable the One WiFi Name feature, enter http://mywifiext.local/ in the address field of the - Netgear AC1750-WiFi | User Manual - Page 27
AC1750 WiFi Mesh Extender extender configuration settings but are not content with the new settings, you can restore the extender configuration to the backed-up settings. Back up the configuration settings You can back up the configuration file of the extender. To back up the extender configuration - Netgear AC1750-WiFi | User Manual - Page 28
backup file uses a .cfg extension. Caution: After you click the RESTORE button, do not try to go online, turn off the extender, shut down the computer, or do anything else to the extender until it finishes restarting. 8. Click the RESTORE button. Maintain and monitor the 28 extender User Manual - Netgear AC1750-WiFi | User Manual - Page 29
to the extender until it finishes restarting! The extender resets and restarts. This process takes about one minute. Log in and reset the extender to factory settings Caution: This process erases any settings that you configured in the extender. Maintain and monitor the 29 extender User Manual - Netgear AC1750-WiFi | User Manual - Page 30
AC1750 WiFi Mesh Extender To log in to the extender and reset the extender's factory settings: 1. Launch a web browser from a computer or mobile device that is connected to your extender network. 2. Log in to your extender: • If you did not enable the One WiFi Name feature, enter www.mywifiext.net - Netgear AC1750-WiFi | User Manual - Page 31
AC1750 WiFi Mesh Extender Update the extender firmware You can log in to the extender and check to see if new firmware is available, or you can manually load a specific firmware version to your extender. Check for new firmware and update the extender Unless you changed the settings in the Firmware - Netgear AC1750-WiFi | User Manual - Page 32
AC1750 WiFi Mesh Extender Note: You might need to unzip the firmware file. The firmware update process takes about two minutes. Manually upload firmware to the extender If you want to upload a specific firmware version, follow these instructions. To manually upload a firmware file to your extender - Netgear AC1750-WiFi | User Manual - Page 33
Find the extender's IP address on page 58. A login page displays. 3. Enter your admin user name and password and click the LOG IN button. The Status page displays. 4. If your browser displays the Menu icon , click it. The extender menu displays. Maintain and monitor the 33 extender User Manual - Netgear AC1750-WiFi | User Manual - Page 34
AC1750 WiFi Mesh Extender 5. Select Settings > Other. The Other Settings page displays. 6. Click the RESTART button and click the Yes button to confirm. The extender restarts, which takes about two minutes. Maintain and monitor the 34 extender User Manual - Netgear AC1750-WiFi | User Manual - Page 35
network • Disable or enable the WiFi radios • Change the WiFi speed • Use WPS to add a computer to the extender's WiFi network • Deny access to a computer or WiFi device • Set up an access schedule • Change the extender's device name • Set up the extender to use a static IP address • Configure - Netgear AC1750-WiFi | User Manual - Page 36
AC1750 WiFi Mesh Extender Enable or disable One WiFi Name The One WiFi Name feature enables your extender to use the same WiFi network settings as your router. If you enabled the One WiFi Name feature, your extender uses the same WiFi network name and password as your router. The following is an - Netgear AC1750-WiFi | User Manual - Page 37
feature: 1. Launch a web browser from a computer or mobile device that is connected to your extender network. 2. Log in to your extender: • If you did not enable the One WiFi Name feature, enter http://mywifiext.local/ in the address field of the browser. Extender Network Settings 37 User Manual - Netgear AC1750-WiFi | User Manual - Page 38
AC1750 WiFi Mesh Extender • If you enabled the One WiFi Name feature, enter one of the following URLs: - Windows-based computers. http://mywifiext/ or http://mywifiext.local/ - Mac computers, iOS devices, and Linux devices. http://mywifiext.local/ - Android devices. http:// - Netgear AC1750-WiFi | User Manual - Page 39
settings: 1. Launch a web browser from a computer or mobile device that is connected to your extender network. 2. Log in to your extender: • If you did not enable the One WiFi Name feature, enter http://mywifiext.local/ in the address field of the browser. Extender Network Settings 39 User Manual - Netgear AC1750-WiFi | User Manual - Page 40
devices. http://mywifiext.local/ - Android devices. http:// - Netgear AC1750-WiFi | User Manual - Page 41
AC1750 WiFi Mesh Extender 3. Enter your admin user name and password and click the LOG IN button. The Status page displays. 4. If your browser displays the Menu icon , click it. The extender hidden WiFi network. To connect to a hidden network you must know its SSID and password and manually enter - Netgear AC1750-WiFi | User Manual - Page 42
AC1750 WiFi Mesh Extender 3. Enter your admin user name and password and click the LOG IN button. The Status page displays. 4. If your browser displays the Menu icon , click it. The extender menu displays. 5. Select Settings > Wireless. The Wireless page displays. 6. Clear the Broadcast the Network - Netgear AC1750-WiFi | User Manual - Page 43
AC1750 WiFi Mesh Extender The extender menu displays. 5. Select Settings > Wireless. The Wireless page displays. 6. Select or clear the Enable 2.4 GHz WiFi check box. 7. Select or clear the Enable 5 GHz WiFi check box. 8. Click the SAVE button. Your settings are saved. Change the WiFi speed The - Netgear AC1750-WiFi | User Manual - Page 44
AC1750 WiFi Mesh Extender The Wireless page displays. 6. In the 5 GHz network WiFi Speed menu, select a speed. 7. Click the SAVE button. Your settings are saved. Use WPS to add a computer to the extender's WiFi network WPS (WiFi Protected Setup) lets you connect a computer or WiFi device to the - Netgear AC1750-WiFi | User Manual - Page 45
, select Settings > Connected Devices. The WiFi device displays onscreen. Use WPS with the PIN method To use the PIN method to connect a WiFi device to the extender's WiFi network, you must know the PIN of the WiFi device that you are trying to connect. Extender Network Settings 45 User Manual - Netgear AC1750-WiFi | User Manual - Page 46
device. 9. Within four minutes, go to the WiFi device and use its WPS software to join the WiFi network. 10. To verify that the WiFi device is connected to the extender's WiFi network, select Settings > Connected Devices. The WiFi device displays onscreen. Extender Network Settings 46 User Manual - Netgear AC1750-WiFi | User Manual - Page 47
Status page displays. 4. If your browser displays the Menu icon , click it. The extender menu displays. 5. Select Settings > Connected Devices. The Connected Devices page displays. 6. In the WiFi Devices section, select the Enable Access Control check box. Extender Network Settings 47 User Manual - Netgear AC1750-WiFi | User Manual - Page 48
the Deny check box for the device. 8. Click the SAVE button. Your settings are saved and that device cannot connect to the extender's WiFi network. Set up an access schedule You can control access by all users during specific periods of the day. You can set up an access schedule that prevents the - Netgear AC1750-WiFi | User Manual - Page 49
page displays. 3. Enter your admin user name and password and click the LOG IN button. The Status page displays. 4. If your browser displays the Menu icon , click it. The extender menu displays. 5. Select Settings > Wireless. The Wireless page displays. Extender Network Settings 49 User Manual - Netgear AC1750-WiFi | User Manual - Page 50
AC1750 WiFi Mesh Extender 6. Scroll down and click the IP Address heading. The page expands. 7. In the Device Name field, type a name. 8. Click the SAVE button. Your settings are saved. Set up the extender to use a static IP address The extender comes set up to use a dynamic IP address, which is - Netgear AC1750-WiFi | User Manual - Page 51
AC1750 WiFi Mesh Extender The page expands. By default, the WiFi access control, or ACL, see your router's documentation. 2. Power on the extender and connect all of your WiFi devices to the extender. 3. Make sure that the Router Link LED remains lit. Extender Network Settings 51 User Manual - Netgear AC1750-WiFi | User Manual - Page 52
AC1750 WiFi Mesh Extender 4. Log in to your extender: a. Launch a web browser from a computer or mobile device that is connected to your extender network. b. Log in to your extender: • If you did not enable the One WiFi Name feature, enter http://mywifiext.local/ in the address field of the browser - Netgear AC1750-WiFi | User Manual - Page 53
AC1750 WiFi Mesh Extender If all your devices and your WiFi router support only the 2.4 GHz band, or all your devices and your WiFi router support only the 5 GHz band, do not enable FastLane Technology. When you enable FastLane Technology, two options are available: • Use the 2.4 GHz band to - Netgear AC1750-WiFi | User Manual - Page 54
3. Enter your admin user name and password and click the LOG IN button. The Status page displays. 4. If your browser displays the Menu icon , click it. The extender menu displays. 5. Select Settings > Wireless. The Wireless page displays the WiFi settings. Extender Network Settings 54 User Manual - Netgear AC1750-WiFi | User Manual - Page 55
AC1750 WiFi Mesh Extender 6. Enable or disable 20/40 MHz coexistence: • To enable 20/40 MHz coexistence, select the Enable 20/40 MHz 40 MHz coexistence, clear the Enable 20/40 MHz Coexistence check box. 7. Click the SAVE button. Your settings are saved. Extender Network Settings 55 User Manual - Netgear AC1750-WiFi | User Manual - Page 56
5 FAQs and troubleshooting This chapter contains the following topics: • FAQs • Find the extender's IP address • Cannot connect to the extender • Cannot join a WiFi network and receive an error message • Cannot access mywifiext.net 56 - Netgear AC1750-WiFi | User Manual - Page 57
point with an Ethernet connection. For more information about access point mode, see Install your extender in access point mode on page 14. I am connected to NETGEAR_EXT and launched a browser and I can't I see the web browser setup guide. What can I do? FAQs and troubleshooting 57 User Manual - Netgear AC1750-WiFi | User Manual - Page 58
router, see your router's documentation. Note: The following instructions might not apply to your NETGEAR router. For more information, see your NETGEAR router's user manual. To log in to your extender and find your extender's IP address: 1. Launch a web browser from a computer or mobile device - Netgear AC1750-WiFi | User Manual - Page 59
key incorrectly. Use the Smart Setup (see Run the Smart Setup installation on page 19) to select a WiFi network and retype the passphrase or key. The passphrase or key is case-sensitive. For example, PASSWORD25 is not the same as Password25 or password25. FAQs and troubleshooting 59 User Manual - Netgear AC1750-WiFi | User Manual - Page 60
www.mywifiext.net. Try these troubleshooting tips to connect to www.mywifiext.net: • If you're trying to access www.mywifiext.net for the first time to set up your extender, see Connect with the NETGEAR installation assistant on page 13 and follow the instructions. • After you connect your computer - Netgear AC1750-WiFi | User Manual - Page 61
AC1750 WiFi Mesh Extender • If your extender and router use the same WiFi network name (SSID), enter http:// - Netgear AC1750-WiFi | User Manual - Page 62
6 Supplemental information This appendix covers the following topics: • Factory default settings • Technical and environmental specifications 62 - Netgear AC1750-WiFi | User Manual - Page 63
AC1750 WiFi Mesh Extender Factory default settings To reset the extender to factory default settings, you can use the Factory Reset button on the side panel or you can log in and click the onscreen RESET button. For more information, see Return the extender to its factory default settings on page - Netgear AC1750-WiFi | User Manual - Page 64
AC1750 WiFi Mesh Extender Technical and environmental specifications The following table shows the technical and environmental specifications. Table 3. Technical specifications Technical Specifications Network protocol and standards compatibility 802.11b Supplemental information 64 User Manual
-
 1
1 -
 2
2 -
 3
3 -
 4
4 -
 5
5 -
 6
6 -
 7
7 -
8
-
9
-
10
-
11
-
12
-
13
-
14
-
15
-
16
-
17
-
18
-
19
-
20
-
21
-
22
-
23
-
24
-
25
-
26
-
27
-
28
-
29
-
30
-
31
-
32
-
33
-
34
-
35
-
36
-
37
-
38
-
39
-
40
-
41
-
42
-
43
-
44
-
45
-
46
-
47
-
48
-
49
-
50
-
51
-
52
-
53
-
54
-
55
-
56
-
57
-
58
-
59
-
60
-
61
-
62
-
63
-
64
 |
 |
User Manual
AC1750 WiFi Mesh Extender
Model EX6250
NETGEAR, Inc.
350 E. Plumeria Drive
January 2019
San Jose, CA 95134, USA
202-11920-01