Netgear DGFV338 Client-to-Box VPN using Certificate Authentication - Page 6
Install CA certificate
 |
View all Netgear DGFV338 manuals
Add to My Manuals
Save this manual to your list of manuals |
Page 6 highlights
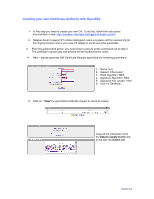
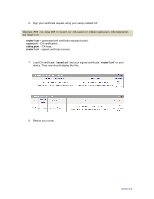
10- Rename the generated certificate request from:"CertReq.req" to "client1.csr". 11- Sign your certificate request using your newly created CA: openssl x509 -req -days 365 -in client1.csr -CA cacert.crt -CAkey cakey.pem -CAcreateserial -out client1.crt client1.csr - generated self certificate request (client), cacert.crt - CA certification, cakey.pem - CA keys, client1.crt - signed certificate (client). 12- Install CA certificate: "cacert.crt" in your system. If you are using Microsoft Windows just select: "Install" from files' context menu. 13- Load your signed certificate using the Certificate Manager: Version 2.0
-
 1
1 -
 2
2 -
 3
3 -
 4
4 -
 5
5 -
 6
6 -
 7
7 -
 8
8 -
 9
9
 |
 |

Version 2.0
10- Rename the generated certificate request from:”
CertReq.req
” to “
client1.csr
”.
11- Sign your certificate request using your newly created CA:
openssl x509 -req -days 365 -in client1.csr -CA cacert.crt -CAkey cakey.pem -CAcreateserial -out
client1.crt
client1.csr
– generated self certificate request (client),
cacert.crt
– CA certification,
cakey.pem
– CA keys,
client1.crt
– signed certificate (client).
12- Install CA certificate: “
cacert.crt
” in your system. If you are using Microsoft Windows
just select: “Install” from files’ context menu.
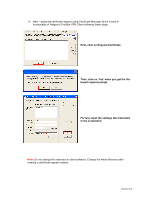
13- Load your signed certificate using the Certificate Manager: