Netgear FVG318v1 FVG318 to NETGEAR VPN Client - Page 5
the box Connect using and select Secure Gateway Tunnel. For ID Type, choose
 |
View all Netgear FVG318v1 manuals
Add to My Manuals
Save this manual to your list of manuals |
Page 5 highlights
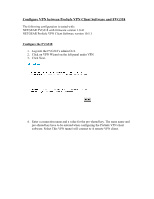
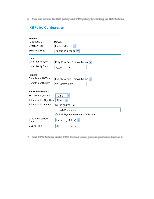
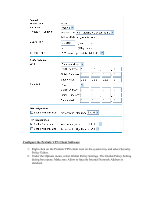
3. Under the Edit menu, select Add and select Connection. 4. A new connection will be created. You can rename the connection name by double click on the name. On the right panel, under Remote Party Identity and Addressing, select IP Subnet as ID Type, enter the LAN subnet on the FVG318 as Subnet and enter the LAN subnet mask as Mask. Choose All for Protocol. Check the box Connect using and select Secure Gateway Tunnel. For ID Type, choose Domain Name and enter fvx_local.com under Domain Name. Select Gateway IP Address and enter the WAN IP address of the FVG318.
-
 1
1 -
 2
2 -
 3
3 -
 4
4 -
 5
5 -
 6
6 -
 7
7 -
 8
8 -
 9
9 -
 10
10 -
 11
11
 |
 |

3.
Under the Edit menu, select Add and select Connection.
4.
A new connection will be created. You can rename the connection name by
double click on the name. On the right panel, under Remote Party Identity and
Addressing, select IP Subnet as ID Type, enter the LAN subnet on the FVG318 as
Subnet and enter the LAN subnet mask as Mask. Choose All for Protocol. Check
the box Connect using and select Secure Gateway Tunnel. For ID Type, choose
Domain Name and enter fvx_local.com under Domain Name. Select Gateway IP
Address and enter the WAN IP address of the FVG318.