Netgear PS121 PS121v1 User Manual - Page 17
Run the Print Server Setup Wizard to Set, Up a Fixed IP Address for the PS121., Finish - default ip
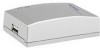 |
UPC - 606449034684
View all Netgear PS121 manuals
Add to My Manuals
Save this manual to your list of manuals |
Page 17 highlights
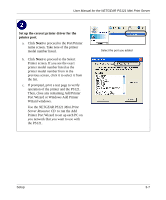
User Manual for the NETGEAR PS121 Mini Print Server Run the Print Server Setup Wizard to Set Up a Fixed IP Address for the PS121. a. The Print Server Setup Wizard screen should be displayed. b. Click Next to proceed. The Print Server Wizard will now search your network for the PS121. If the Print Server Setup Wizard cannot find your PS121, check the network connections and status lights on the PS121. c. The "Server Name" and the "IP Address" your network assigned to the PS121 are displayed. Click Next to proceed to the device name screen. d. You can enter a descriptive Device Name and Domain Name or accept the defaults. Click Next to proceed to the IP Address configuration screen. The Print Server Wizard displays a recommended static IP address setting for the PS121. This is usually fine. e. Click Next to proceed. f. Click Finish to exit the Print Server Setup Wizard. This completes the configuration of the PS121 for operation on your network. g. Click Yes to run the Add Printer Port Wizard. Follow the instructions in the next section for using the this wizard to set up each computer to use the PS121. IP Address your network assigned to the PS121. Select Print Server screen Select Print Server Device Name screen Set UP a Fixed IP Address for your PS121. In this example, the address was set to 192.168.0.245. Since most home routers reserve the first 50 addresses for their DHCP pool, picking a number between 200 to 250 should work fine. Numbers above 254 will not work. Setup 3-5
-
 1
1 -
2
-
3
-
4
-
5
-
6
-
7
-
8
-
9
-
10
-
11
-
 12
12 -
 13
13 -
 14
14 -
 15
15 -
 16
16 -
 17
17 -
 18
18 -
 19
19 -
 20
20 -
 21
21 -
 22
22 -
23
-
24
-
25
-
26
-
27
-
28
-
29
-
30
-
31
-
32
-
33
-
34
-
35
-
36
-
37
-
38
-
39
-
40
-
41
 |
 |
