Netgear RNDX4210 ReadyNAS NVX User Manual - Page 99
Resynchronizing the Volume, Using the System Diagnostic Menu
 |
UPC - 606449060195
View all Netgear RNDX4210 manuals
Add to My Manuals
Save this manual to your list of manuals |
Page 99 highlights
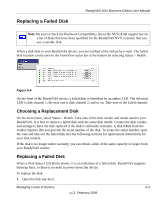
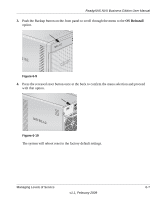
ReadyNAS NVX Business Edition User Manual 4. If you want to prevent easy removal of the disk from the drive bay, set the tray lock: to the left is locked; to the right is unlocked. Figure 6-7 5. Replace the failed disk, reassemble, and slide the disk tray back in. Resynchronizing the Volume If you had to power off to replace the failed disk, turn on the power on the ReadyNAS. The RAID volume automatically resynchronizes with the new disk in the background. The process takes several hours depending on disk size. During the resync process, the ReadyNAS can be used as normal, although access will be slower until the volume is finished resynchronizing. You will be notified by e-mail when the resync process is complete. Using the System Diagnostic Menu The recessed reset switch on the back of the unit (see the illustration "Rear Panel" on page 1-6) allows you to perform six functions: 1. Normal: Bypass the diagnostic menu and perform a normal boot. 2. Factory Default: Reset the ReadyNAS back to factory default state, erasing all data on the disks. This option can be used to change between X-RAID2 and Flex-RAID mode. Warning: This process reinstalls the firmware and resets all disk configurations, wiping out any data you might have on the NAS. Managing Levels of Service 6-5 v1.1, February 2009
-
 1
1 -
2
-
3
-
4
-
5
-
6
-
7
-
8
-
9
-
10
-
11
-
12
-
13
-
14
-
15
-
16
-
17
-
18
-
19
-
20
-
21
-
22
-
23
-
24
-
25
-
26
-
27
-
28
-
29
-
30
-
31
-
32
-
33
-
34
-
35
-
36
-
37
-
38
-
39
-
40
-
41
-
42
-
43
-
44
-
45
-
46
-
47
-
48
-
49
-
50
-
51
-
52
-
53
-
54
-
55
-
56
-
57
-
58
-
59
-
60
-
61
-
62
-
63
-
64
-
65
-
66
-
67
-
68
-
69
-
70
-
71
-
72
-
73
-
74
-
75
-
76
-
77
-
78
-
79
-
80
-
81
-
82
-
83
-
84
-
85
-
86
-
87
-
88
-
89
-
90
-
91
-
92
-
93
-
 94
94 -
 95
95 -
 96
96 -
 97
97 -
 98
98 -
 99
99 -
 100
100 -
 101
101 -
 102
102 -
 103
103 -
 104
104 -
105
-
106
-
107
-
108
-
109
-
110
-
111
-
112
-
113
-
114
-
115
-
116
-
117
-
118
-
119
-
120
-
121
-
122
 |
 |
