Netgear WC7500-Wireless Installation Guide - Page 5
Configure the Wireless Controller
 |
View all Netgear WC7500-Wireless manuals
Add to My Manuals
Save this manual to your list of manuals |
Page 5 highlights
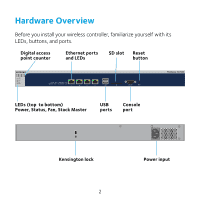
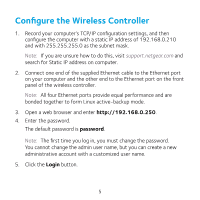
Configure the Wireless Controller 1. Record your computer's TCP/IP configuration settings, and then configure the computer with a static IP address of 192.168.0.210 and with 255.255.255.0 as the subnet mask. Note: If you are unsure how to do this, visit support.netgear.com and search for Static IP address on computer. 2. Connect one end of the supplied Ethernet cable to the Ethernet port on your computer and the other end to the Ethernet port on the front panel of the wireless controller. Note: All four Ethernet ports provide equal performance and are bonded together to form Linux active-backup mode. 3. Open a web browser and enter http://192.168.0.250. 4. Enter the password. The default password is password. Note: The first time you log in, you must change the password. You cannot change the admin user name, but you can create a new administrative account with a customized user name. 5. Click the Login button. 5
-
 1
1 -
 2
2 -
 3
3 -
 4
4 -
 5
5 -
 6
6 -
 7
7 -
 8
8 -
 9
9 -
 10
10 -
 11
11 -
12
 |
 |
