Nikon 1713 Instruction Manual - Page 10
Mount Lens
 |
UPC - 018208098729
View all Nikon 1713 manuals
Add to My Manuals
Save this manual to your list of manuals |
Page 10 highlights
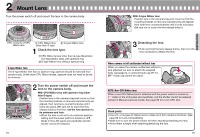
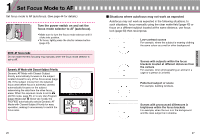
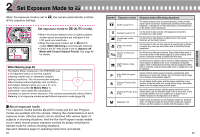
2 Mount Lens Turn the power switch off and mount the lens to the camera body. With G-type Nikkor lens Position lens in the camera's bayonet mount so that the mounting indexes on lens and camera body are aligned, then twist lens counterclockwise until it locks into place. (Be sure not to touch the lens release button.) PREPARATION CPU contacts of CPU Nikkor lens Å CPU Nikkor lens other than G-type Í G-type Nikkor lens 1 Check the lens type. ÅCPU Nikkor lenses other than G-type (Illustration is D-type Nikkor lens), with aperture ring ÍG-type Nikkor lens, without aperture ring G-type Nikkor lens The G-type Nikkor lens has no aperture ring; aperture should be selected from camera body. Unlike other CPU Nikkor lenses, aperture does not need to be set to minimum. 2 Turn the power switch off and mount the lens to the camera body. With CPU Nikkor lens with aperture ring (other than G-type) Position lens in the camera's bayonet mount so that the mounting indexes on lens and camera body are aligned, then twist lens counterclockwise until it locks into place. (Be sure not to touch the lens release button.) And then, set the lens aperture to its minimum and lock. • When the lens is not set to its minimum aperture setting and the power switch is turned on, ƒEE blinks in the LCD panel and viewfinder and the shutter cannot be released. 18 3 Detaching the lens. • Push and hold the lens release button, then turn the lens clockwise to detach the lens. When camera is left unattended without lens When you leave the camera unattended without a lens attached, be sure to attach the supplied body cap (page 3), or optional body cap BF-1A. (BF-1 body cap cannot be used.) NOTE: Non-CPU Nikkor lens When a non-CPU Nikkor lens is attached and the power switch is turned on, ƒ-- blinks in the LCD panel and viewfinder, and the shutter cannot be released (except in Manual exposure mode). See page 90 for a non-CPU lens. Check points • Use a D- or G-type AF Nikkor lens to utilise all of this camera's functions. (See page 88 for Lens Compatibility.) • Make sure to turn the power switch off when attaching/detaching the lens. • Avoid direct sunlight when attaching/detaching the lens. 19
-
 1
1 -
2
-
3
-
4
-
 5
5 -
 6
6 -
 7
7 -
 8
8 -
 9
9 -
 10
10 -
 11
11 -
 12
12 -
 13
13 -
 14
14 -
 15
15 -
16
-
17
-
18
-
19
-
20
-
21
-
22
-
23
-
24
-
25
-
26
-
27
-
28
-
29
-
30
-
31
-
32
-
33
-
34
-
35
-
36
-
37
-
38
-
39
-
40
-
41
-
42
-
43
-
44
-
45
-
46
-
47
-
48
-
49
-
50
-
51
-
52
-
53
-
54
-
55
-
56
-
57
-
58
-
59
 |
 |
