Nikon 1718 Instruction Manual
Nikon 1718 - N 55 SLR Camera Manual
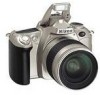 |
UPC - 018208017188
View all Nikon 1718 manuals
Add to My Manuals
Save this manual to your list of manuals |
Nikon 1718 manual content summary:
- Nikon 1718 | Instruction Manual - Page 1
Nikon N 55 INSTRUCTION MANUAL - Nikon 1718 | Instruction Manual - Page 2
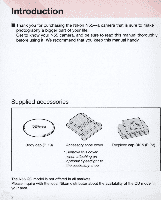
you keep this manual handy. Supplied accessories Body cap (P. 19) Accessory shoe cover • Remove this cover when attaching an optional Speedlight to the accessory shoe. Eyepiece cap DK-5 (P. 73) The N55 QD model is not offered in all markets. Please inquire with the local Nikon distributor about - Nikon 1718 | Instruction Manual - Page 3
spot-check your camera regularly I Nikon recommends that you have your camera serviced by an authorized dealer or service center at least once every two years. • Using your camera correctly The Nikon N55's performance has been optimized for use with Nikon brand accessories. Accessories made by - Nikon 1718 | Instruction Manual - Page 4
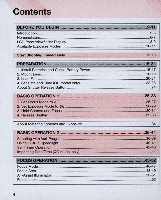
and Check Battery Power 16-17 2. Mount Lens ...18-19 3. Load Film ...20-21 4. Set Date and Time (QD model only 22-23 About Shutter Release Button 24 -43 - Imprinting DatefTime (QD model only 44 - ~-- fFOCUS OPERAnON I Focus Mode ...46-47 Focus Area ...48-49 AF-Assist Illuminator - Nikon 1718 | Instruction Manual - Page 5
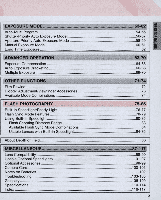
Aperture-Priority Auto Exposure Mode 58-59 Manual Exposure Mode 60-61 Long Time Exposure OTHER FUNCTIONS 71-7~1 Film Rewind ...72 Diopter Lens Compatibility 88-90 Usable Optional Speedlights 91-97 Optional Accessories 98-99 Camera Care ...100- 101 Notes on Batteries 102 Troubleshooting - Nikon 1718 | Instruction Manual - Page 6
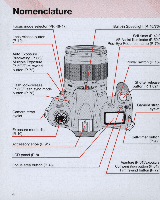
(PP. 46-47) Lens release button (P. 19) Auto Exposure Bracketing (Po 66)/ Multiple Exposure (Po69)/ Film rewind button (P. 72) Flash lock-release (Po80)/ Flash sync mode button (P. 78) Camera strap eyelet t:X[)osure mode dial Accessory shoe (Po 91) LCD Focus area button 6 Built-in Speedlight - Nikon 1718 | Instruction Manual - Page 7
Dial Camera back lock release lever (P. 20) Film confirmation window (P. 21) Data Back (00 model only) (P. 22/ 44) Tripod socket • Illustration shown is the N55 00 model. The camera back of the N55 non-OD model differs from the 00 model. • QD model only: Data imprint LCD/buttons 1 -~-, fiMD - Nikon 1718 | Instruction Manual - Page 8
_i_~[Lt:~ ''.Lt:',) Battery power (P. 17) II III I Flash sync mode (P. 78/ 80) Frame counter (P. 21)/ Exposure Compensation value (P. 64) Focus area (P. 48) Exposure Compensation (P. 64) • The illustrations are fully labelled for your reference. NOTE: About LCD The LCD panel and viewfinder - Nikon 1718 | Instruction Manual - Page 9
(focus brackets) (P. 30/48) I i Center Partial Metering area (p. 60) I Focus indicator (P. 31 /46) Focus area Shutter speed Flash ready-light (P. 41n7)/ Flash recommended indication (P. 80) Exposure Compensation (P. 64) Electronic analog exposure (P. 61)/ Exposure Compensation value Aperture 9 - Nikon 1718 | Instruction Manual - Page 10
Nikon N55 can be divided into two sections. One is the user-controlled exposure mode with Auto-Multi Program , ShutterPriority Auto, Aperture-Priority Auto or Manual depth of the in-focus area. M: Manual (P. 60) Shutter speed and aperture are set manually. Suitable for taking photographs with unique - Nikon 1718 | Instruction Manual - Page 11
• Point-and-shoot exposure mode I 8: AUTO mode (P. 28) ! Camera automatically controls all the exposure settings. Suitable for taking pictures right away. i ~ : Portrait mode (P. 37) Use this mode to take portraits. The background is blurred to accentuate your main subject. rJ: Landscape mode - Nikon 1718 | Instruction Manual - Page 12
while the camera's power is off (page 16). ~ # ~ #~cj>"~~ 2 Attach the lens and turn the power switch on (page 18). 3 Open the camera back and install the film (page 20). • When the camera back is closed , the film is automatically advanced and the number of available exposures is displayed in the - Nikon 1718 | Instruction Manual - Page 13
lightly pressing the shutter release button (page 30). 6 Confirm focus indicator. appears without blinking and slowly depress the shutter release button (page 32). 7 Film starts to rewind automatically when it reaches the end of the roll (page 33). • Make sure E is blinking in the LCD panel when - Nikon 1718 | Instruction Manual - Page 14
14 - Nikon 1718 | Instruction Manual - Page 15
PREPARATION This section introduces the various operations necessary before you start shooting. • Install batteries and check battery power • Mount lens • Load film • Set date and time (QD model only) • About shutter release button 15 - Nikon 1718 | Instruction Manual - Page 16
Install Batteries and Check Battery Power . .... Use two CR2-type ..... ... ... ...... 3V lithium batteries. .... 1 Turn the power switch off and open the battery chamber cover by sliding the battery chamber cover lock release lever toward indicated direction. • When replacing batteries - Nikon 1718 | Instruction Manual - Page 17
spare batteries with you , especially when travelling . • For the number of film rolls that can be shot with fresh batteries, see page 114. 3 Turn the the LCD panel and viewfinder. Shutter speed and aperture (f - - when lens is not attached) indications in the LCD panel automatically turn off 5 sec. - Nikon 1718 | Instruction Manual - Page 18
points • Use a G- or O-type AF Nikkor lens to utilize all of this camera's functions. However, lens. NOTE: Non-CPU Nikkor lens When a non-CPU Nikkor lens is attached and the power switch is turned on, f- - blinks in the LCD panel and viewfinder, and the shutter cannot be released (except in Manual - Nikon 1718 | Instruction Manual - Page 19
and the shutter cannot be released . 3 Detach the lens. • Push and hold the lens release button, then turn the lens clockwise to detach the lens. When camera is left unattended without lens When you leave the camera unattended without a lens attached, be sure to attach the supplied body cap - Nikon 1718 | Instruction Manual - Page 20
Turn the power switch on and load OX-coded fi lm. With OX-coded film, film speed will be set automatically (ISO 25-5000). When the camera back is closed, the film automatically advances and the number of available exposures is displayed in the LCD panel. 1 Turn the power switch on, open the camera - Nikon 1718 | Instruction Manual - Page 21
may be discarded in the process of developing . OX-coded film With OX-coded film , film speed will be set automatically between ISO 25 to ISO 5000. Film speed is set to ISO 100 with non-OXcoded film . OX-coded film ~ISO ~~ j6 (film speed) I); DX mark Check points • Avoid direct sunlight when - Nikon 1718 | Instruction Manual - Page 22
Set Date and Time (QD model only) This camera allows you to imprint Year/Month/Day, Day/Hour/Minute (24-hour clock), Month/DaylYear or Day/MonthlYear on your picture in - Nikon 1718 | Instruction Manual - Page 23
• Changing battery for imprinting 1 Open camera back, remove the battery chamber cover for imprinting by removing the screw using a screwdriver. 2 Remove the used battery and insert a new CR2025 3V lithium battery with EEl side facing up. Attach the battery chamber cover by reinserting the screw. • - Nikon 1718 | Instruction Manual - Page 24
About Shutter Release Button~-- Lightly pressing the shutter release button and holding it halfway down activates the camera's exposure meter and pressing it all the way down releases the shutter 1 Lightly press the shutter release button. • When the focus mode selector is set to AF ( - Nikon 1718 | Instruction Manual - Page 25
easy operation even for beginners. Shooting modes/functions explained in this section are as follows: Lens attached G-type AF Nikkor (P. 18) Focus mode AF (autofocus) (P. 26) Focus area Dynamic AF Mode with ClosestSubject Priority' (P. 26) Exposure metering system Five-segment 3D Matrix - Nikon 1718 | Instruction Manual - Page 26
release button (page 24). NOTE: AF focus mode Do not rotate the lens focusing ring manually when the focus mode selector is set to AF. Dynamic AF Mode with focus areas. When the exposure mode is set to 8 (AUTO mode, page 28) or to any Vari-Program (page 36) (except .!. Close-Up mode), the N55 - Nikon 1718 | Instruction Manual - Page 27
• Situations where autofocus may not work as expected Autofocus may not work as expected in the following situations. In such situations, focus manually using the clear matte field (page 47) or focus on a different subject located at the same distance, use focus lock (page 52) then recompose. Low- - Nikon 1718 | Instruction Manual - Page 28
rix Metering is automatically selected. • Check if the AF Area mode is set to Dynamic AF Mode with Closest-Subject Priority Matrix Meter employed in the N55 uses a five- segment sensor a G- or D-type Nikkor lens (3D Matrix -1 =I() I in all exposure modes except Manual exposure mode (page 60). - Nikon 1718 | Instruction Manual - Page 29
See each reference page for operating instructions and details. Symbol Exposure mode Characteristics determine depth of the in-focus area, so you can choose whether near or far subjects are to be blurred. M Manual P. 60 Shutter speed and aperture are set manually. Suitable for situations where - Nikon 1718 | Instruction Manual - Page 30
properly. • Keep your elbow propped against your body for support. • Stand with one foot forward a half step and keep your left hand to cradle the camera (or lens). NOTE: Camera shake Camera shake is likely is located closest at any of three focus areas and lightly press the shutter release button. - Nikon 1718 | Instruction Manual - Page 31
Assist Illuminator (page 50) is automatically activated to guide autofocus (except in 0 or ~Q) . Check take a picture of a subject outside the focus area, shift the focus area (page 48) or use focus lock (page of the image actually exposed on the film frame. Therefore, the actual exposed frame is - Nikon 1718 | Instruction Manual - Page 32
up and starts charging (pages 40, 76). 2 Confirm that focus indicator. appears and slowly depress the shutter release button . • After the shutter is released , the film automatically advances to the next frame and the next shot can be taken . 32 - Nikon 1718 | Instruction Manual - Page 33
shot is taken . ~ 0_ --1 .- @ dE"3 ( Il V 2J · 0 _ __ is displayed during film rewind . 4 Confirm that film is completely rewound , then remove film cartridge. - Nikon 1718 | Instruction Manual - Page 34
three focus areas in the viewfinder. With the N55, Matrix Metering is automatically selected when the exposure mode is set to other than Manual and Center Partial Metering is selected with Manual exposure mode. • Exposure Light from the subject passes through the lens and exposes the film. Light - Nikon 1718 | Instruction Manual - Page 35
BASIC OPERATION 2 This section describes the following basic operations: • Shooting with Vari-Program • Using Built-In Speedlight • Self-Timer Operation • Imprinting DatefTime (QD model only) 35 - Nikon 1718 | Instruction Manual - Page 36
Shooting with Vari-Program- - - Vari-Program gives you the option to choose from Portrait, Landscape, Close- Up, Sports Continuous or Night Portrait mode-designed for specific picture- taking situations and photographic images. .... ... 1 Set the exposure mode dial to the desired Vari - Nikon 1718 | Instruction Manual - Page 37
, slow shutter speed is selected. To avoid camera shake, use a tripod. Use of self-timer also helps to avoid camera shake. • A wide-angle lens is suited to capturing a wide view of the landscape. NOTE: Vari-Program Flexible Program (page 55), Auto Exposure Bracketing (page 66) and Multiple Exposure - Nikon 1718 | Instruction Manual - Page 38
of subjects such as flowers or insects. • Dynamic AF Mode and center focus area are automatically selected (page 48). • In some shooting situations, slow shutter speed of ISO 400 or faster film speed is recommende d . • A tripod is recommended when using a telephoto lens to avoid camera shake. 38 - Nikon 1718 | Instruction Manual - Page 39
the scene, including the foreground subject and background. • Use 0 Landscape mode for twilight or nighttime scene without foreground subject. • Use of ISO 400 or faster film speed is recommended . • To avoid camera shake, use a tripod . 39 - Nikon 1718 | Instruction Manual - Page 40
with a guide number of 12/40 (ISO 100, m/ft .). When a wide-angle lens of less than 28mm focal length is used in flash photography using the built-in Speedlight, the flash may not reach the peripheral area and may result in a dark picture. • Using CPU Nikkor lenses such as a G- or O-type Nikkor lens - Nikon 1718 | Instruction Manual - Page 41
dark subjects, the camera's AF-Assist Illuminator is automatically activated to guide autofocus. See page 50 for details. NOTE: Continuous use of built Speedlight again. Check points • Be sure to remove (or store) the lens hood before flash shooting. • Some lenses have limitations using the built-in - Nikon 1718 | Instruction Manual - Page 42
Check points • Use a tripod or place the camera on a stable surface before using the self-timer. • To shoot in an exposure mode other than Manual, cover the eyepiece with the supplied eyepiece cap DK-5 (page 2) or with your hand before pressing the shutter release button to prevent interference from - Nikon 1718 | Instruction Manual - Page 43
2 Compose picture, focus by lightly pressing the shutter release button and fully depress the shutter release button. • Self-timer shooting cannot be performed unless the camera's shutter can be released (i.e. when subject cannot be brought into focus with autofocus). • Once the self-timer is - Nikon 1718 | Instruction Manual - Page 44
Imprinting Datef-T-ime (QD model only) You can imprint the following date information on your imprint LCD will be imprinted on the picture. Select no imprint) to cancel data imprint. Compatible film speeds for data imprinting are IS032-3200. 2 Compose picture, focus and fully depress the shutter - Nikon 1718 | Instruction Manual - Page 45
t ~ ~ ~ ,.. ....... T 11 ~ ~ FOCUS OPERATION ~ A ~ !~A ......6...A This section features detailed descriptions of focusing operations. ~ • Focus mode • Focus area ~ • AF-Assist Illuminator • Focus lock ~ ~ !~A ~ ~ ~~A ~ ~ 45 - Nikon 1718 | Instruction Manual - Page 46
Single Servo AF and Continuous Servo AF) and Manual focus, are available with this camera. • focuses the camera on the subject at the focus area (page 9/48) and causes . to appear in the camera continuously focuses on the subject. Also, N55 will continue to focus firmly on a main subject - Nikon 1718 | Instruction Manual - Page 47
to the N55 (page 88). • When using a lens with the A-M select function , set the switch/ring to M to focus manually. If M/A (autofocus with manual priority) is available with your lens, Manual focus is possible either with the switch/ ring set to M or M/A. See the instruction manual of your lens for - Nikon 1718 | Instruction Manual - Page 48
, or Dynamic AF Mode, where you select the desired focus area. When the focus mode is set to M (manual focus, page 47), Single Area Mode is automatically selected. In this mode, you focus manually using the selected focus area. ~ Tip Dynamic AF Mode with Closest-Subject Priority is useful when you - Nikon 1718 | Instruction Manual - Page 49
on t he subject determining the data from the other focus areas. When .!. Close-Up mode is selected, Dynamic AF Mode and center focus area are automatically selected. • When focus mode is set to Manual Set the focus mode selector to M I (manual) and rotate the Command Dial ~ wh ile pressing the - Nikon 1718 | Instruction Manual - Page 50
. AF-Assist Illuminator automatically turns on in the following situations: Focus mode is autofocus, AF Nikkor lens (except AF-S and AF-I) is used , subject is dark and center focus area is selected or Dynamic AF Mode with Closest-Subject Priority is activated . • AF-Assist Illuminator does - Nikon 1718 | Instruction Manual - Page 51
NOTE: Lenses incompatible with AF-Assist Illuminator • Lenses with autofocus using the camera's AF-Assist Illuminator cannot be performed due to vignetting at a shooting distance less than 1m. AF Micro 200mm f/4 IF-ED AF 1B-35mm f/3.5-4.5 ED AF 2o-35mm fl2 .B IF AF 24-B5mm fl2 .B-4 IF AF 24-12omm - Nikon 1718 | Instruction Manual - Page 52
Focus Lock Focus lock is useful in autofocus shooting when you want to capture a subject that's framed outside of the N55's three focus areas. ~ Tip Focus lock is best suited for a photograph where composition is your top priority, and in ...... situations.w.he.r.e•..... autofocus.m.a.y not work as - Nikon 1718 | Instruction Manual - Page 53
EXPOSURE MODE This section describes how to take pictures in each exposure mode. • Auto-Multi Program • Shutter-Priority Auto • Aperture-Priority Auto • Manual 53 - Nikon 1718 | Instruction Manual - Page 54
Program (page 55) . Exposure Compensation (page 64) or Auto Exposure Bracketing (page 66). • P (Auto-Multi Program) can only be used with a CPU Nikkor lens such as G- or D-type Nikkor (page 88) . ~ Tip Auto-Multi Program is best suited for snapshots. 1 Set the exposure mode dial to P. NOTE: CPU - Nikon 1718 | Instruction Manual - Page 55
Difference between 8 (AUTO mode) and P (Auto-Multi Program) Although exposure controls are the same, with Auto-Multi Program, you can select functions such as Flexible Program, Exposure Compensation, Auto Exposure Bracketing, Multiple Exposure (page 69) or Slow Sync flash (page 78) for more flexible - Nikon 1718 | Instruction Manual - Page 56
shutter speed 1/500 sec. s:Shutter-Priority Auto Enables you to manually set the desired shutter speed (30-1/2000 sec.); the camera correct exposure. • S (Shutter-Priority Auto) can only be used with a CPU Nikkor lens such as G- or O-type Nikkor (page 88) . < Tip With high shutter speeds, - Nikon 1718 | Instruction Manual - Page 57
when you lightly press the shutter I release button. Use the Speedlight (page 80/ 91) . Check point • If - - (Long Time exposure) is selected in Manual exposure mode and the exposure mode is changed to Shutter-Priority Auto without cancelling - - , - - blinks and the shutter locks. To shoot in - Nikon 1718 | Instruction Manual - Page 58
Aperture-Priority Auto Exposure Mode Small aperture f/32 A: Aperture-Priority Auto Enables you to set the desired aperture (lens' mi nimum to maximum) manually. The camera automatically selects a shutter speed suitable for correct exposure. • A (Aperture-Priority Auto) can only be used with a CPU - Nikon 1718 | Instruction Manual - Page 59
2 Set the aperture (lens' minimum to maximum) by rotating the Command Dial. Overexposure Underexposure 3 Compose picture, confirm focus indicator. and shoot. • When the subject is too dark or too - Nikon 1718 | Instruction Manual - Page 60
(lens' minimum to maximum) manually. • Non-CPU lenses (page 90) can only be used in Manual exposure lens aperture ring. Camera's exposure meter cannot be used. See page 90 for details. Center Partial Metering Center Partial Metering places special emphasis on brightness around three focus areas - Nikon 1718 | Instruction Manual - Page 61
NOTE: CPU Nikkor lenses other than G-type Always set the aperture ring of a CPU Nikkor lens (except G-type) to its minimum (largest f-number). When the lens is not set to its minimum aperture setting, FEE blinks in the LCD panel and viewfinder, and the shutter locks. e r8!l8J 2So F'-I [!) 2 Set - Nikon 1718 | Instruction Manual - Page 62
Long Time Exposure • Long Time (Time) exposure of more than 30 sec. When the exposure mode dial is set to M (Manual), set the shutter speed indication to - - (next after 30 sec.) to set Long Time (Time) exposure. Depress the shutter release button once to open the - Nikon 1718 | Instruction Manual - Page 63
ADVANCED OPERATION This section features descriptions of operations using this camera's advanced functions. • Exposure Compensation • Auto Exposure Bracketing • Multiple Exposure 63 - Nikon 1718 | Instruction Manual - Page 64
Exposure Compensation To modify exposure control (i.e. from the ISO standard), use the Exposure Compensation function . This can be useful when intentionally achieving under· or overexposure to obtain a specific photographic effect. This camera offers compensation of -2 EV to +2 EV in 1/2 steps. - Nikon 1718 | Instruction Manual - Page 65
NOTE: Setting Exposure Compensation Normally, you should compensate exposure to the + side when the background is brighter than your main subject, or to the - side when the background is darker. 2 Compose picture, confirm focus indicator. and shoot. • To cancel Exposure Compensation, rotate the - Nikon 1718 | Instruction Manual - Page 66
EV) shifting from the automatically set proper exposure (or selected exposure in Manual exposure mode) for three shots each time the shutter is released . • exposures after processing the film , when the subject has pronounced contrast in shooting with color slide film and where the latitude - Nikon 1718 | Instruction Manual - Page 67
Bracketing with a compensated value of over +2 EV or under -2 EV (maximum of ±4 EV). • If the end of the film roll is reached during bracketing, the remaining shots can be taken after new film has been loaded. Also, if you turn the power switch off during bracketing, the remaining shots can be taken - Nikon 1718 | Instruction Manual - Page 68
Auto Exposure Bracketing-continued 3 Auto Exposure Bracketing is completed and automatically canceled when the third shot is taken . • lim and ~ in the LCD panel and ~ and the electronic analog exposure display in e the viewfinder disappear when the bracketing is completed . • To cancel the - Nikon 1718 | Instruction Manual - Page 69
dark and subjects do not overlap, no compensation is necessary for each shot. • In some cases, frames may shift slightly in multiple exposure. In particular, film advance becomes unstable at the beginning and near the end of - Nikon 1718 | Instruction Manual - Page 70
, rotate the Command Dial while pressing the button so ~ disappears from the LCD panel or set the exposure mode to ~ or Vari-Program. Film is advanced and frame counter counts down when the multiplE exposure is canceled before or during multiple exposure operation. Check points • Multiple Exposure - Nikon 1718 | Instruction Manual - Page 71
OTHER FUNCTIONS This section describes other useful camera functions and information. • Film rewind • Diopter adjustmenWiewfinder accessories • Available mode combinations 71 - Nikon 1718 | Instruction Manual - Page 72
blinking when the exposure meter is off.) Make sun E is blinking, open the camera back and remove th film cartridge. 1--/ ----J S \ ~ "Q ~: ~ I @ II "\"' "Tc:-. :SJ E,,~ 1 ~ If film does not start to rewind or film rewind stops at mid-roll • When battery power is very low, or at low temperatures - Nikon 1718 | Instruction Manual - Page 73
accessories To attach an eyepiece cap or eyepiece correction lens, remove the rubber eyecup and slide down the eyepiece cap or eyepiece correction lens. To reattach the rubber eyecup after removing the eyepiece cap or eyepiece correction lens, make sure the "Nikon DK-16" stamp is at the bottom. 73 - Nikon 1718 | Instruction Manual - Page 74
The following chart lists available modes when a CPU Nikkor lens such as a .G.-.o.r.O.-t.y.pe..le.n.s.is.a.t.ta.c.h.ed Exposure mode Matrix Matrix Matrix Center Partial Film advance mode Single frame Single Subject Priority @: Dynamic AF Mode @: Single Area Mode • Single frame with use of built- - Nikon 1718 | Instruction Manual - Page 75
FLASH PHOTOGRAPHY This section introduces various aspects of flash photography using the built-in Speedlight. • Built-in Speedlight (Matrix Balanced FillFlash , Standard TTL Flash)/Ready-light • Flash sync mode features • Using built-in Speedlight 75 - Nikon 1718 | Instruction Manual - Page 76
-Light • Built-in Speedlight and TTL Flash modes This camera is equipped with a built-in Speed light that provides an angle of coverage for a 28mm lens with a guide number of 12 (ISO 100, m) or 40 (ISO 100, ft .). When the subject is dark or backlit, in 8 or Vari-Program (except in rJ - Nikon 1718 | Instruction Manual - Page 77
blinks to indicate that the flash will be fired at full output. Make sure to set the optional Speedlight to A (non-TIL Auto Flash) or M (Manual Flash) mode. 77 - Nikon 1718 | Instruction Manual - Page 78
Flash Sync Mode Features Five flash sync modes can be selected for desired photographic effect depending on the conditions when using the built-in Speedlight. In rJ and modes, flash is not available even when the subject is dark or backlit. Set the flash sync mode by rotating the Command Dial wh - Nikon 1718 | Instruction Manual - Page 79
~ : Red-Eye Reduction The Red-Eye Reduction lamp lights for approx. 1 sec. before the flash fires in order to reduce the red-eye effect in photos of people or animals. Red-Eye Reduction can be used in 8 . Vari-Program (except for r:J and .!...-.r..). p . S. A. or M exposure mode. [Ij : Red-Eye - Nikon 1718 | Instruction Manual - Page 80
Using Built-In Speedlight This section explains how to use the built-in Speed light set to desired flash sync mode when a G- or D-type AF Nikkor.le.n.s.is.a.t.ta.c.he.d 1 In P, S, A or M exposure mode, release the built-in Speedlight by pressing the 0 flash lock-release button. In 8 or Vari- - Nikon 1718 | Instruction Manual - Page 81
• If 0 or ~.. is set when the built-in Speedlight is in the up position, flash is automatically canceled. • Matrix Balanced Fill-Flash is selected in exposure modes other than M and Standard TIL Flash is selected for M exposure mode. See page 76 for details. • See the table on pages 82, 83 and - Nikon 1718 | Instruction Manual - Page 82
subject is dark, the AF-Assist Illuminator automatically turns on to guide autofocus. See page 50 for details. • Available shutter speed Speedlight pops up. *3 Flash shooting distance range depends on the ISO speed of the film in use and aperture setting. In A or M exposure mode, set the aperture - Nikon 1718 | Instruction Manual - Page 83
• Flash shooting distance range Flash shooting distance for the built-in Speedlight changes according to the film speed in use and aperture setting. ISO film speed 25 50 100 200 400 800 Flash shooting distance range Guide number (m/ft.) 6/20 8.5/28 12/40 17/56 24/79 34/12, (m/ft.) - - 1.4 2 - Nikon 1718 | Instruction Manual - Page 84
: Using built-in Speedlight • Make sure to remove the lens hood. • The built-in Speedlight cannot be used with zoom lenses set to Macro in wideangle. • AF-S 17-35mm f/2 .8 ED, AF 18-35mm f/3.5-4.5 ED, AF 20-35mm f/2 .8 zoom lenses cannot be film compared to color slide film since the edges of the frame are - Nikon 1718 | Instruction Manual - Page 85
70-180mm 1/4.5-5.6 ED At 70-85mm, 1m (3.3 fl.) or longer shooting distance AF-S 80-200mm 1/2.8 ED 105mm or longer local length With color slide film Lens AF 24-50mm 1/3.3-4.5 AF 24-85mm 1/2.8-4 AF 24-120mm 1/3.5-5.6 AF 28mm 1/1.4 AF-S 28-70mm 1/2.8 ED AF 28-70mm 1/3.5-4.5 AF 28-80mm 1/3.3-5.6G AF - Nikon 1718 | Instruction Manual - Page 86
of field should be considered. Depth of field is the zone of sharpest focus in front of and behind the subject on which the lens is focused. It varies according to shooting distance, focal length and, above all, aperture. Smaller apertures (larger f-numbers) will produce a deeper depth of field - Nikon 1718 | Instruction Manual - Page 87
MISCELLANEOUS This section explains miscellaneous information. • Lens compatibility • Usable optional Speedlights • Optional accessories • Camera care • Notes on batteries • Troubleshooting • Glossary • Specifications • Index 87 - Nikon 1718 | Instruction Manual - Page 88
with the Vibration Reduction function of the VR Nikkor lens and autofocus function of the AF-S and AF-I lens.) ~ Focus mode Exposure mode Manual with Any mode Autofocus electronic Manual other than M rangefinder M lens/accessories G-type AF Nikkor, Ootype AF Nikkor*3 0 0 0 0 0 N AF - Nikon 1718 | Instruction Manual - Page 89
switches to Center Partial Metering when the exposure mode is set to Manual. '2 IX-Nikkor lenses cannot be attached. '3 This camera is not compatible with the Vibration Reduction function of the VR Nikkor lens. '4 The camera's exposure metering and flash control system do not work properly - Nikon 1718 | Instruction Manual - Page 90
of the aperture indication in the LCD panel and viewfinder; set/confirm aperture using the lens aperture ring. c50 rf- C,,] [36J @ ~ Jj CAUTION: Nikkor lenses/accessories that cannot be attached to the N55 The following non-CPU Nikkor lenses/accessories cannot be attached to the NSS (otherwise - Nikon 1718 | Instruction Manual - Page 91
Optional Speedlights Usable optional Speedlights and available flash modes are listed in the following table. Available modes are listed assuming a CPU lens is attached. ~ Speedlight Non-TIL Auto Flash Manual Flash S8-29*' , S8-28, S8-27, S8-26, S8-25, S8-24, S8-22, S8-22s, S8-20, S8-168 - Nikon 1718 | Instruction Manual - Page 92
's light sensor). It is useful in situations such as when the camera 's built-in Speedlight does not reach the subject. See your Speedlight manual for details on operation . • Non-TTL Auto Flash using optional Speedlight 1 Attach the optional Speedlight to the accessory shoe of the camera. Turn - Nikon 1718 | Instruction Manual - Page 93
on Manual Flash. 3 Compose picture and set aperture so that the subject is located within the flash shooting distance. 4 Set ISO film speed, aperture and zoom-head position of the optional Speedlight according to camera's ISO film speed, aperture and focal length (zoom position). 1' ''' moll - Nikon 1718 | Instruction Manual - Page 94
the subject is dark, the camera's AF-Assist Illuminator automatically turns on to guide autofocus (the Speedlight's AF-Assist Illuminator does not turn on). See page 50 optional Speedlight instead of being measured through the lens. Compared to TTL Auto Flash of the bu ilt-in Speedlight, where t - Nikon 1718 | Instruction Manual - Page 95
by one EV. If the film speed of the ~ film in use is an intermediate value of the film speed indicated in the table, the &I aperture changes accord ingly. If the controlled aperture is darker than maximum aperture, maximum aperture of the attached lens is selected. i~i~i • See " Non-TIL - Nikon 1718 | Instruction Manual - Page 96
continued • Notes on using optional Speed lights • See your Speedlight manual for details. • Make sure to cancel the standby mode of the focus mode is set to AF, an AF Nikkor lens is attached, the subject is dark and center focus area is selected or Dynamic AF Mode with Closest-Subject Priority is - Nikon 1718 | Instruction Manual - Page 97
to incompatible voltage requirements (not compatible with 250V or higher), electric contact alignment or switch phase. When flash attachments made by manufacturers other than Nikon are attached, the built-in Speedlight may not pop up all the way (with power switch of the Speedlight on or off). When - Nikon 1718 | Instruction Manual - Page 98
Micro or DC (Defocus image Control)-is available for the NSS. Filters • Nikon filters can be divided into three types: screw-in, drop-in and rear- with the NSS. • Use NC fi lter when using the filter to protect the lens. • Moire may occur when shooting a subject against bright light or if a bright - Nikon 1718 | Instruction Manual - Page 99
four AA-type alkaline-manganese batteries with a guide number of 36/118 (S8-28) and 30/98 (S8-27) (manual flash , 35mm zoom-head position, ISO 100 The camera body fits inside the case with AF 28-80mm f/3.3-5.6G or smaller lens attached. Neckstraps/Handstrap AH-4 • 8raid-type AN-48 (black) and AN-4Y - Nikon 1718 | Instruction Manual - Page 100
brush to remove dirt and dust from the mirror or lens. To remove fingerprints or smudges from the lens' surface, use a soft, clean cotton cloth or lens tissue moistened with ethanol (alcohol) or lens cleaner. • Do not subject the camera or lens to strong vibration or shock Do not drop the camera - Nikon 1718 | Instruction Manual - Page 101
maintain the built-in Speedlight in peak condition , fire it a few times every month. This will enable you to use the flash for many years. I Nikon cannot be held responsible for any malfunction resulting from the use of the camera other than as specified in this - Nikon 1718 | Instruction Manual - Page 102
ith old batteries. Use a fresh set of batteries at low temperatures, keep spare batteries warm, and use them alternately. • Film advance speed lowers and number of usable film rolls becomes less at low temperatures. However, battery power may recover when the temperature returns to normal. • Do not - Nikon 1718 | Instruction Manual - Page 103
rewind buttons simultaneously for more than 1 sec. to start film rewind again. If this warning appears frequently, contact authorized Nikon dealer or service center. • Non-CPU lens is attached or lens is not attached. • Attach CPU lens. With a non-CPU lens, set the exposure mode to M and set the - Nikon 1718 | Instruction Manual - Page 104
Troubleshooting-continued H : appears L 0 appears - - blinks • blinks • Autolocus is not • Focus manually. 47 possible. H : appears • Overexposure • P mode, use NO lilter. 54 warning (subject is • In S mode, select laster shutter 56 too bright). speed. • In A mode, select smaller - Nikon 1718 | Instruction Manual - Page 105
, or this warning appears frequently, contact authorized Nikon dealer or service center. In certain cases, due to static electricity, the N55's microcomputer may turn the camera off, even with fresh, properly installed batteries. For the same reason, the film may not advance properly. In each of - Nikon 1718 | Instruction Manual - Page 106
EV1 . The camera can be used only within the EV range of the exposure meter. For example, with the N55, the exposure metering range is from EV1 to EV20 at ISO 100 with an f/ 1.4 lens. Exposure bracketing Shooting the same subject a number of times at a range of different exposures to attain proper - Nikon 1718 | Instruction Manual - Page 107
film speed , etc. Flash sync speed Shutter speed at which the entire film frame is exposed when the flash is fired in flash shooting. The N55 f-number The f-number represents the aperture value and is calculated from lens' focal length divided by the effective aperture opening. The standard numbers - Nikon 1718 | Instruction Manual - Page 108
the flash sync mode at Normal Sync. Guide number The guide number indicates the power of a flash in relation to ISO film speed. The guide number of the built-in Speedlight of the N55 is 12 (ISO 100, m). Guide numbers are quoted in either meters or feet. Guide numbers are used to calculate the f/stop - Nikon 1718 | Instruction Manual - Page 109
with the flash brings out the background details in the picture. The N55's Slow Sync mode extends the automatically controlled shutter speed range down to illumination on the film from the center to the corners. There are two kinds of vignetting-natural vignetting caused by the lens, and vignetting - Nikon 1718 | Instruction Manual - Page 110
M: Manual Picture format 24 x 36mm (standard 35mm film format) Lens mount Nikon F mount (with AF coupling, AF contacts) Lens Nikkor and Nikon lenses having Nikon F 50mm lens set to infinity (at -1.5 to +O.8m-1) Viewfinder information (with illuminator) Focus indications, focus area, shutter - Nikon 1718 | Instruction Manual - Page 111
Area with M focus mode Metering syst em TTL full-aperture exposure metering system Three metering systems selectable (limitations with lens 8 or Vari-Program) Film speed setting • Automatically set to ISO film speed of OX-coded film in use (manual not selectable) • Film speed range: OX: ISO - Nikon 1718 | Instruction Manual - Page 112
button Guide number: 12/40 (at ISO 100, m/ft.); flash coverage: 28mm or longer lens; film speed lens (except in Manual exposure mode) • Standard TTL: in Manual exposure mode • Programmed Flash (Non-TTL Auto Flash): optional Speedlight and CPU Nikkor lens (except in A or M exposure mode) • Film - Nikon 1718 | Instruction Manual - Page 113
sync mode, focus area, battery power, frame counter, self-timer Date/time imprint function (QD model only) Built-in clock: 24-hour type with timing accuracy within ±90 seconds a month; leap year adjustment until December 31, 2049 Usable film: ISO 32 to 3200 DX-coded film Display mode: Year/Month - Nikon 1718 | Instruction Manual - Page 114
(24exposure) film rolls per set (10) Autofocus operation using an AF Zoom-Nikkor 28-80mm f/3.3-5.66 lens, covering the full range from infinity (~) to the closest distance and x D) Approx. 129 x 92 x 65mm or 5.1 x 3.6 x 2.6 in. QD model: Approx. 129 x 92 x 67.5mm or 5.1 x 3.6 x 2.7 in. Weight - Nikon 1718 | Instruction Manual - Page 115
115 - Nikon 1718 | Instruction Manual - Page 116
adjustment 73 Distance information 28. 34 D-type Nikkor lens 18. 88 DX-coded film 21 DynamiC AF Mode 38. 48-49. 74 area 8. 9. 30. 48-49 Focus Lock 27. 52 Focus mode 26. 46-47. 74. 88 Focus Tracking 46. 108 Front-Curtain Sync ........41. 78. 84. 95. 108 G G-type Nikkor lens 18. 88 Guide - Nikon 1718 | Instruction Manual - Page 117
. 34. 60-62. 74. 82. 84. 95 Manual focus 27. 47 Manual focus with electronic rangefinder ... 47 Matrix Balanced Fill-Flash Priority Auto exposure mode .......... 10.29. 34. 55-57. 74. 82. 84. 95 Single Area Mode 49. 74 Single-frame shooting 74 Single Servo AF 46 Slow Sync flash 78. 84. 95 - Nikon 1718 | Instruction Manual - Page 118
118 - Nikon 1718 | Instruction Manual - Page 119
119 - Nikon 1718 | Instruction Manual - Page 120
No reproduction in any form of this manual, in whole or in part (except for brief quotation in critical articles or reviews) , may be made without written authorization from NIKON CORPORATION. ... Nikon NIKON CORPORATION FUJI BLDG., 2-3, MARUNOUCHI 3-CHOME, CHIYODA-KU, TOKYO 100-8331, JAPAN Printed
-
 1
1 -
 2
2 -
 3
3 -
 4
4 -
 5
5 -
 6
6 -
 7
7 -
8
-
9
-
10
-
11
-
12
-
13
-
14
-
15
-
16
-
17
-
18
-
19
-
20
-
21
-
22
-
23
-
24
-
25
-
26
-
27
-
28
-
29
-
30
-
31
-
32
-
33
-
34
-
35
-
36
-
37
-
38
-
39
-
40
-
41
-
42
-
43
-
44
-
45
-
46
-
47
-
48
-
49
-
50
-
51
-
52
-
53
-
54
-
55
-
56
-
57
-
58
-
59
-
60
-
61
-
62
-
63
-
64
-
65
-
66
-
67
-
68
-
69
-
70
-
71
-
72
-
73
-
74
-
75
-
76
-
77
-
78
-
79
-
80
-
81
-
82
-
83
-
84
-
85
-
86
-
87
-
88
-
89
-
90
-
91
-
92
-
93
-
94
-
95
-
96
-
97
-
98
-
99
-
100
-
101
-
102
-
103
-
104
-
105
-
106
-
107
-
108
-
109
-
110
-
111
-
112
-
113
-
114
-
115
-
116
-
117
-
118
-
119
-
120
 |
 |
Nikon
N
55
INSTRUCTION MANUAL