Nikon Coolpix S4 User Manual - Page 20
Turning the Camera On, Basic Setup, Auto Power off Stand-by Mode
 |
UPC - 410000220139
View all Nikon Coolpix S4 manuals
Add to My Manuals
Save this manual to your list of manuals |
Page 20 highlights
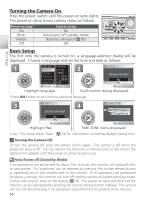
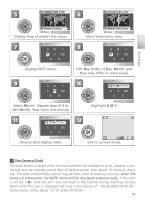
Turning the Camera On Press the power switch until the power-on lamp lights. The power-on lamp shows camera status as follows: Power-on lamp On Blinks Flickers Off Camera status On Auto power off (standby mode) Batteries exhausted ( 85) Off First Steps Basic Setup The first time the camera is turned on, a language-selection dialog will be displayed. Choose a language and set the time and date as follows: 1 2 DATE Set time and date? Cancel Confirm Highlight language. * No Yes Confirm Confirmation dialog displayed. * Press button to exit without selecting language. 3 DATE 4 TIME ZONE Set time and date? London, Casablanca DaylightSaving No Yes Confirm Confirm Highlight Yes. TIME ZONE menu displayed. † † See "The Setup Menu: Date" ( 74) for information on setting daylight saving time. Turning the Camera Off To turn the camera off, press the power switch again. The camera is off when the power-on lamp is off. Do not remove the batteries or memory card or disconnect the optional AC adapter until the power-on lamp has gone out. Auto Power off (Stand-by Mode) If no operations are performed for about five seconds, the monitor will gradually dim to save power. Full brightness can be restored by pressing the shutter-release button or operating any of the controls next to the monitor. If no operations are performed for about a minute, the monitor will turn off and the camera will enter stand-by mode, further reducing the drain on the battery ( 78). The power-on lamp will blink and the monitor can be reactivated by pressing the shutter-release button halfway. The camera will turn off automatically if no operations are performed for another three minutes. 10
-
 1
1 -
2
-
3
-
4
-
5
-
6
-
7
-
8
-
9
-
10
-
11
-
12
-
13
-
14
-
 15
15 -
 16
16 -
 17
17 -
 18
18 -
 19
19 -
 20
20 -
 21
21 -
 22
22 -
 23
23 -
 24
24 -
 25
25 -
26
-
27
-
28
-
29
-
30
-
31
-
32
-
33
-
34
-
35
-
36
-
37
-
38
-
39
-
40
-
41
-
42
-
43
-
44
-
45
-
46
-
47
-
48
-
49
-
50
-
51
-
52
-
53
-
54
-
55
-
56
-
57
-
58
-
59
-
60
-
61
-
62
-
63
-
64
-
65
-
66
-
67
-
68
-
69
-
70
-
71
-
72
-
73
-
74
-
75
-
76
-
77
-
78
-
79
-
80
-
81
-
82
-
83
-
84
-
85
-
86
-
87
-
88
-
89
-
90
-
91
-
92
-
93
-
94
-
95
-
96
-
97
-
98
-
99
-
100
-
101
-
102
-
103
-
104
-
105
-
106
-
107
-
108
 |
 |
