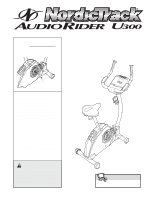
NordicTrack Audiorider U300 Bike Canadian English Manual
NordicTrack Audiorider U300 Bike Manual
 |
View all NordicTrack Audiorider U300 Bike manuals
Add to My Manuals
Save this manual to your list of manuals |
NordicTrack Audiorider U300 Bike manual content summary:
- NordicTrack Audiorider U300 Bike | Canadian English Manual - Page 1
. If you have questions, or if parts are damaged or missing, PLEASE DO NOT instructions in this manual before using this equipment. Keep this manual for future reference. USER'S MANUAL Visit our website at www.proform.com Visit our website at www.healthrider.com Visit our website at www.nordictrack - NordicTrack Audiorider U300 Bike | Canadian English Manual - Page 2
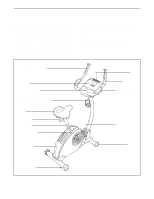
CYCLE 9 MAINTENANCE AND TROUBLESHOOTING 16 EXERCISE GUIDELINES 17 PART LIST 18 EXPLODED DRAWING 19 ORDERING REPLACEMENT PARTS cover of this manual and request a free replacement decal. Apply the decal in the location shown. Note: The decal may not be shown at actual size. NordicTrack is a - NordicTrack Audiorider U300 Bike | Canadian English Manual - Page 3
problems. 2. Read all instructions in this manual and all warnings on the exercise cycle before using the exercise cycle. 3. Use the exercise cycle only as described in this manual cycle to mount, dismount, and use it. 7. Inspect and properly tighten all parts regularly. Replace any worn parts - NordicTrack Audiorider U300 Bike | Canadian English Manual - Page 4
entire body. The AUDIORIDER U300 exercise cycle offers an impressive array of features, including a console with two motivational interactive games, designed to let you enjoy this healthful exercise in the comfort and convenience of your home. For your benefit, read this manual carefully before you - NordicTrack Audiorider U300 Bike | Canadian English Manual - Page 5
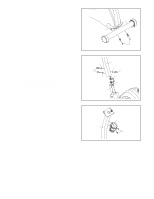
adjustable wrench . and an As you assemble the exercise cycle, use the drawings below to identify small parts. The number in parentheses below each drawing is the key number of the part, from the PART LIST near the end of this manual. The number following the parentheses is the quantity used in - NordicTrack Audiorider U300 Bike | Canadian English Manual - Page 6
2. Attach the Rear Stabilizer (3) to the Frame (1) with 2 two M10 x 85mm Button Screws (56). 3 1 56 3. While another person holds the Handlebar Post (6) near the Frame (1), connect the Upper Wire Harness (51) to the Lower Wire Harness (50) and the Power Jack Wire (65). Next, pull the excess - NordicTrack Audiorider U300 Bike | Canadian English Manual - Page 7
(not included); alkaline batteries are recommended. IMPORTANT: If the exercise cycle has been exposed to cold temperatures, allow it to warm to room number on the front cover of this manual. Plug one end of the power supply into the jack at the front of the exercise cycle. Plug the other end of the - NordicTrack Audiorider U300 Bike | Canadian English Manual - Page 8
8. Slide the Bottom Handlebar Cover (33) into the slots 8 in the bottom of the Console (9). Attach the Bottom Handlebar Cover to the Handlebar (7) and the Top Handlebar Cover (30) with two M4 x 16mm Screws (54) and one M4 x 12mm Screw (64). 30 9 7 9. Turn the Seat Post Knob (20) - NordicTrack Audiorider U300 Bike | Canadian English Manual - Page 9
Important: Tighten both Pedals as firmly as possible. After using the exercise cycle for one week, retighten the Pedals. For best performance, keep the Pedals 15 40 12. Make sure that all parts are properly tightened before you use the exercise cycle. Note: Some hardware may be left over after - NordicTrack Audiorider U300 Bike | Canadian English Manual - Page 10
and prompts you to increase or decrease your pedaling pace as it guides you through an effective workout. In addition, the console features two .com or call the toll-free telephone number on the front cover of this manual. iFIT Cards are also available at select stores. You can even connect your MP3 - NordicTrack Audiorider U300 Bike | Canadian English Manual - Page 11
the manual mode. When you turn on the console, the manual mode will be selected. If you have selected a program, reselect the manual mode the elapsed time. To view the total distance pedaled since the exercise cycle was purchased and the trip distance, press the Odometer button. The information - NordicTrack Audiorider U300 Bike | Canadian English Manual - Page 12
5. Measure your heart rate if desired. 6. Turn on the fan if desired. If there are sheets of clear plastic on the Contacts metal contacts on the handgrip pulse sensor, remove the plas- tic. In addition, make sure that your hands are clean. To measure your heart rate, hold the handgrip - NordicTrack Audiorider U300 Bike | Canadian English Manual - Page 13
at a pace that is comfortable for you. If the resistance setting for the current segment is too high or too low, you can manually override the setting by pressing the OneTouch Resistance buttons. However, when the current segment ends, the pedals will automatically adjust to the resistance setting - NordicTrack Audiorider U300 Bike | Canadian English Manual - Page 14
. When no arrow appears, maintain your current pace. If the resistance setting for the current segment is too high or too low, you can manually override the setting by pressing the OneTouch Resistance buttons. However, when the console compares your heart rate to the target heart rate setting, the - NordicTrack Audiorider U300 Bike | Canadian English Manual - Page 15
Card by pressing the up and down buttons next to the iFIT slot. A moment after you select a program, the voice of a personal trainer will begin guiding you through your workout. iFIT programs work in the same way as preset programs. To use the program, see steps 3 to 6 on page 13. HOW - NordicTrack Audiorider U300 Bike | Canadian English Manual - Page 16
AND TROUBLESHOOTING Inspect and properly tighten all parts of the exercise cycle regularly. The exercise cycle can be instructions. If the console does not display your heart rate when you use the handgrip pulse sensor, see step 5 on page 12. HOW TO LEVEL THE EXERCISE CYCLE If the exercise cycle - NordicTrack Audiorider U300 Bike | Canadian English Manual - Page 17
achieving results. You can use your heart rate as a guide to find the proper intensity level. The chart below shows increases the flexibility of your muscles and helps to prevent post-exercise problems. To find the proper intensity level, find your age at the part of your everyday life. 17 - NordicTrack Audiorider U300 Bike | Canadian English Manual - Page 18
60 2 M6 x 10mm Screw 61 4 M6 Split Washer 62 4 M6 Washer 63 4 M6 Nylon Locknut 64 1 M4 x 12mm Screw 65 1 Power Jack/Wire * 1 User's Manual * 2 Hex Key Note: * indicates a non-illustrated part. Specifications are subject to change without notice. See the back cover of this - NordicTrack Audiorider U300 Bike | Canadian English Manual - Page 19
EXPLODED DRAWING-Model No. 30706.1 R0707A 10 54 54 22 24 46 54 7 54 54 54 30 9 37 25 16 5 54 54 26 45 14 8 54 54 54 6 55 48 55 17 43 18 47 51 55 48 56 60 53 54 33 64 54 19 12 11 31 20 58 13 27 35 17 43 36 54 58 54 57 44 49 59 52 21 63 38 52 23 34 2 65 1 61 21 32 - NordicTrack Audiorider U300 Bike | Canadian English Manual - Page 20
and description of the replacement part(s) (see the PARTS LIST and the EXPLODED DRAWING near the end of this manual) LIMITED WARRANTY ICON OF CANADA, INC., (ICON) warrants this product to be free from defects in workmanship and material, under normal use and service conditions, for a period of one
-
 1
1 -
 2
2 -
 3
3 -
 4
4 -
 5
5 -
 6
6 -
 7
7 -
8
-
9
-
10
-
11
-
12
-
13
-
14
-
15
-
16
-
17
-
18
-
19
-
20
 |
 |

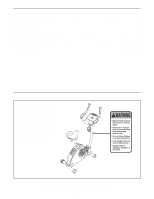
C
AUTION
Read all precautions and instruc-
tions in this manual before using
this equipment. Keep this manual
for future reference.
Serial Number
Decal (under frame)
Model No. 30706.1
Serial No.
www.nordictrack.com
Visit our website at
QUESTIONS?
As a manufacturer, we are com-
mitted to providing complete
customer satisfaction. If you
have questions, or if parts are
damaged or missing, PLEASE DO
NOT CONTACT THE STORE. For
assistance, contact Customer
Care.
CALL TOLL-FREE:
1-888-936-4266
Mon.–Fri., 8:00 until 17:00 EST
(excluding holidays)
OR E-MAIL US:
USER'S MANUAL
Write the serial number in the
space above for reference.