NordicTrack Audiorider U300 Bike Canadian English Manual - Page 6
Harness 51 to the Lower Wire Harness 50
 |
View all NordicTrack Audiorider U300 Bike manuals
Add to My Manuals
Save this manual to your list of manuals |
Page 6 highlights
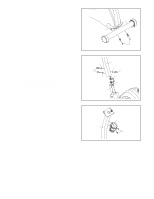
2. Attach the Rear Stabilizer (3) to the Frame (1) with 2 two M10 x 85mm Button Screws (56). 3 1 56 3. While another person holds the Handlebar Post (6) near the Frame (1), connect the Upper Wire Harness (51) to the Lower Wire Harness (50) and the Power Jack Wire (65). Next, pull the excess Upper Wire Harness out of the top of the Handlebar Post, and slide the Handlebar Post onto the Frame. Be careful not to pinch the Wire Harnesses. Attach the Handlebar Post (6) to the Frame (1) with three M10 x 50mm Button Screws (48) and three M10 Split Washers (55); tighten the two Button Screws in the front of the Handlebar Post first, and then tighten the third Button Screw. 3 48 55 6 55 48 55 51 50 65 1 4. Attach the Water Bottle Holder (18) to the Handlebar Post (6) with two M4 x 19mm Screws (47). 4 6 18 47 6
-
 1
1 -
 2
2 -
 3
3 -
 4
4 -
 5
5 -
 6
6 -
 7
7 -
 8
8 -
 9
9 -
 10
10 -
 11
11 -
 12
12 -
13
-
14
-
15
-
16
-
17
-
18
-
19
-
20
 |
 |
