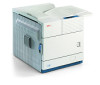
Oki B8300n Guide: Installation B8300
Oki B8300n Manual
 |
View all Oki B8300n manuals
Add to My Manuals
Save this manual to your list of manuals |
Oki B8300n manual content summary:
- Oki B8300n | Guide: Installation B8300 - Page 1
- Oki B8300n | Guide: Installation B8300 - Page 2
Installation Manual for B8300 and Its Peripheral Devices To install the devices feeding device [Electrical setting/adjustment] 1) Installation of driver software, setting, and operation check Main unit / B83H P. 13) 2) Paper guide position adjustment/off center adjustment B83MP / B83LT / B83TT - Oki B8300n | Guide: Installation B8300 - Page 3
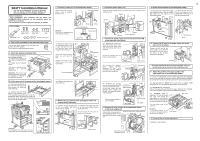
FOR USE WITH COMPATIBLE OKI DIGITAL PRINTERS. SEE OKI DIGITAL PRINTER SERVICE MANUAL OR INSTALLATION MANUAL TO DETERMINE SUITABILITY. MINIMUM SIZE" is displayed. Pull out the paper tray again and narrow the paper guides to the minimum. Then, return the paper tray into the main unit and press the [OK] - Oki B8300n | Guide: Installation B8300 - Page 4
B83LT Installation Manual FOR USE WITH COMPATIBLE OKI DIGITAL PRINTERS. SEE OKI DIGITAL PRINTER SERVICE MANUAL OR INSTALLATION MANUAL TO DETERMINE SUITABILITY. • Start installation after checking that the DATA and COMMUNICATION indicators on the operation panel are neither lit - Oki B8300n | Guide: Installation B8300 - Page 5
B83TT Installation Manual FOR USE WITH COMPATIBLE OKI DIGITAL PRINTERS. SEE OKI DIGITAL PRINTER SERVICE MANUAL OR INSTALLATION MANUAL TO DETERMINE SUITABILITY. • Start installation after checking that the DATA and COMMUNICATION indicators on the operation panel are neither lit - Oki B8300n | Guide: Installation B8300 - Page 6
Printer Main Unit Installation Manual FOR USE WITH COMPATIBLE OKI DIGITAL PRINTERS. SEE OKI DIGITAL PRINTER SERVICE MANUAL OR INSTALLATION MANUAL sidesof the tray. Then Toner cartridge • Developer cartridge • CD-ROM • Safety and Warranty information • User Guide (may be on CD-ROM) Shake the toner - Oki B8300n | Guide: Installation B8300 - Page 7
For installation of printer drivers on the computer refer to the Operation manual (for printer operation and general information) supplied with the machine. After driver installation, execute a test print to ensure normal printing. Remove the sealing tape from the toner/drum cartridge by - Oki B8300n | Guide: Installation B8300 - Page 8
FOR USE WITH COMPATIBLE OKI DIGITAL PRINTERS. SEE OKI DIGITAL PRINTER SERVICE MANUAL OR INSTALLATION MANUAL TO DETERMINE SUITABILITY. • Carry out the installation after checking that the DATA indicator on the operation panel is neither lit nor blinking. • For installing B83D - Oki B8300n | Guide: Installation B8300 - Page 9
FOR USE WITH COMPATIBLE OKI DIGITAL PRINTERS. SEE OKI DIGITAL PRINTER SERVICE MANUAL OR INSTALLATION MANUAL TO DETERMINE SUITABILITY. Parts included • Carry out the installation after checking that the DATA indicator on the operation panel is neither lit nor blinking - Oki B8300n | Guide: Installation B8300 - Page 10
Manual FOR USE WITH COMPATIBLE OKI DIGITAL PRINTERS. SEE OKI DIGITAL PRINTER SERVICE MANUAL OR INSTALLATION MANUAL TO DETERMINE SUITABILITY. • Start installation after checking that the DATA or damage the unit.) Relay unit Actuator Tray Steps 5 and after are the procedure to - Oki B8300n | Guide: Installation B8300 - Page 11
B83F Installation Manual FOR USE WITH COMPATIBLE OKI DIGITAL PRINTERS. SEE OKI DIGITAL PRINTER SERVICE MANUAL OR INSTALLATION MANUAL TO DETERMINE SUITABILITY. • Start installation after checking that the DATA and COMMUNICATION indicators on the operation panel are neither lit - Oki B8300n | Guide: Installation B8300 - Page 12
OKI DIGITAL PRINTERS. SEE OKI DIGITAL PRINTER SERVICE MANUAL OR INSTALLATION MANUAL the front cover of the finisher and insert the staple unit. Packing tape Packing tape 6. Attach the cover to adjust the height. Connecting hole Guide pin 1. If the guide pin of the lock securing plate is - Oki B8300n | Guide: Installation B8300 - Page 13
/ FBP Installation Manual FOR USE WITH COMPATIBLE OKI DIGITAL PRINTERS. SEE OKI DIGITAL PRINTER SERVICE MANUAL OR INSTALLATION MANUAL TO DETERMINE SUITABILITY dial Remove the four front cabinet securing screws, pull out the staple unit until it stops, then remove the pawl of the front cabinet - Oki B8300n | Guide: Installation B8300 - Page 14
Manual FOR USE WITH COMPATIBLE OKI DIGITAL PRINTERS. SEE OKI DIGITAL PRINTER SERVICE MANUAL OR INSTALLATION MANUAL TO DETERMINE SUITABILITY. • Start installation after checking that the DATA change of the printer drivers on the computer, see the supplied operation manual. Then, - Oki B8300n | Guide: Installation B8300 - Page 15
adjustment of the toner density sensor is being done, do not turn the power to the machine off. This will cause improper adjustment. Check the printer operation For installation of printer drivers on the computer refer to the Operation manual (for printer operation and general information - Oki B8300n | Guide: Installation B8300 - Page 16
simultaneously. When carrying out the off center adjustment after paper guide position adjustment, this operation is not needed. (For B83D, unit of the printer and then turn on the switch again after several seconds. The setting is now complete. (ADU) BPT (MFT) Main unit TRAY 1 (T1) TRAY 2 (T2)
-
 1
1 -
 2
2 -
 3
3 -
 4
4 -
 5
5 -
 6
6 -
 7
7 -
8
-
9
-
10
-
11
-
12
-
13
-
14
-
15
-
16
 |
 |
