Oki B8300n Guide: Installation B8300 - Page 7
Load paper., Connecting the machine to a computer., Check the printer operation
 |
View all Oki B8300n manuals
Add to My Manuals
Save this manual to your list of manuals |
Page 7 highlights
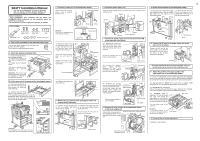
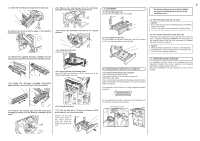
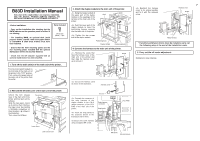
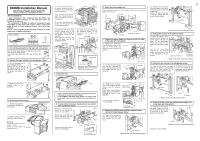
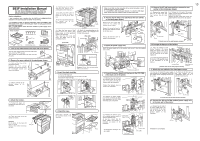
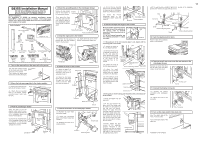
Insert the toner/drum cartridge into the main unit. Remove the sealing tape from the developer cartridge in the direction indicated by the arrow. 5. Load paper. Pull out the paper tray. Gently pull out the paper tray until it stops. 6 * If another peripheral device must be installed, carry out the following step at the end of the installation work. Remove the drum protective paper in the direction indicated by the arrow. Remove the supplied developer cartridge from the packing case and remove the protective materials A and B. A B Shake the developer cartridge horizontally approximately 5 times and insert it into the machine. Return the developer unit lock to its original position. Close the front cover. Gently close the cover. Apply pressure to the fusing roller. Raise the right and left levers of the fusing unit in the direction indicated by the arrow. Load paper into the tray. Do not exceed the maximum height line. (up to 500 sheets of OKI recommended paper can be loaded) 6. Connecting the machine to a computer. Connect the machine to the computer • When connecting to a parallel port: The parallel interface of this machine conforms to IEEE-STD-1284-1983. Use a commercially available shielded type parallel interface cable conforming to the specifications of both the machine and the computer. The connector on this machine is a 36-pin Amphenol female connector. 18 1 Insert the power plug into an outlet. Caution If the outlet is also used for lighting fixtures, the lighting fixtures may flicker. Use an outlet which is not connected to lighting fixtures. Turn on the main switch of the main unit. Automatic level adjustment of toner density sensor will start and a message indicating [WARMING UP] will appear on the operation panel. After the level adjustment is complete, the ready indicator will light up. Caution While automatic adjustment of the toner density sensor is being done, do not turn the power to the machine off. This will cause improper adjustment. 7. Check the printer operation For installation of printer drivers on the computer refer to the Operation manual (for printer operation and general information) supplied with the machine. After driver installation, execute a test print to ensure normal printing. Remove the sealing tape from the toner/drum cartridge by pulling it in the direction indicated by the arrow. Close the left door. Turn the lock pin a 1/4 turn and remove it while pressing down on the pressure plate. Remove the lock pin while holding down on the paper pressure plate and insert the paper tray into the main unit. 36 19 For the specifications of the connector on the computer, see the operation manual of the computer. Parallel interface connector TEL LINE
-
 1
1 -
 2
2 -
 3
3 -
 4
4 -
 5
5 -
 6
6 -
 7
7 -
 8
8 -
 9
9 -
 10
10 -
 11
11 -
 12
12 -
13
-
14
-
15
-
16
 |
 |
